Definition
A drawer in the wardrobe used for storing small items.
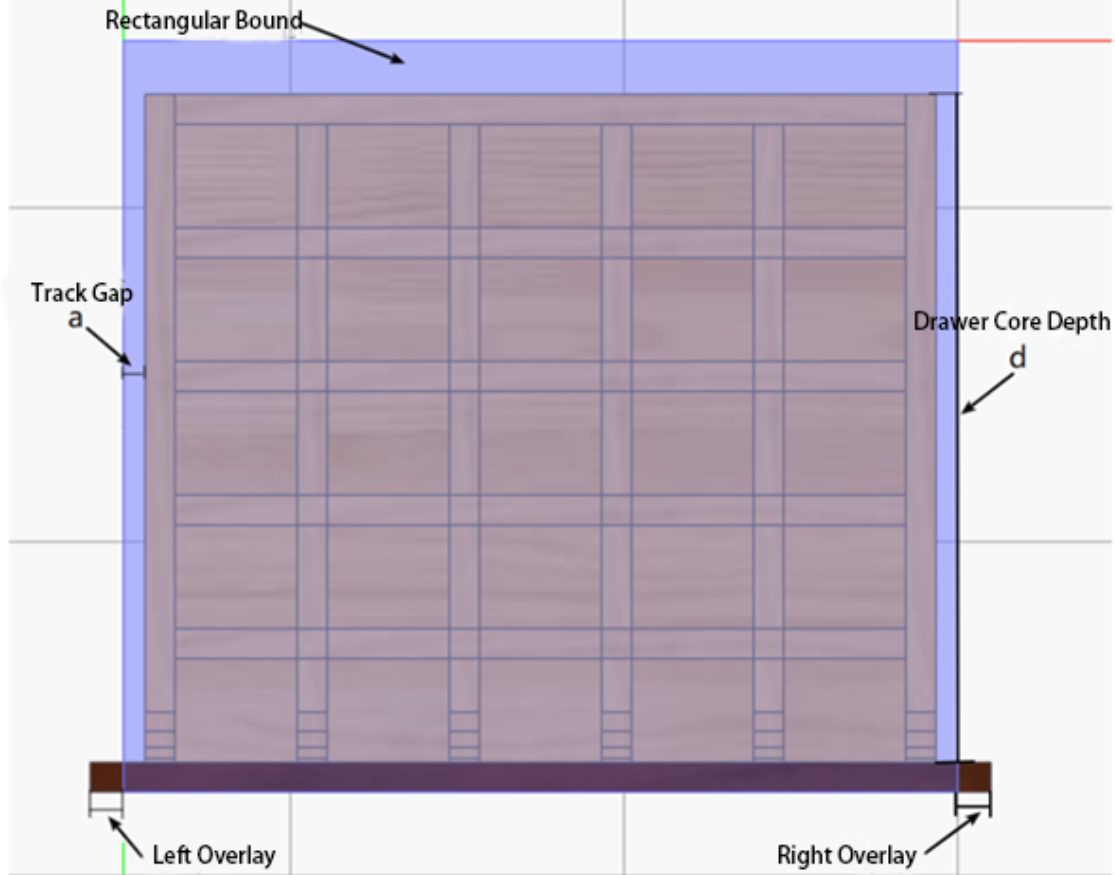
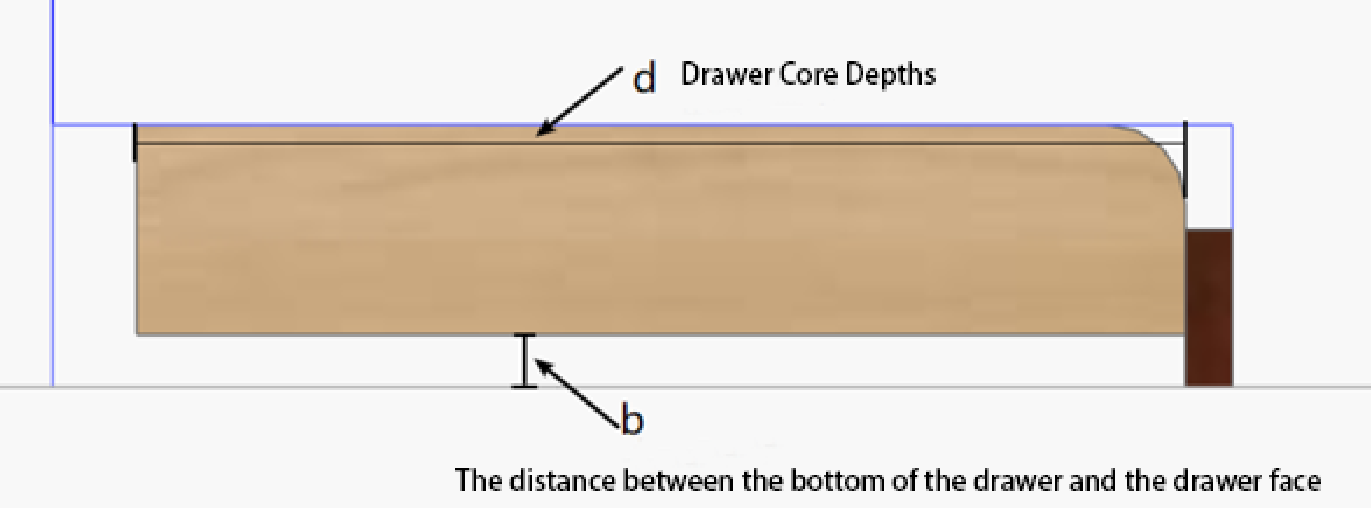
In the following example, we will create a grid drawer. The drawer box and bottom panel are both 18mm thick. There is a 13mm gap on one side for the track, and the distance between the bottom of the drawer and the drawer face is 20mm. The relationship between the cabinet's internal depth and the drawer core depth is as follows:
300≤D<360 —— Drawer Core Depth: 300
360≤D<410 —— Drawer Core Depth: 350
410≤D<460 —— Drawer Core Depth: 400
460≤D<510 —— Drawer Core Depth: 450
510≤D<600 —— Drawer Core Depth: 500
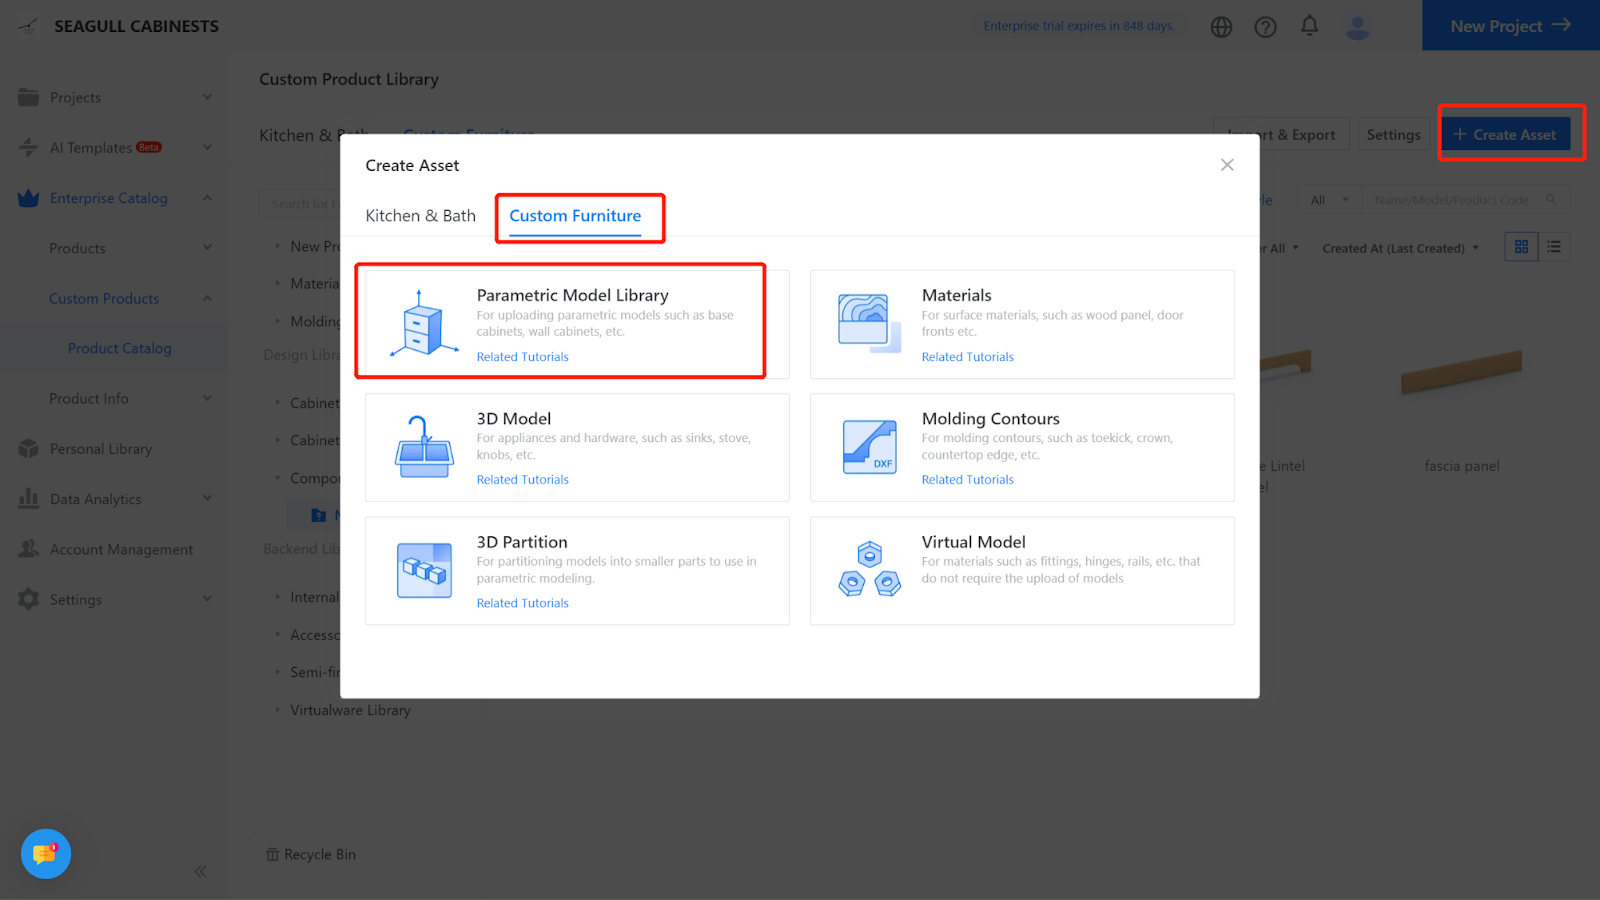
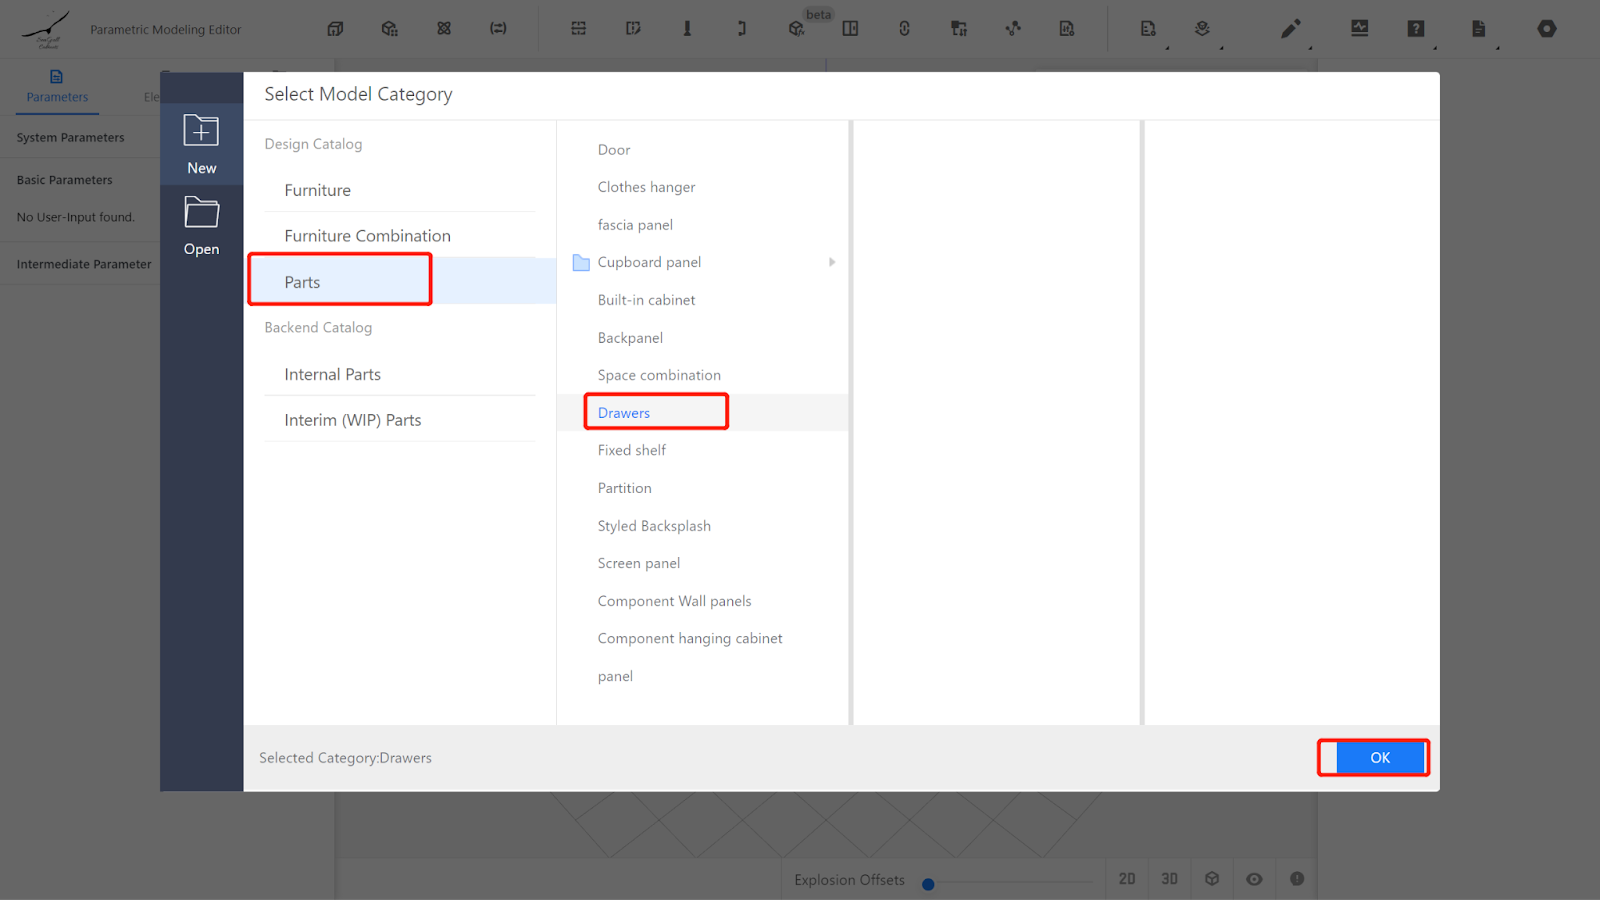
I.Creation Position
Custom Furniture —Create Asset—Parametric Model Library— New—
II.Parameter Configuration
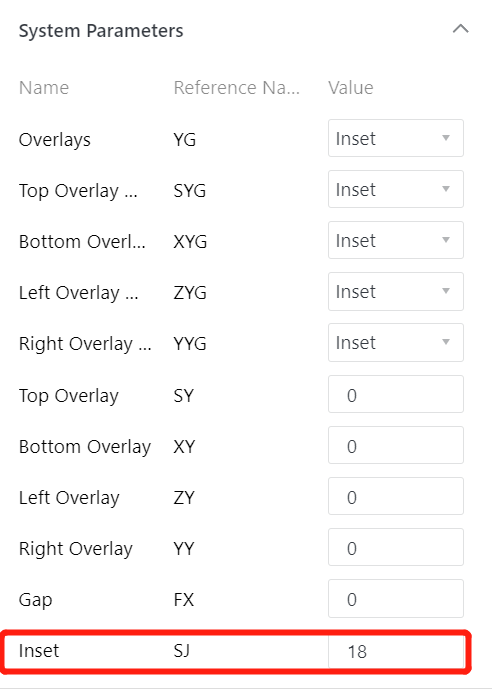
2.1 System Parameters
Change the indentation in the system Parameters to 18mm, leave the rest as default.
2.2 Custom Parameters
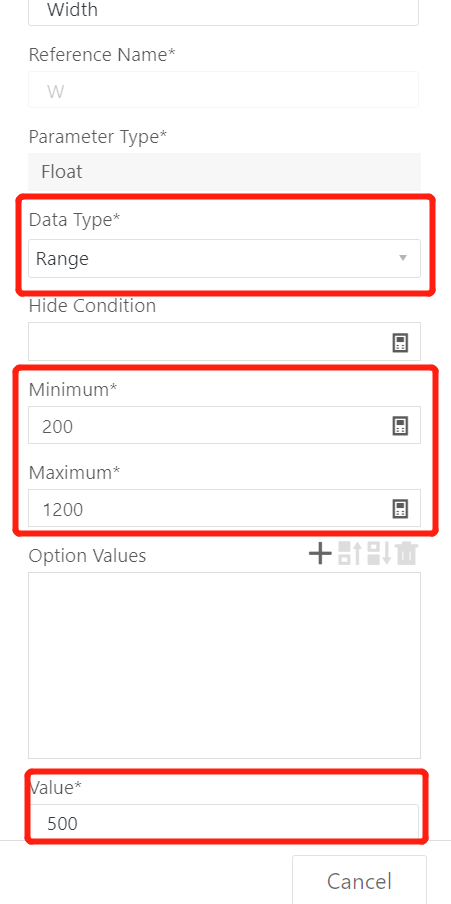
Width (W) — represents the X-dimension of the drawer model. Set the value type as a range (e.g., range: 200 - 1200, current value: 500).
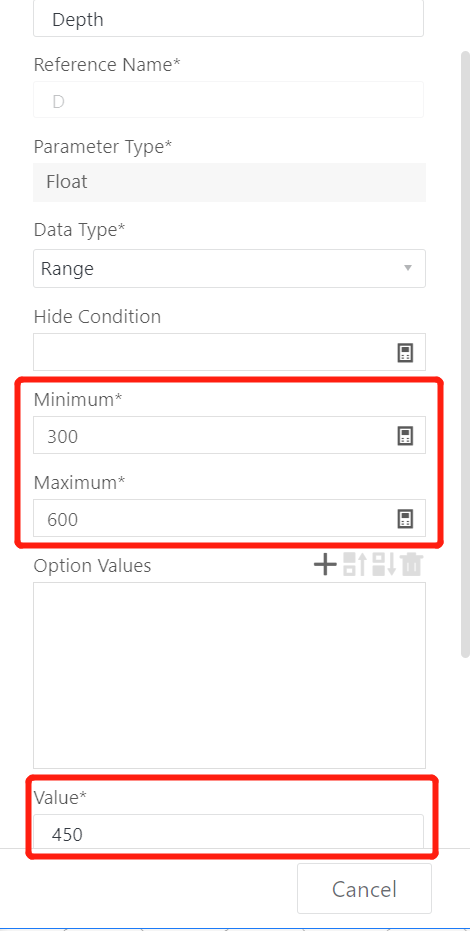
Depth (D) — represents the Y-dimension of the drawer model, including the additional space at the back. Set the value type as a range (e.g., range: 360 - 600, current value: 450).
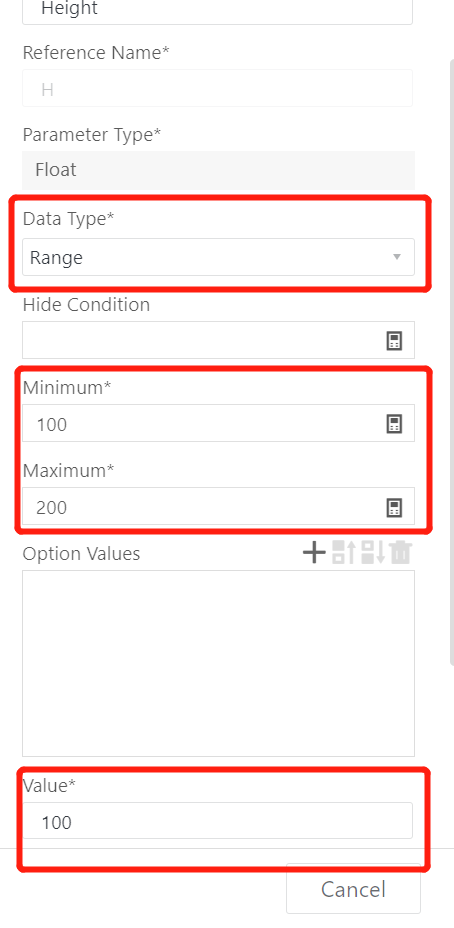
Height (H) — represents the Z-dimension of the drawer model. Set the value type as a range (e.g., range: 100 - 200, current value: 100).
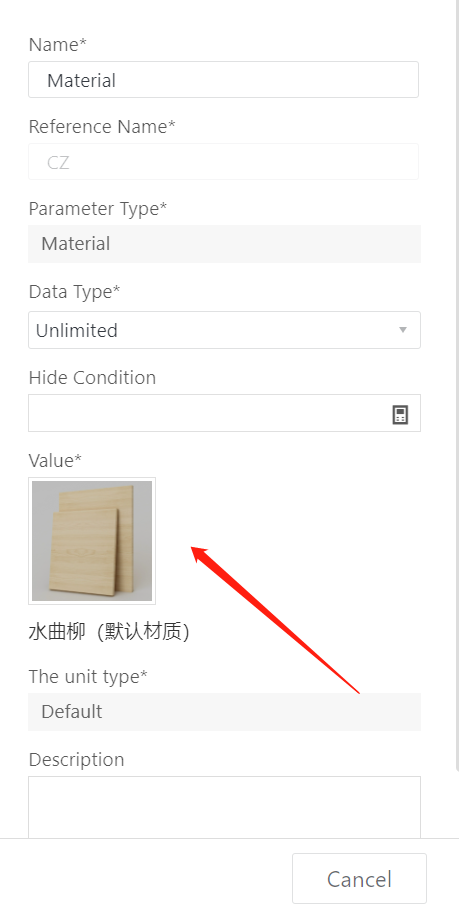
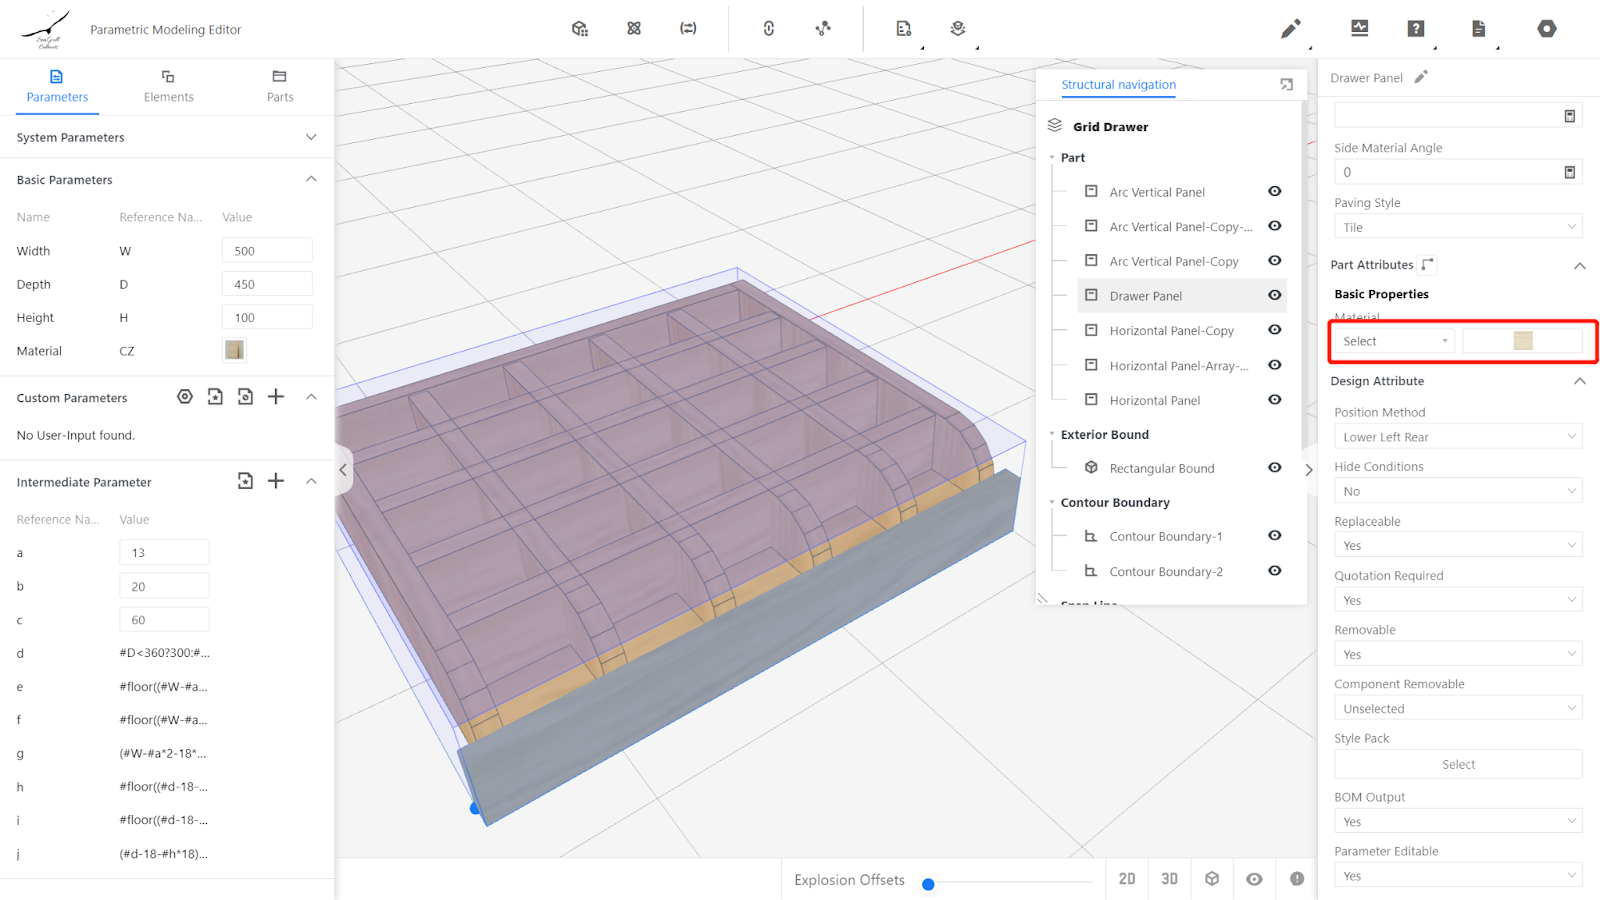
Material Selection — choose the default material, which represents the color of the drawer box.
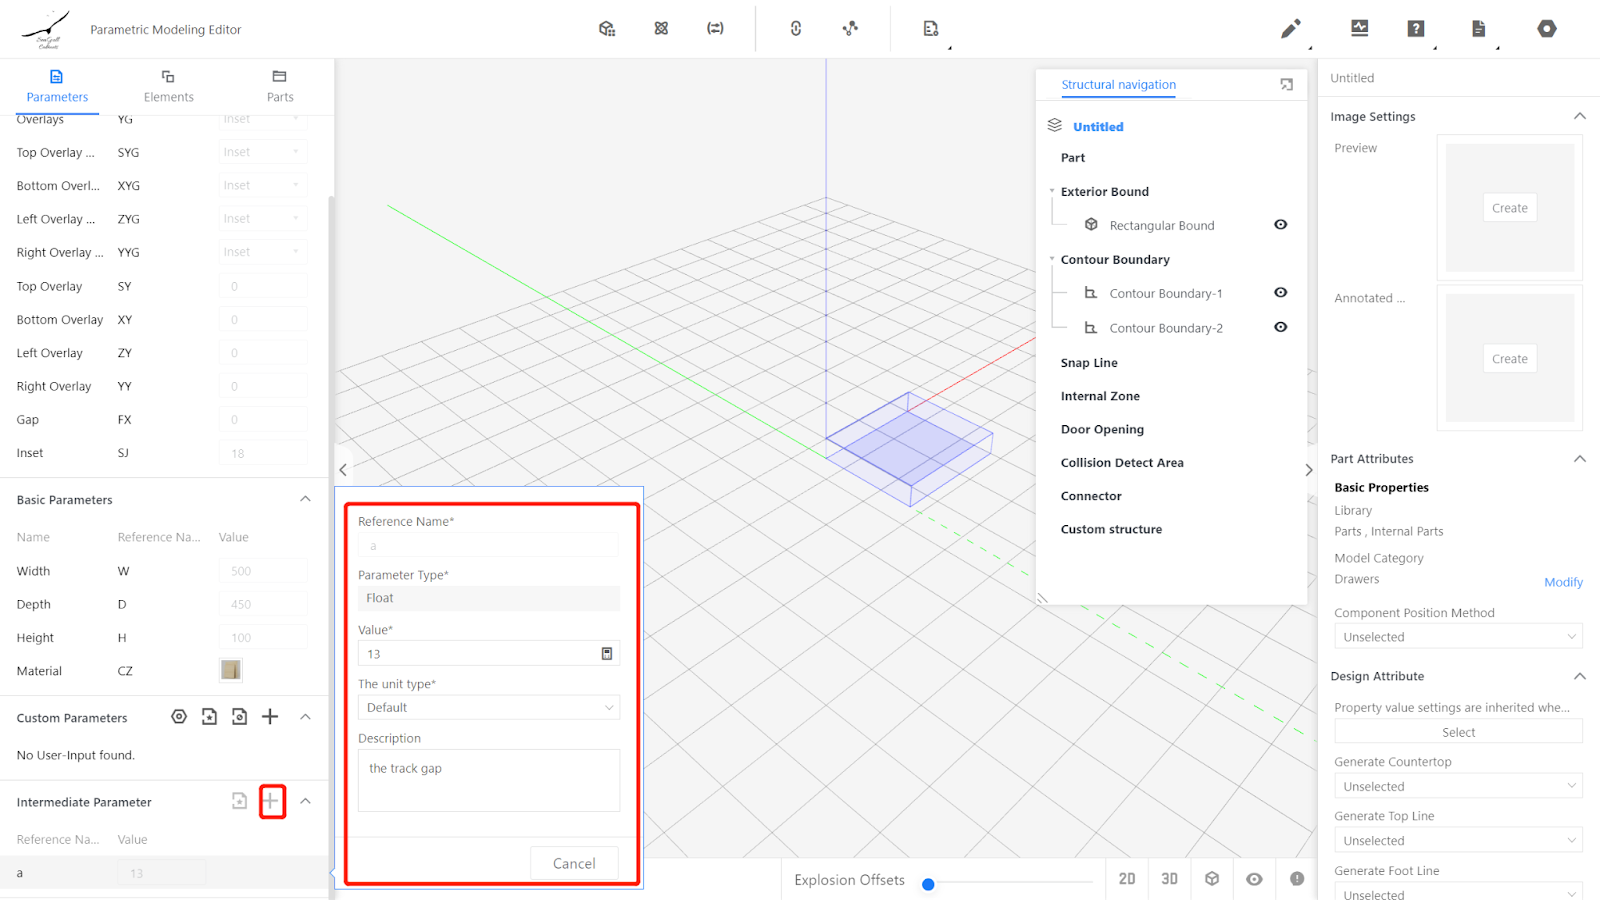
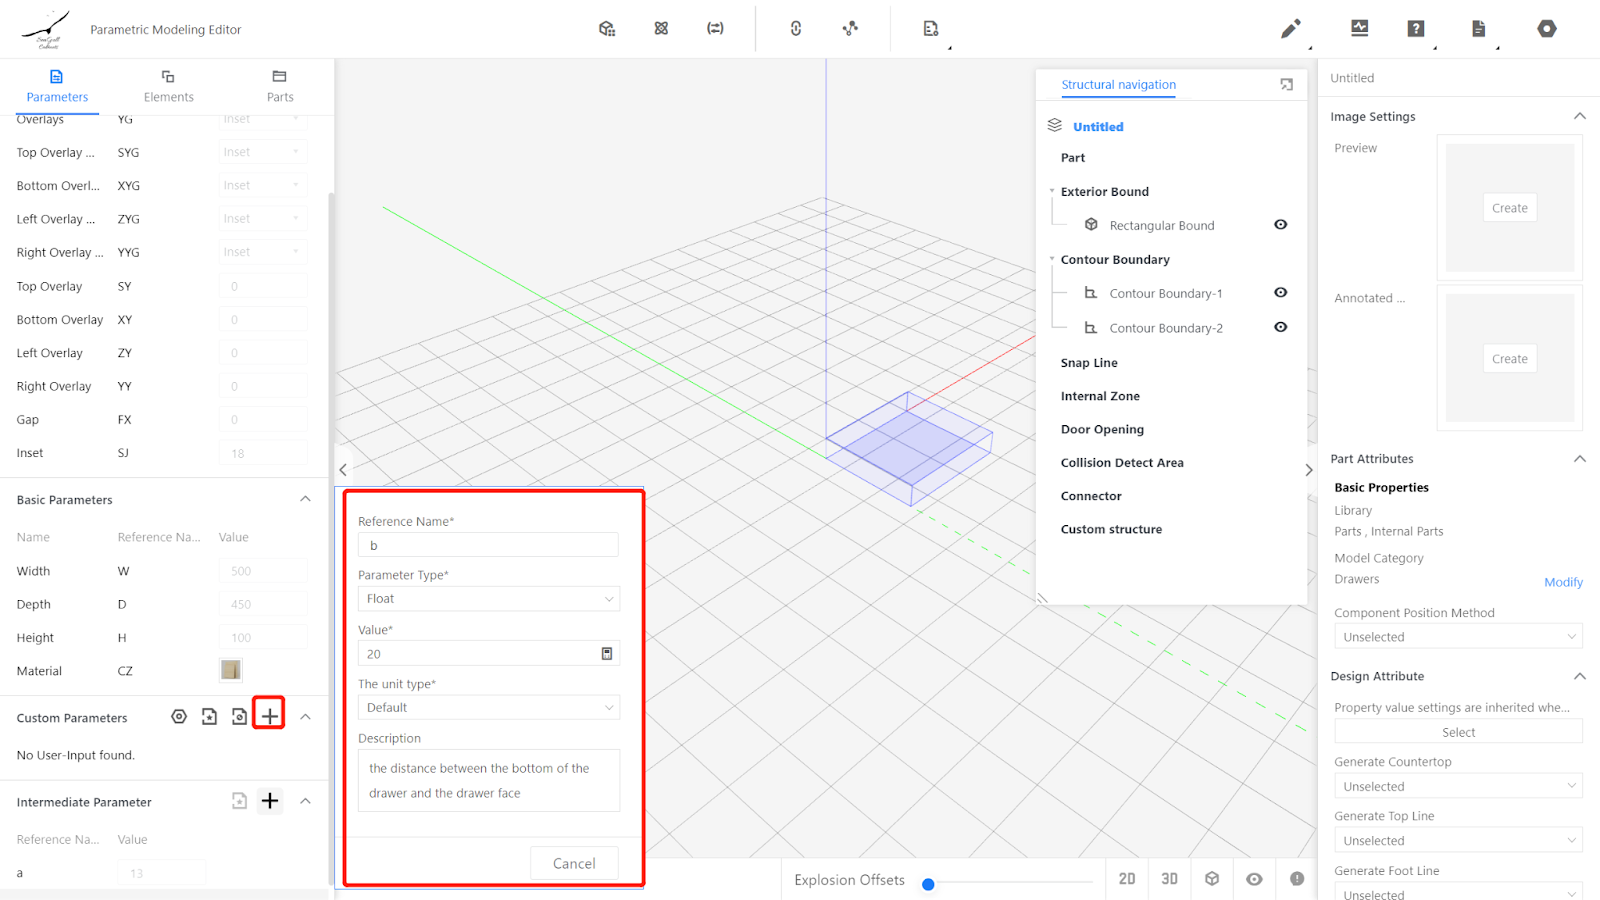
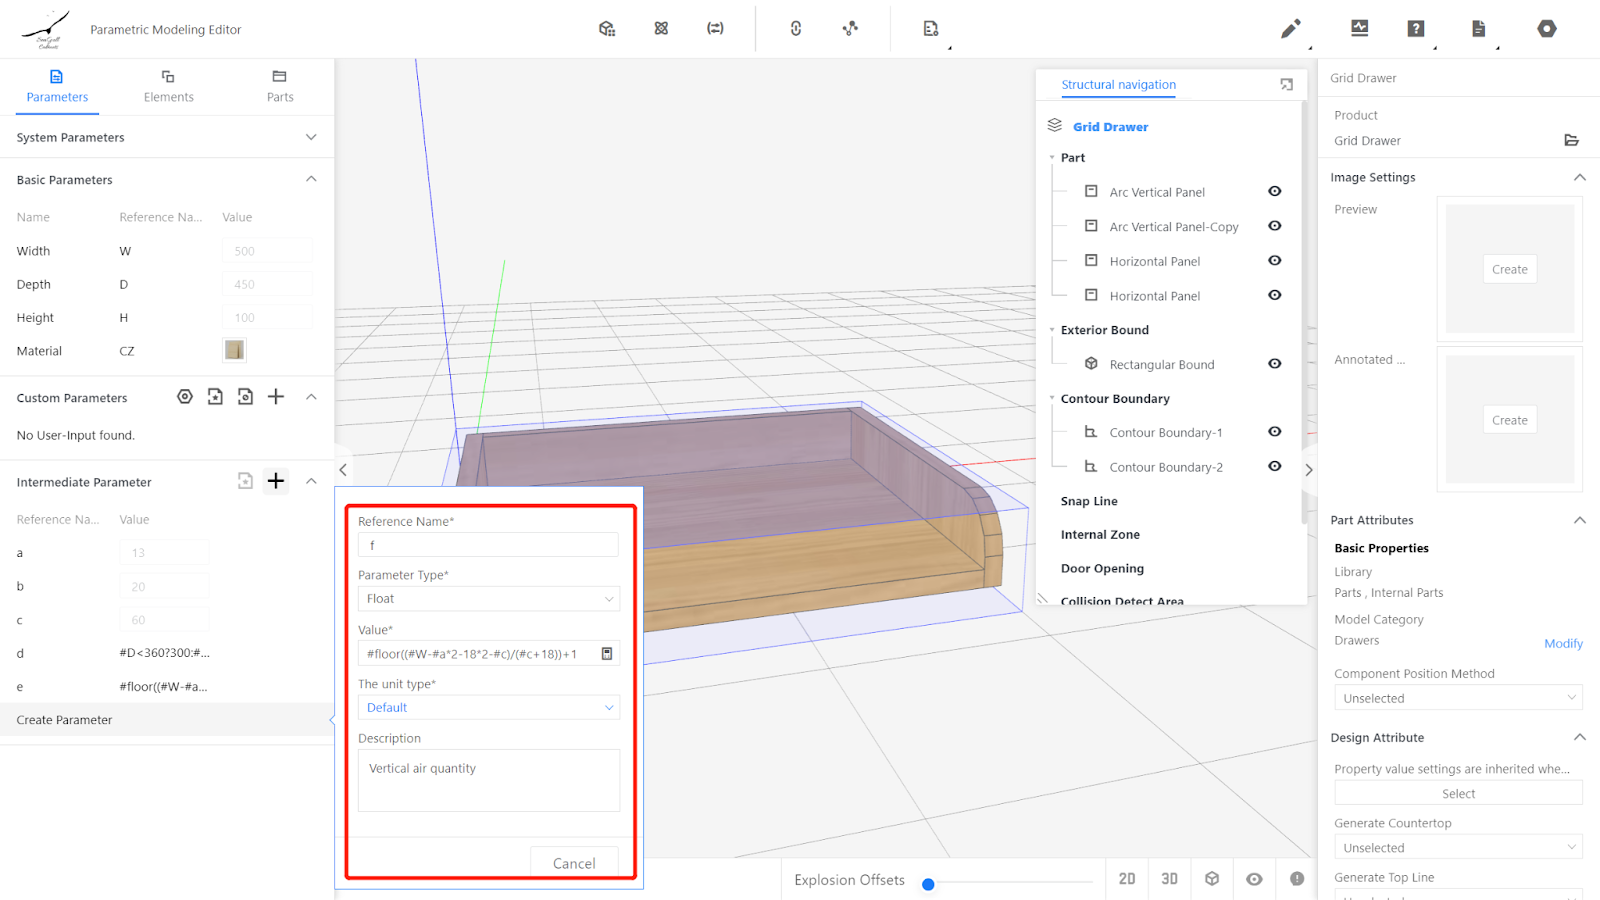
2.3 Intermediate Parameters
Intermediate Parameters are used to replace commonly used numbers or formulas in the editor. They are only displayed in the editor and not in the frontend tools.
Set a as 13mm for the track gap,
b as 20mm for the distance between the bottom of the drawer and the drawer face,
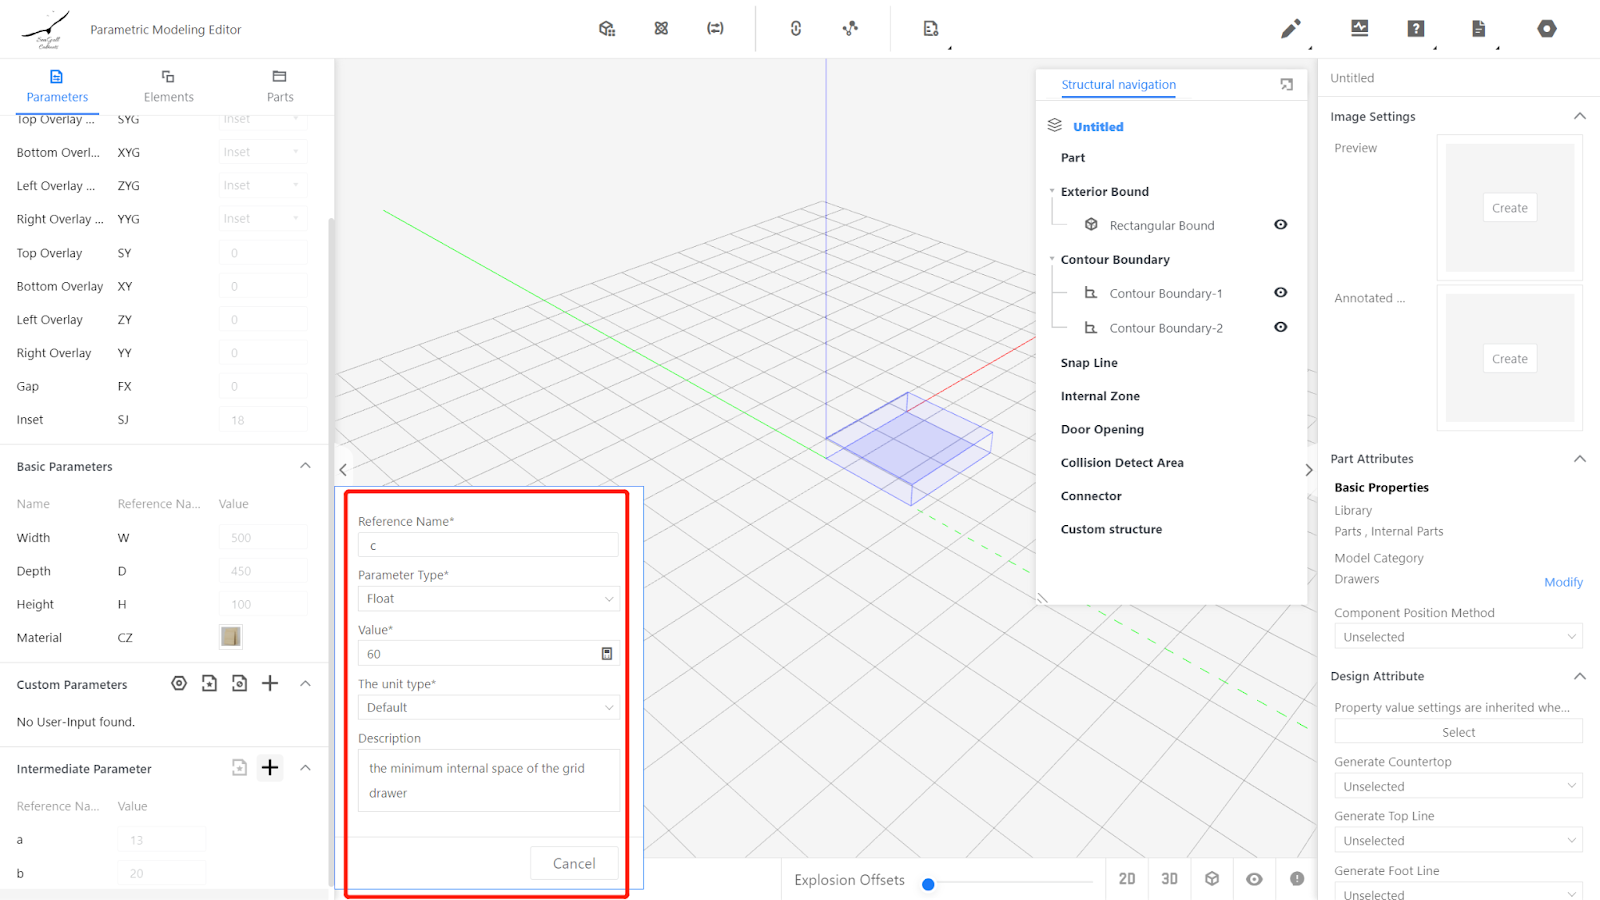
c as 60mm for the minimum internal space of the grid drawer,
d as Drawer Core Depth based on the conditions below:
If 300 ≤ D < 360, d = 300
If 360 ≤ D < 410, d = 350
If 410 ≤ D < 460, d = 400
If 460 ≤ D < 510, d = 450
If 510 ≤ D < 600, d = 500
Note that the above data is specific to the manufacturing process.

III.Inserting Submodel for Modeling
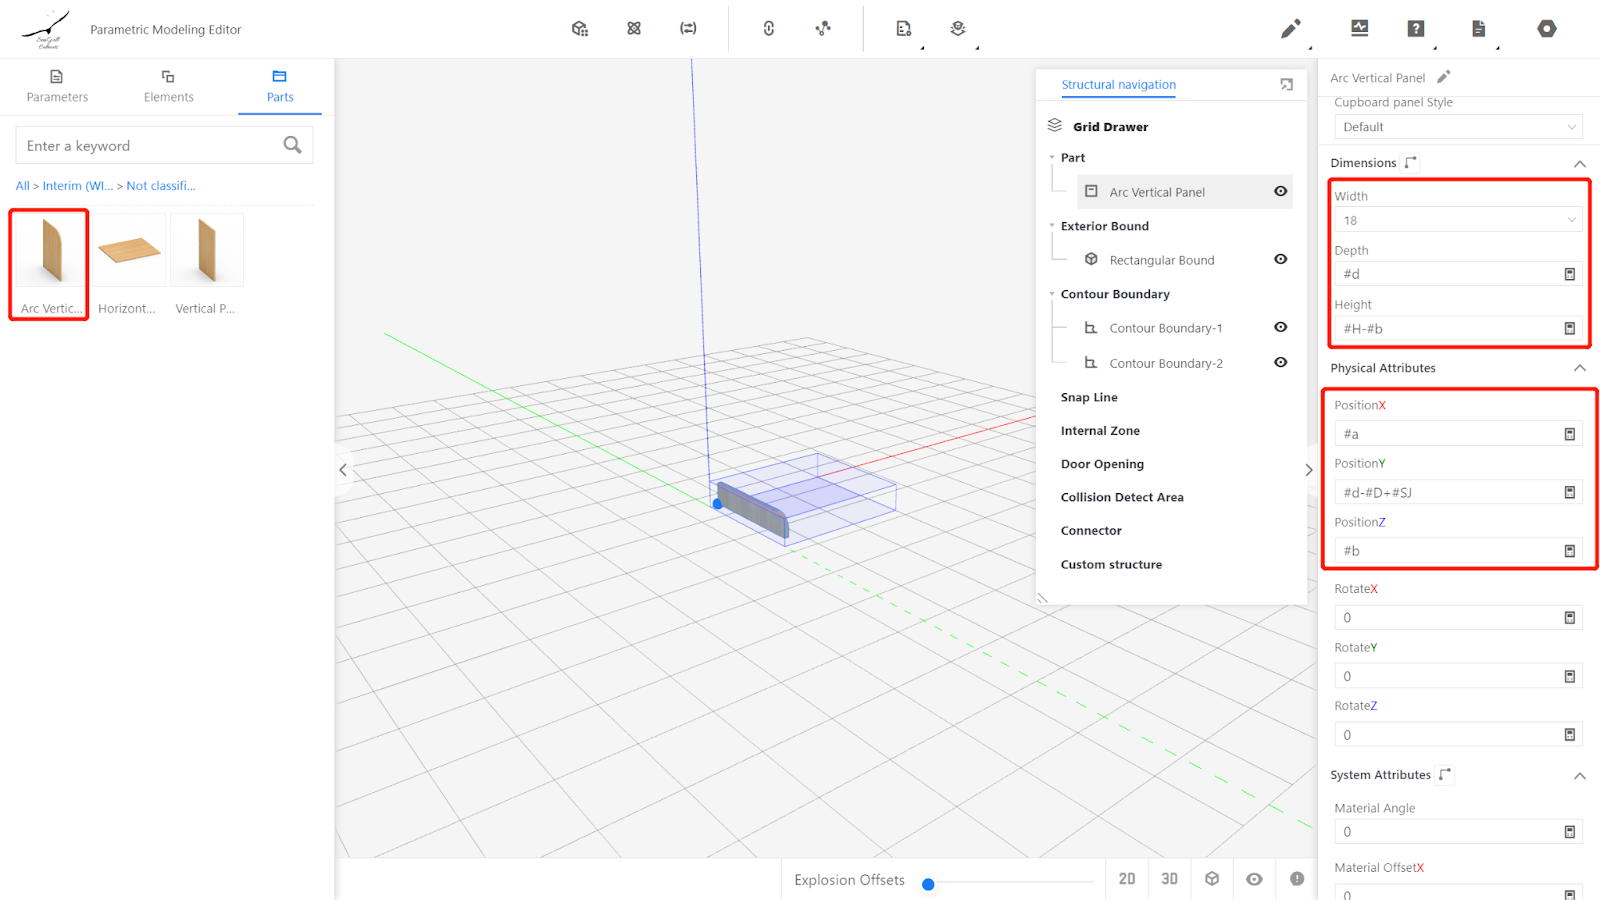
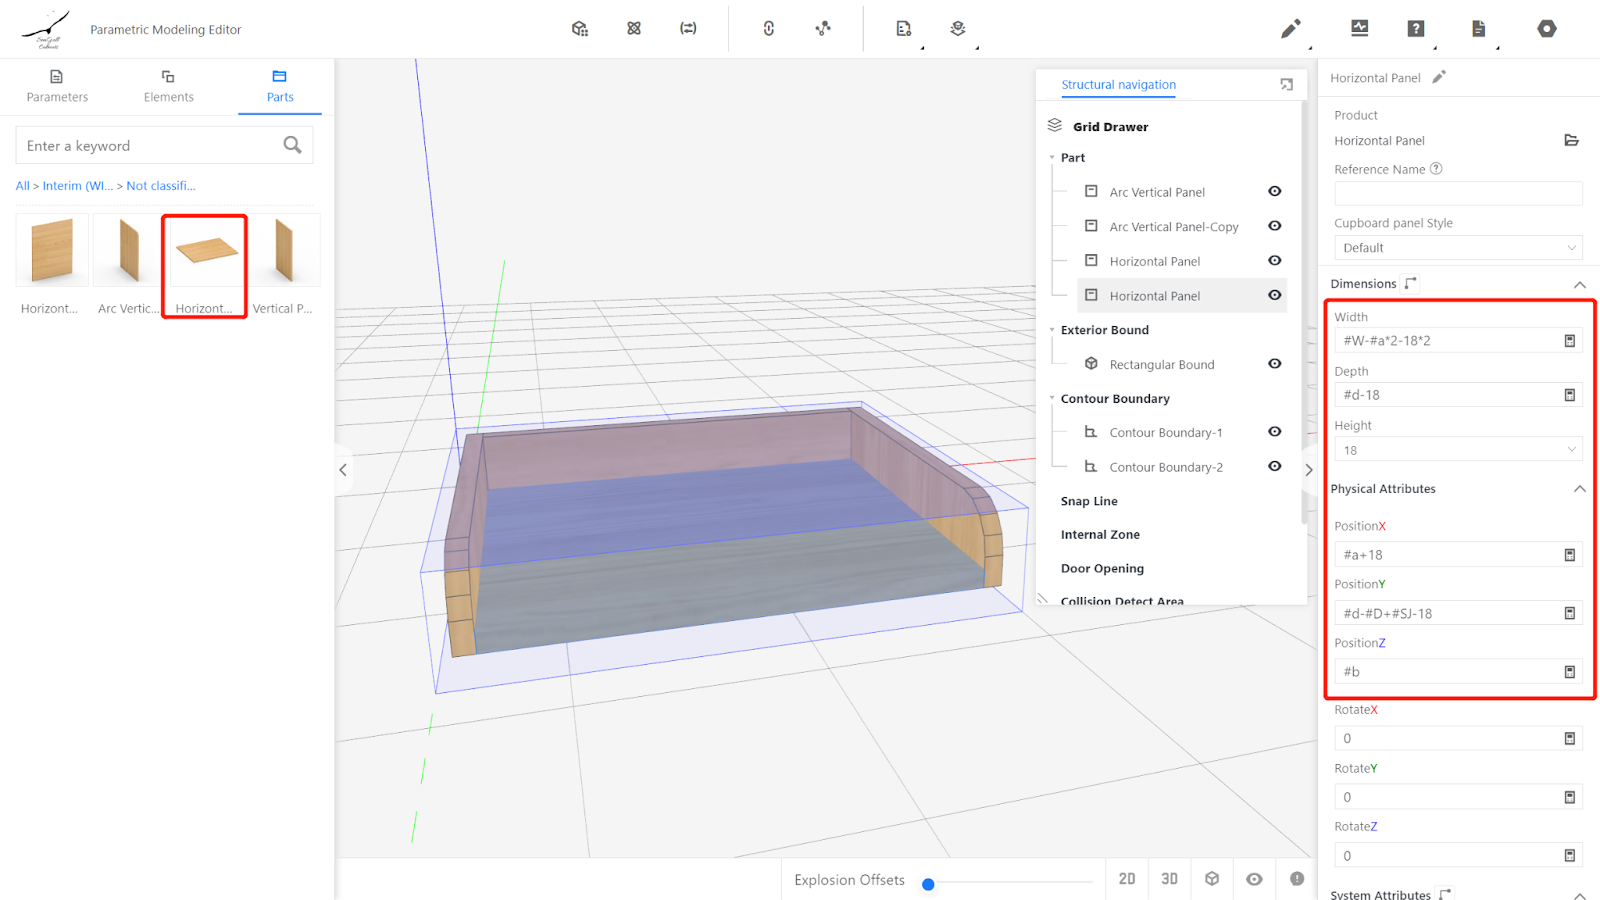
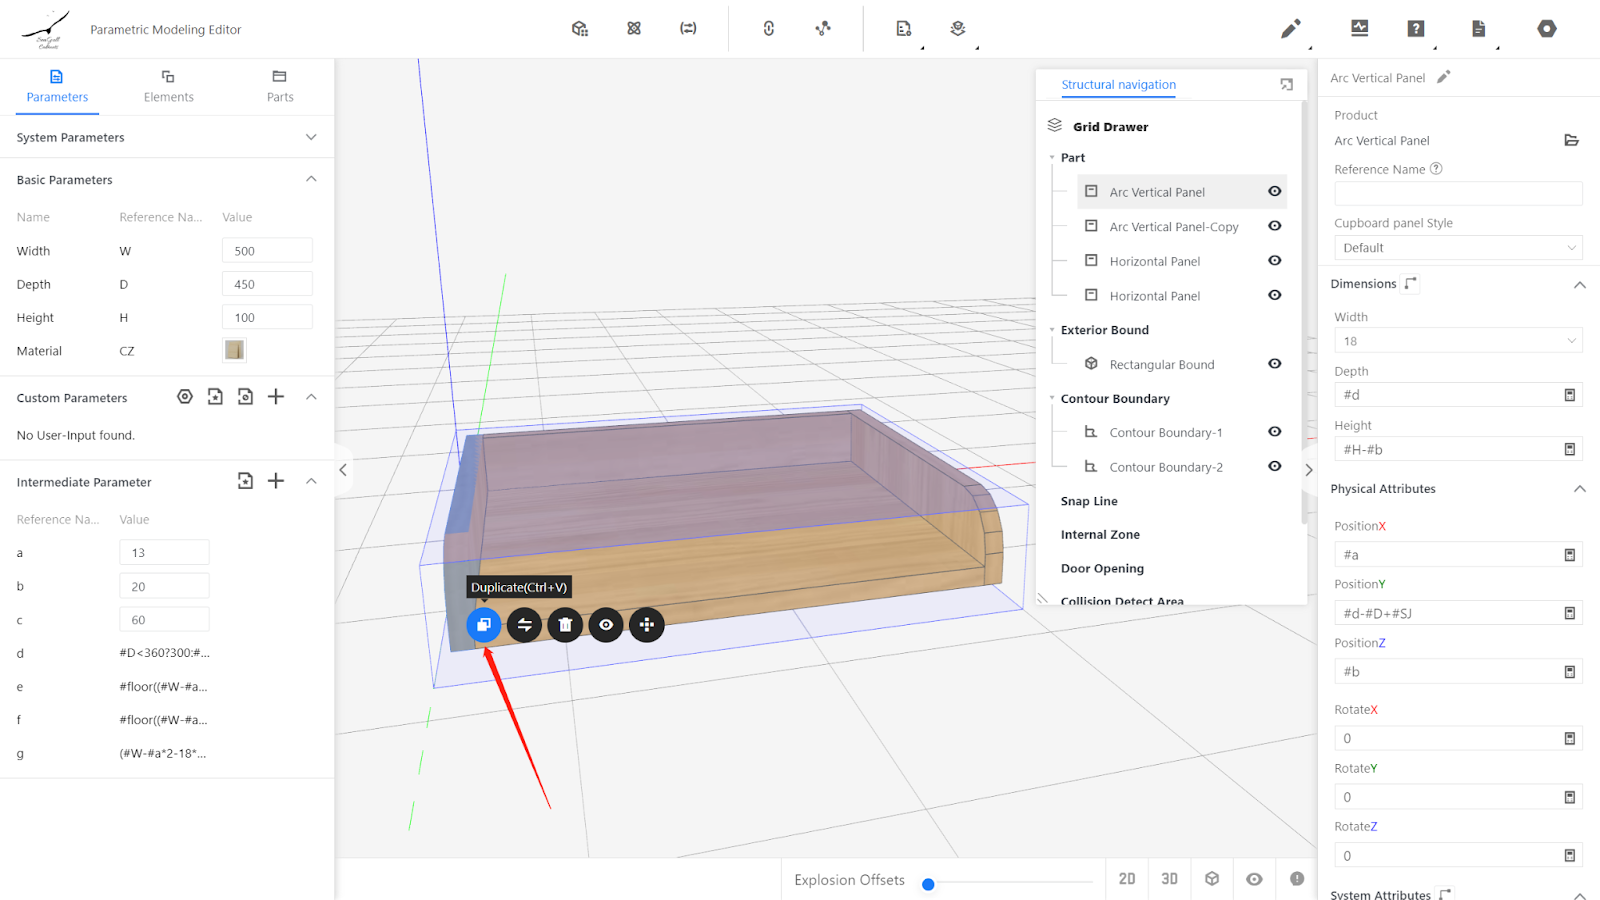
3.1. Insert the pre-made vertical circular arc panel from the semi-finished product library as the left panel and set its physical attributes. Width: 18mm, Depth: #d, Height: #H - #b Position X: #a, Position Y: #d -#D + #SJ, Position Z: #b
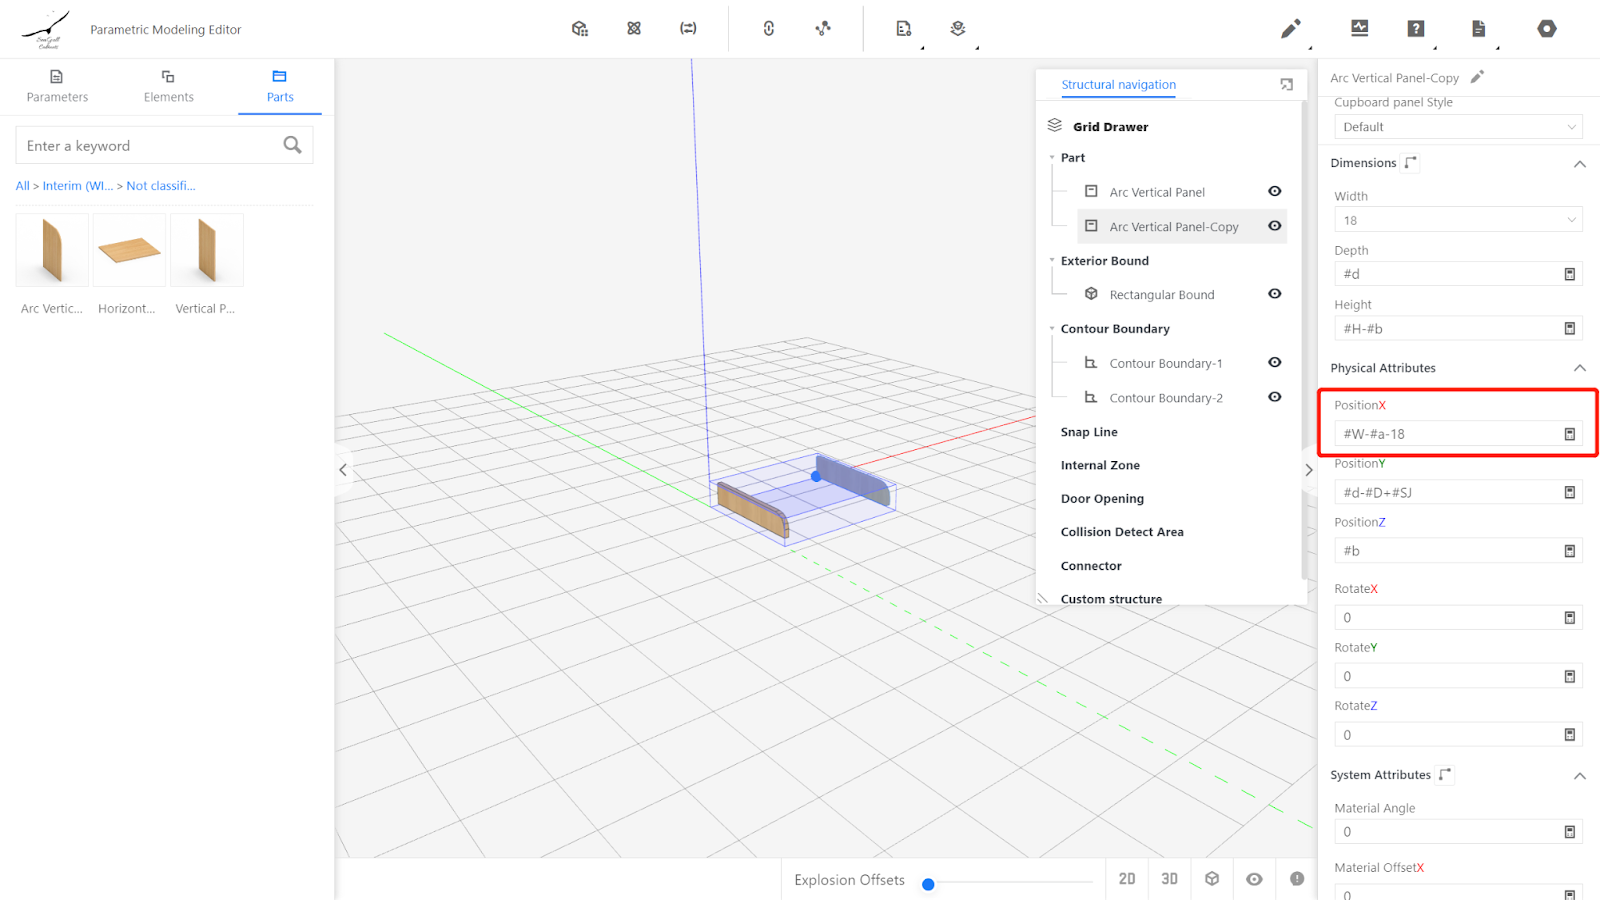
3.2. Right-click on the left panel and select "Copy". Change the Position X to #W-#a-18
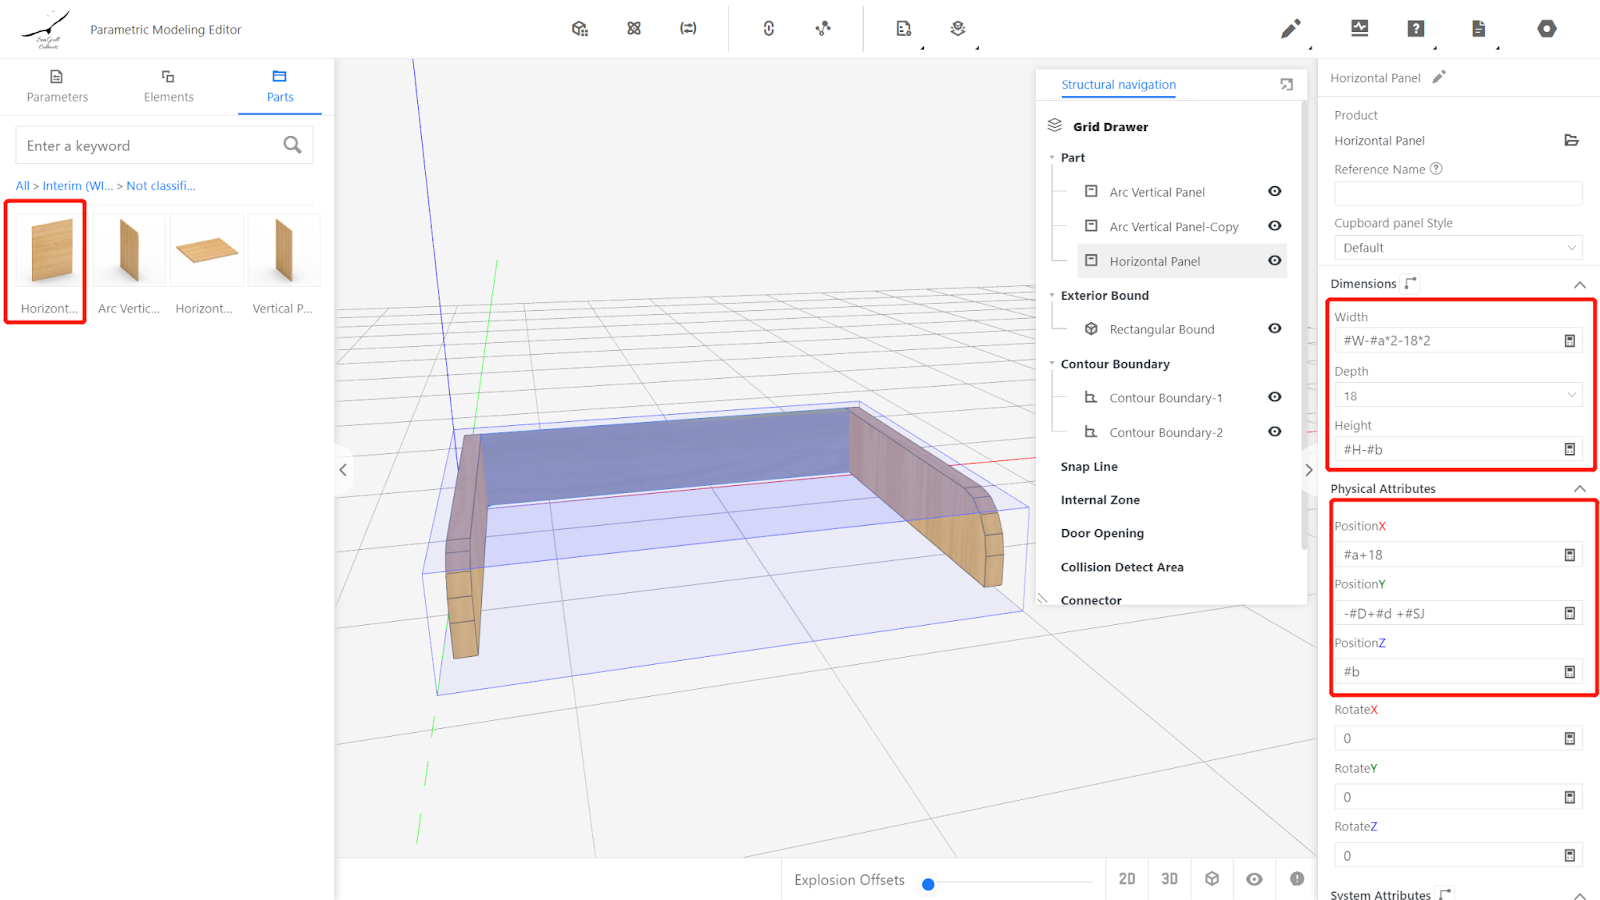
3.3. Insert an 18mm horizontal striped back panel and set its physical attributes.
#W-#a*2-18*2, depth: 18, height: #H-#b,
Position X: #a+18, position Y: -#D+#d +#SJ, position Z: #b.
3.4. Insert an 18mm flat panel and set its physical attributes.
Width: #W-#a*2-18*2, Depth: #d-18, Height: 18,
Position X: #a+18, position Y: #d-#D+#SJ-18, position Z: #b.
loor ((# W - # #
Set intermediate parameters:
Vertical grid number reference name e current value
#floor((#W-#a*2-18*2-#c)/(#c+18))
Vertical air quantity reference name within current value f
#floor((#W-#a*2-18*2-#c)/(#c+18))+1
True empty reference name g Current value (#W-#a*2-18*2 -#e*18)/#f


Parameter Explanation:
Because we need to calculate the actual gap to determine the array's step size and vertical grid position X, we use the minimum gap c and substitute it into the calculation to obtain the actual gap. The following is the calculation method:
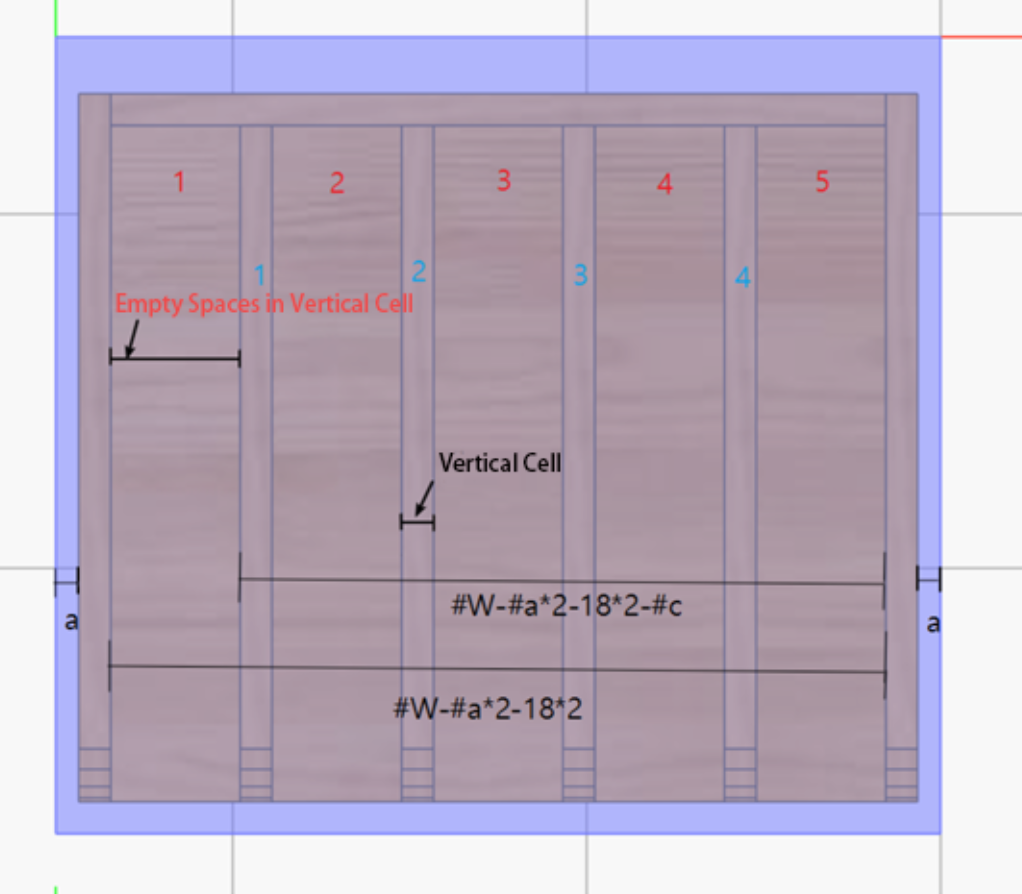
Number of vertical cells e #floor((#W-#a*2-18*2-#c)/(#c+18))
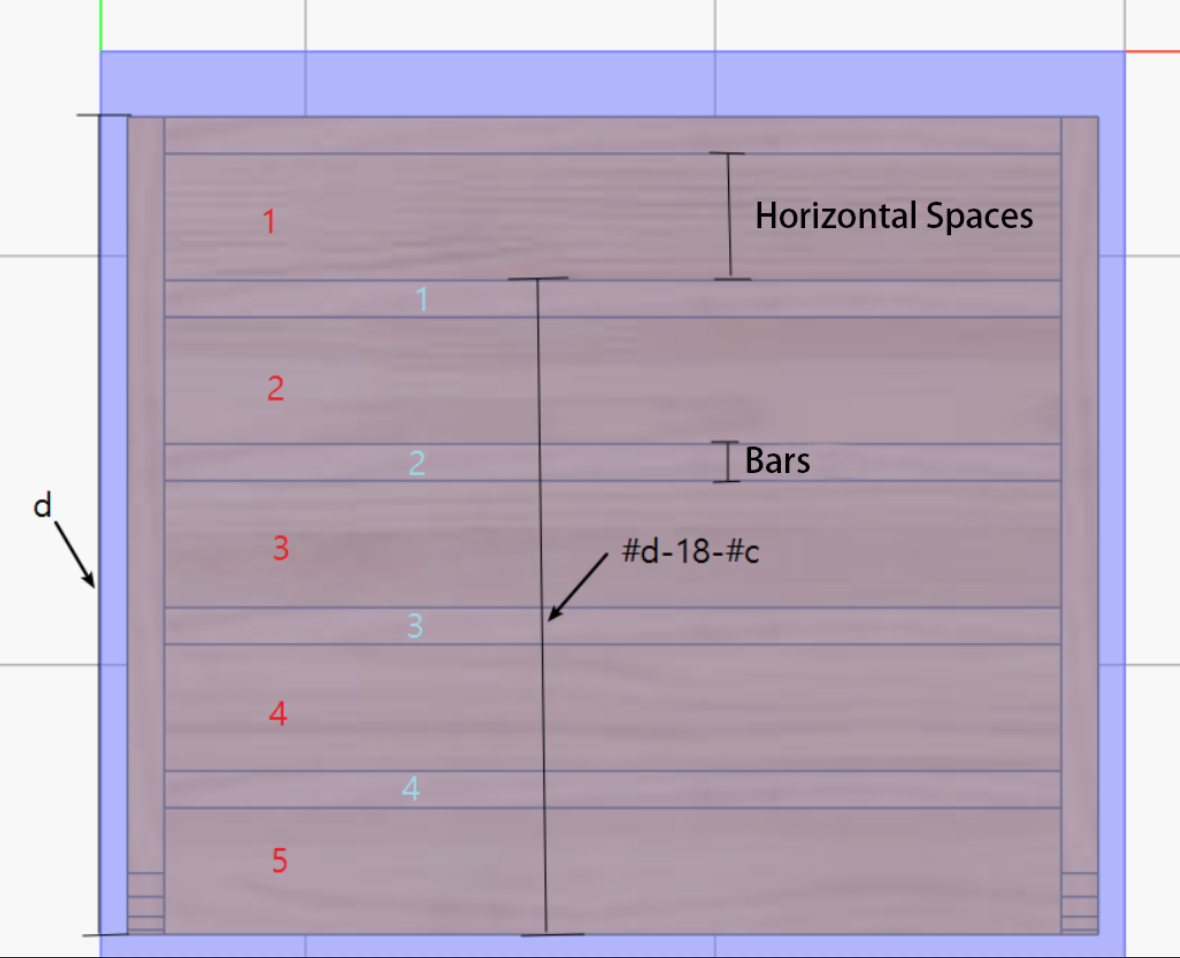
The vertical grid here refers to the vertical grid after the left and right sides are pulled, as shown in the figure 1,2,3,4, and the empty space in the vertical grid is 1,2,3,4,5
The number of empty Spaces in vertical cells is one more than the number of vertical cells. As can be seen from the figure, in width, 1+2=2+3=3+4=4+5
The minimum inner space is #c, the vertical width is 18,
So the number of vertical cells is #floor((#W-#a*2-18*2-#c)/(#c+18))
(#W-#a*2-18*2-#c) indicates the width after both sides of the track, the pumping side and the left inner space,
(#c+18) indicates the width of (empty + vertical)
The formula #floor((#W-#a*2-18*2-#c)/(#c+18)) expresses how many vertical cells there are
Vertical empty number more than vertical lattice in a to f # floor ((# W - # # 18 * a * 2-2 - c)/(# c + 18)) + 1
True empty space g (#W-#a*2-18*2 -#e*18)/#f
The value of #e*18 is the width of the vertical grid,
(#W-#a*2-18*2-#e*18) indicates the width of the inner space in addition to the gaps on both sides of the track, the left and right sides of the pull side and the width of all vertical grids
(#W-#a*2-18*2-#e*18)/#f indicates the width of the blank/the number of blank = the actual width of the blank.
Configuration:
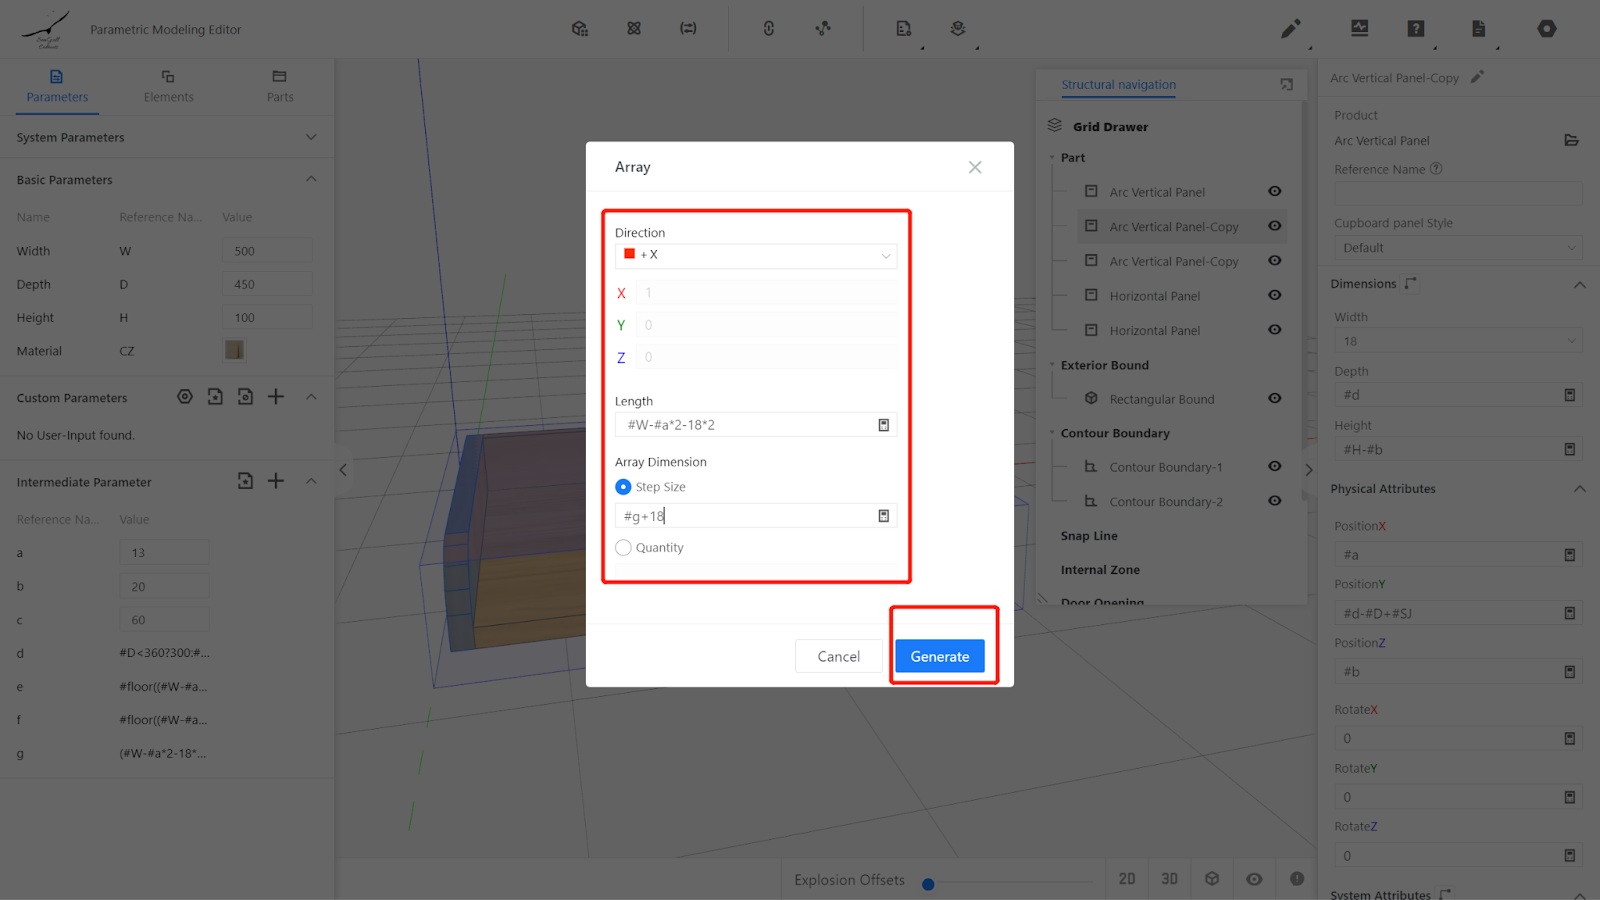
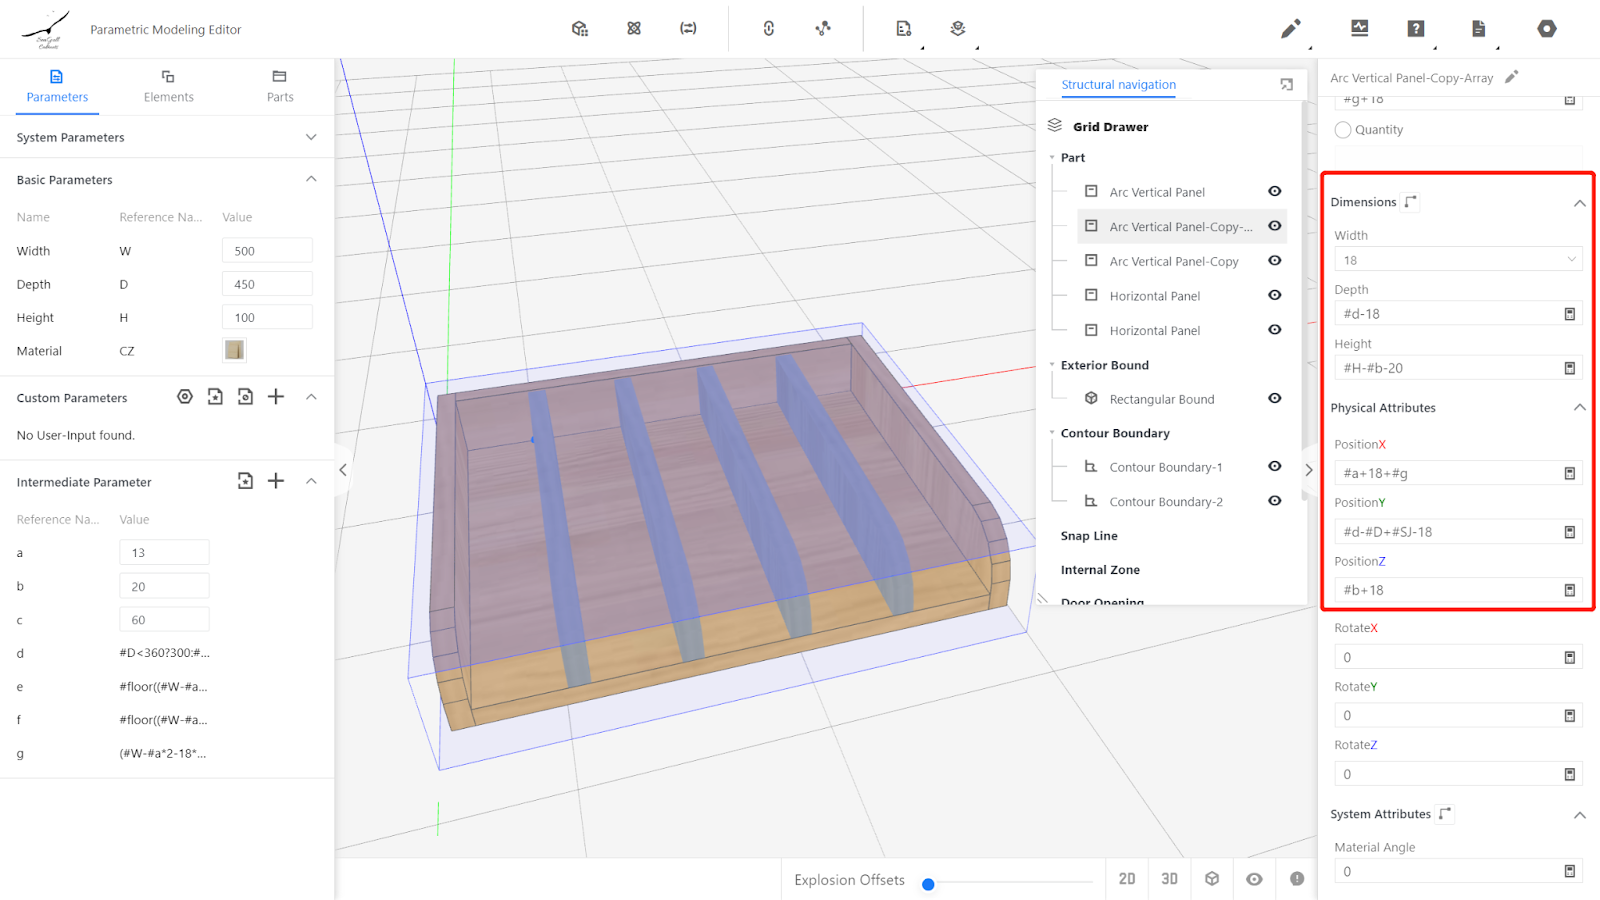
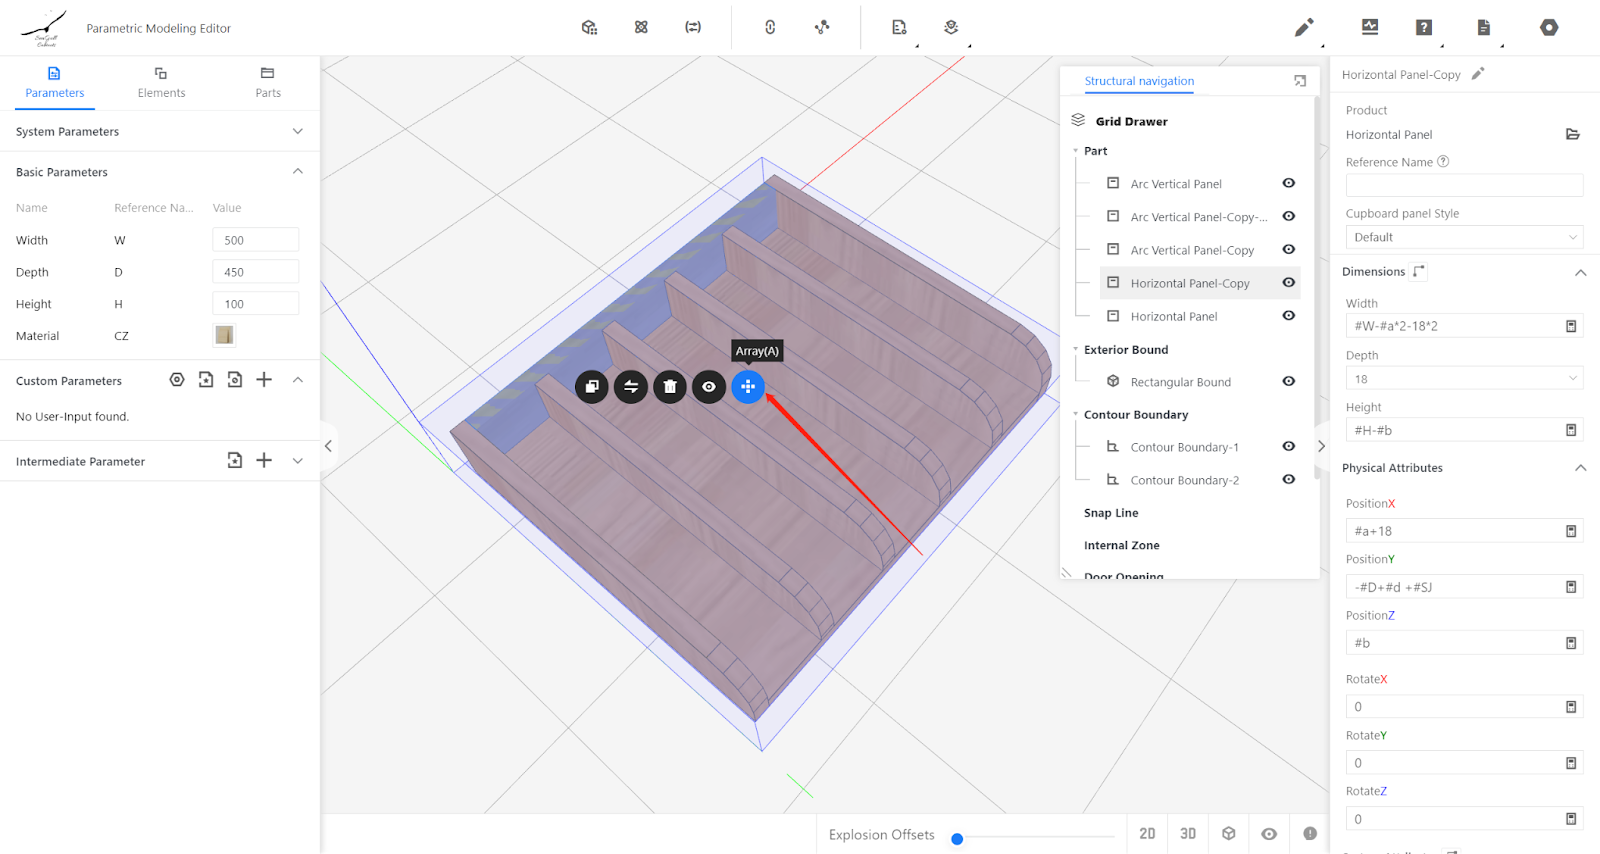
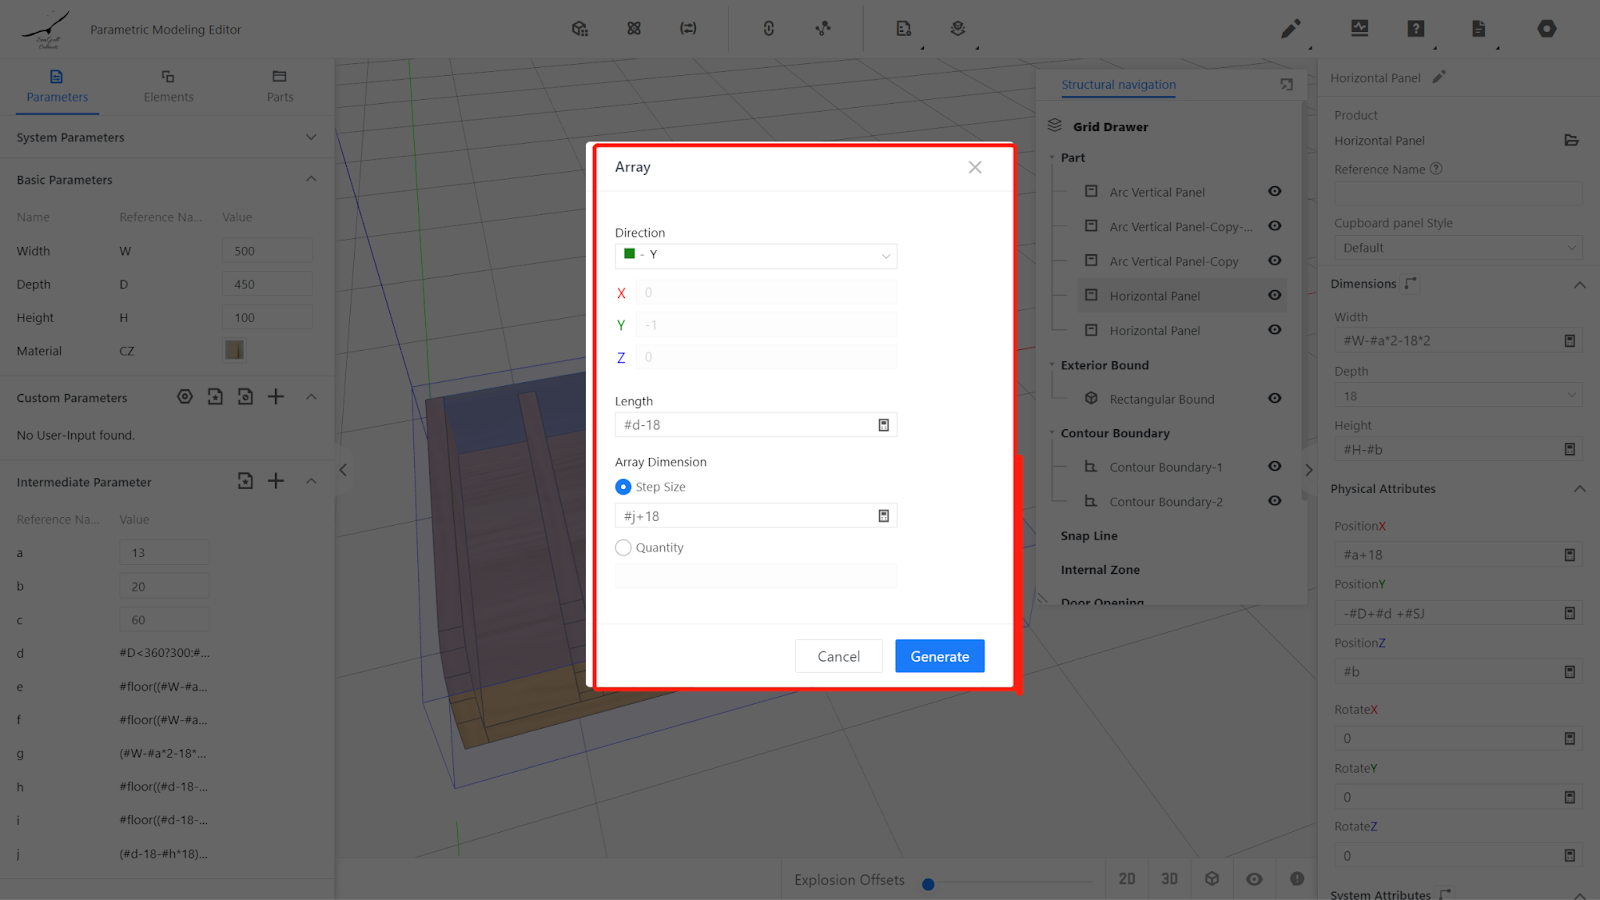
Click the right mouse button on the left panel and select "Copy". Then click the right mouse button on the copied panel and choose "Array". Set the array direction, length, step size, click "Generate", and modify the physical properties.
Array direction: +X, array length: #W-#a*2-18*2, step size: #g+18
Width: 18, Depth: #d-18, Height: #H-#b-20,
Position X: #a+18+#g, position Y: #d-#D+#SJ-18, position Z: #b+18.
(Step size = actual gap + thickness of each vertical grid)
3.5. Setting intermediate parameters:
Number of bars h Current value #floor((#d-18-#c)/(#c+18))
Number of horizontal Spaces i Current value #floor((#d-18-#c)/(#c+18))+1
Transverse true empty j current value (#d-18-#h*18)/#i
Parameter Explanation:
Similarly, we need to calculate the actual gap between horizontal grids to determine the step size and the position Y of each horizontal grid. Therefore, we use the minimum gap to calculate the actual gap. The following is the calculation method:
Grid quantity h #floor((#d-18-#c)/(#c+18))
The horizontal grid here refers to the horizontal grid after removing the backplane, as shown in Figure 1,2,3,4. The space is 1,2,3,4,5. The number of empty Spaces in the horizontal grid is one more than the number of the horizontal grid. In distance, 1+2=2+3=3+4=4+5.
The minimum inner space is #c, the transverse width is 18,
So the number of bars is
(#d-18-#c) represents the width after removing the back board and 1 inner space,
(#c+18) represents the width of (empty + horizontal)
The formula #floor((#d-18-#c)/(#c+18)) expresses how many horizontal cells there are
There is one more space in the horizontal space than in the horizontal space: i #floor((#d-18-#c)/(#c+18))+1
True empty space between horizontal cells (#d-18-#c-#h*18)/#i
The value of #h*18 is the width of the bars added together,
(#d-18-#c-#h*18) represents the inner space width of all bars except the backplane
(#d-18-#c-#h*18)/#i indicates width of inside space/number of inside space = actual width of inside space.
Start setting:
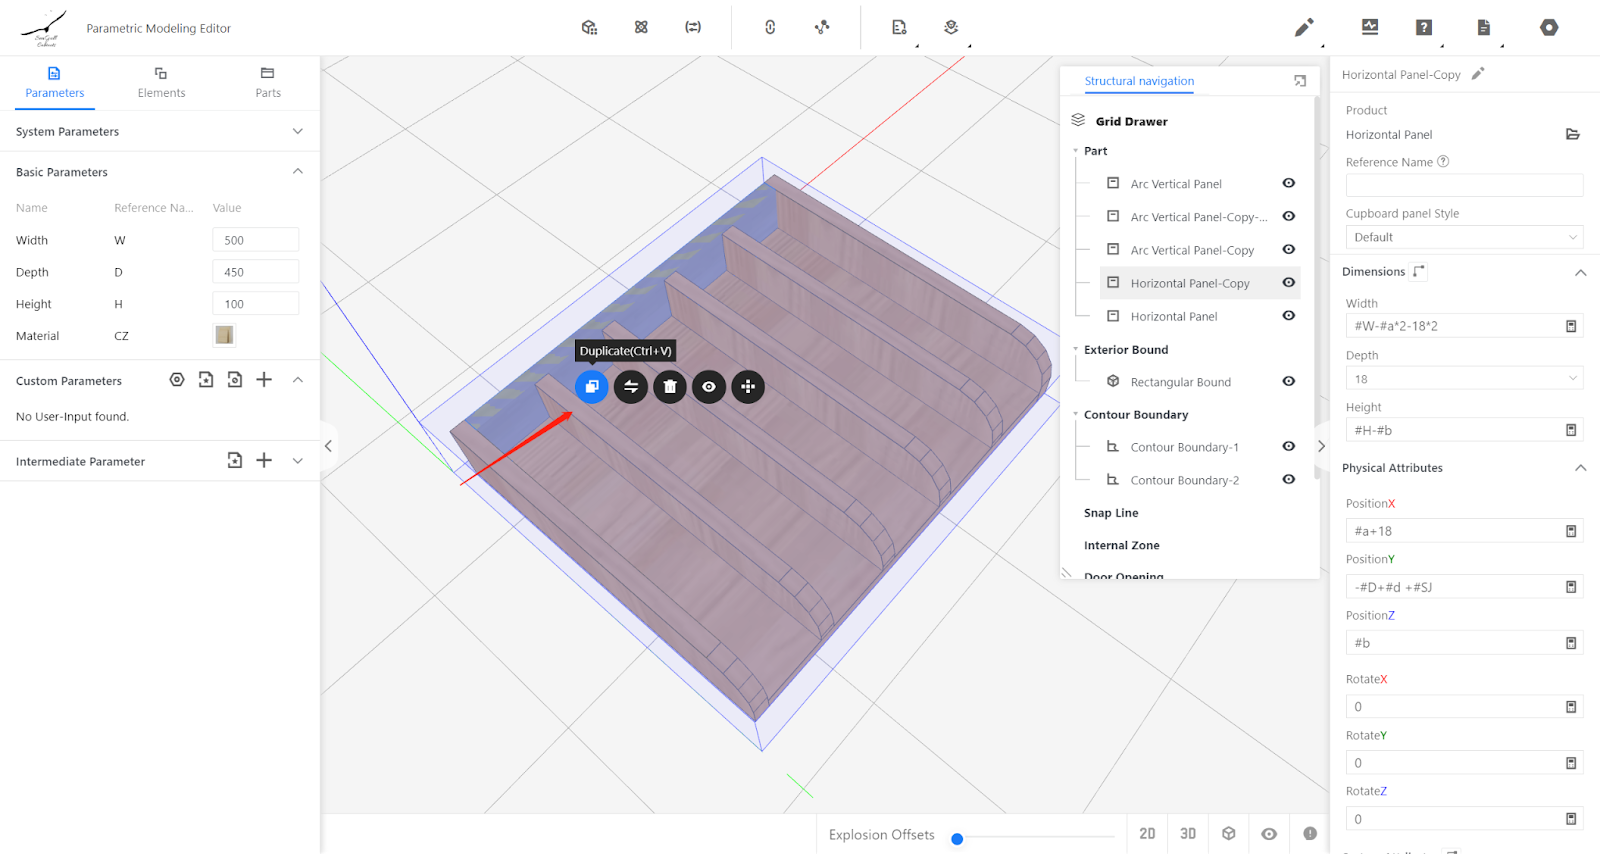
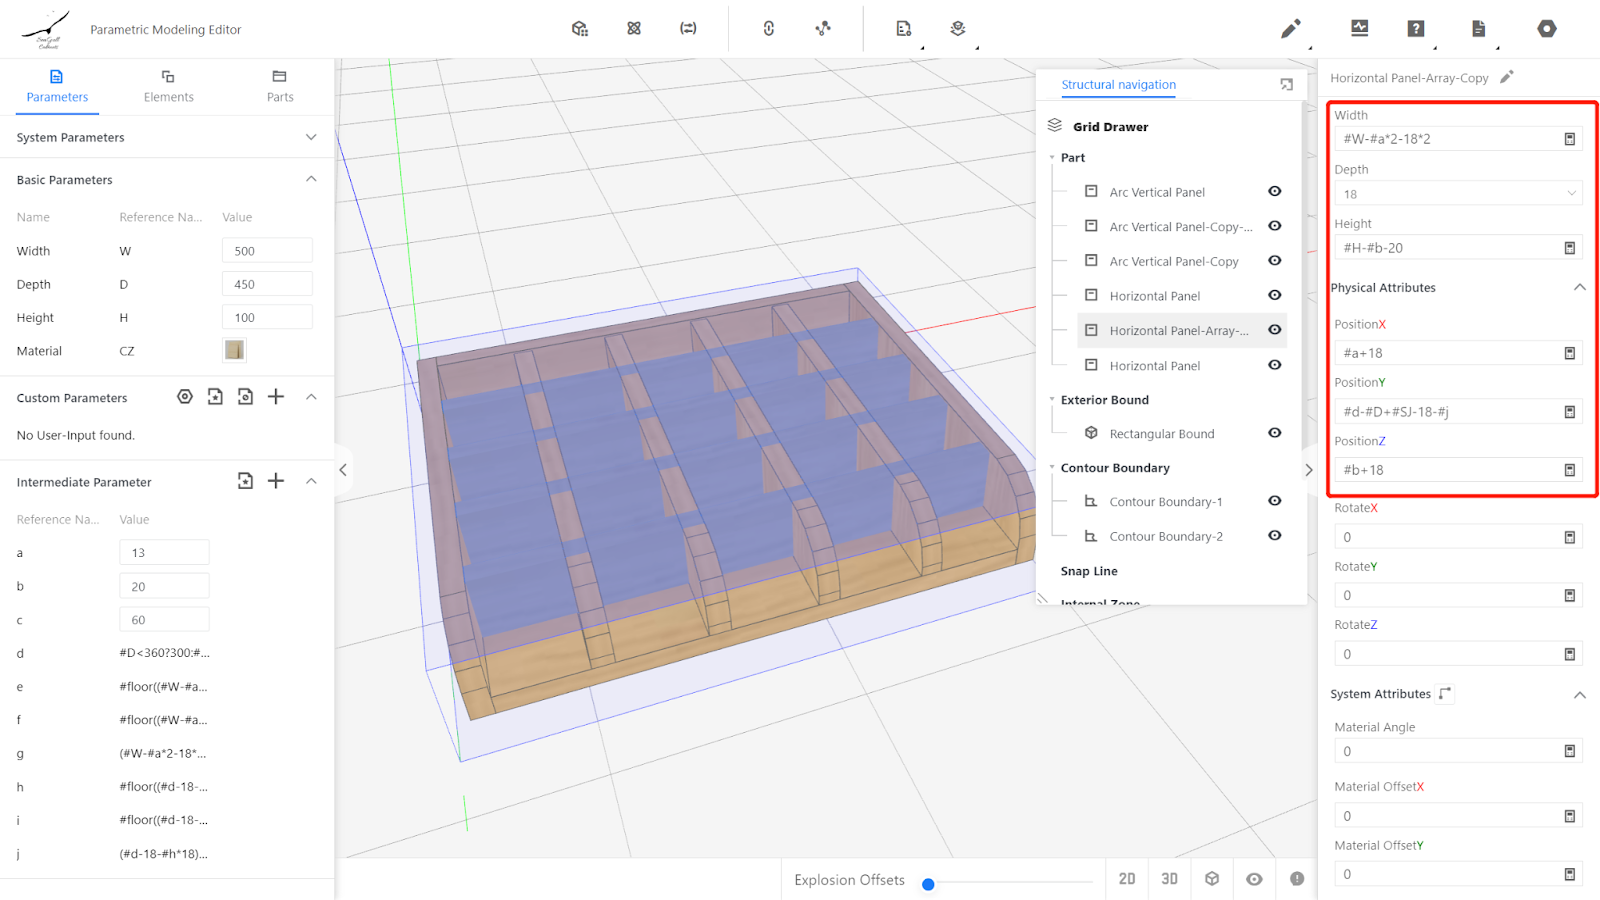
Click the right mouse button on the back panel and select "Copy". Then click the right mouse button on the copied panel and choose "Array". Set the array direction, length, step size, click "Generate", and modify the physical properties.
Array direction: -Y, array length: #d-18, step size: #j+18
Width: #W-#a*2-18*2, Depth: 18, Height: #H-#b-20,
Position X: #a+18,
Position Y: #d-#D+#SJ-18-#j
Position Z: #b+18.
3.6. Insert a handleless drawer front and set its physical properties.
Width: #W+#ZY+#YY-#FX*2
Depth: 18
Height: #H-40
Position X: #FX-#ZY
Position Y: -#D+#SJ
Position Z: 0
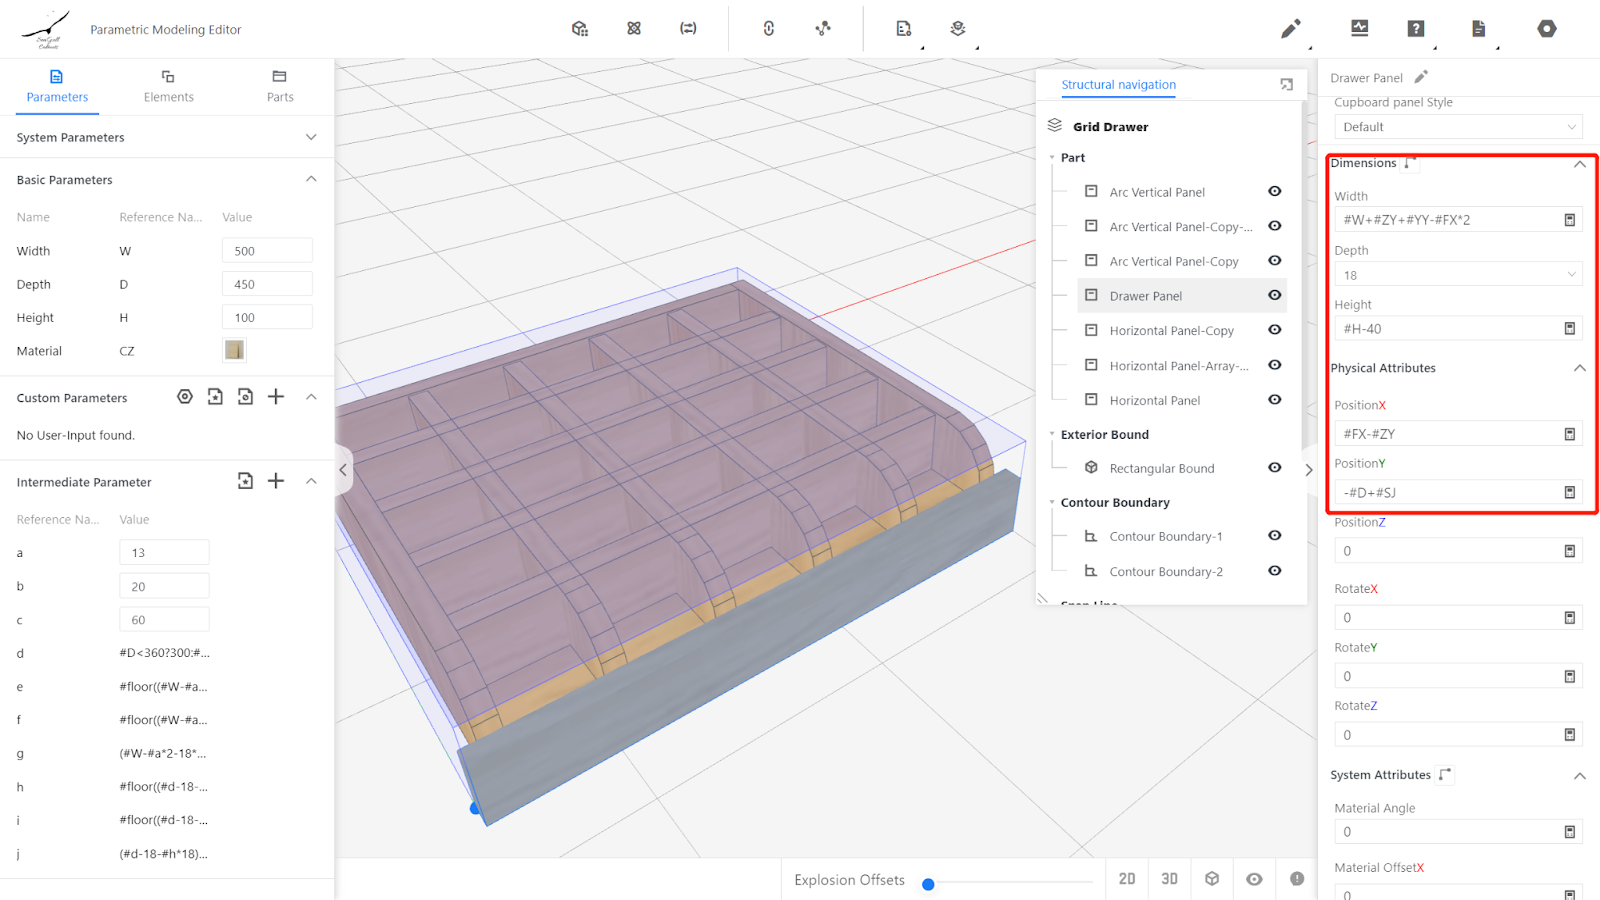
Material selection for drawer fronts can be done using a method that allows the front-end to easily replace the material of the drawers individually.
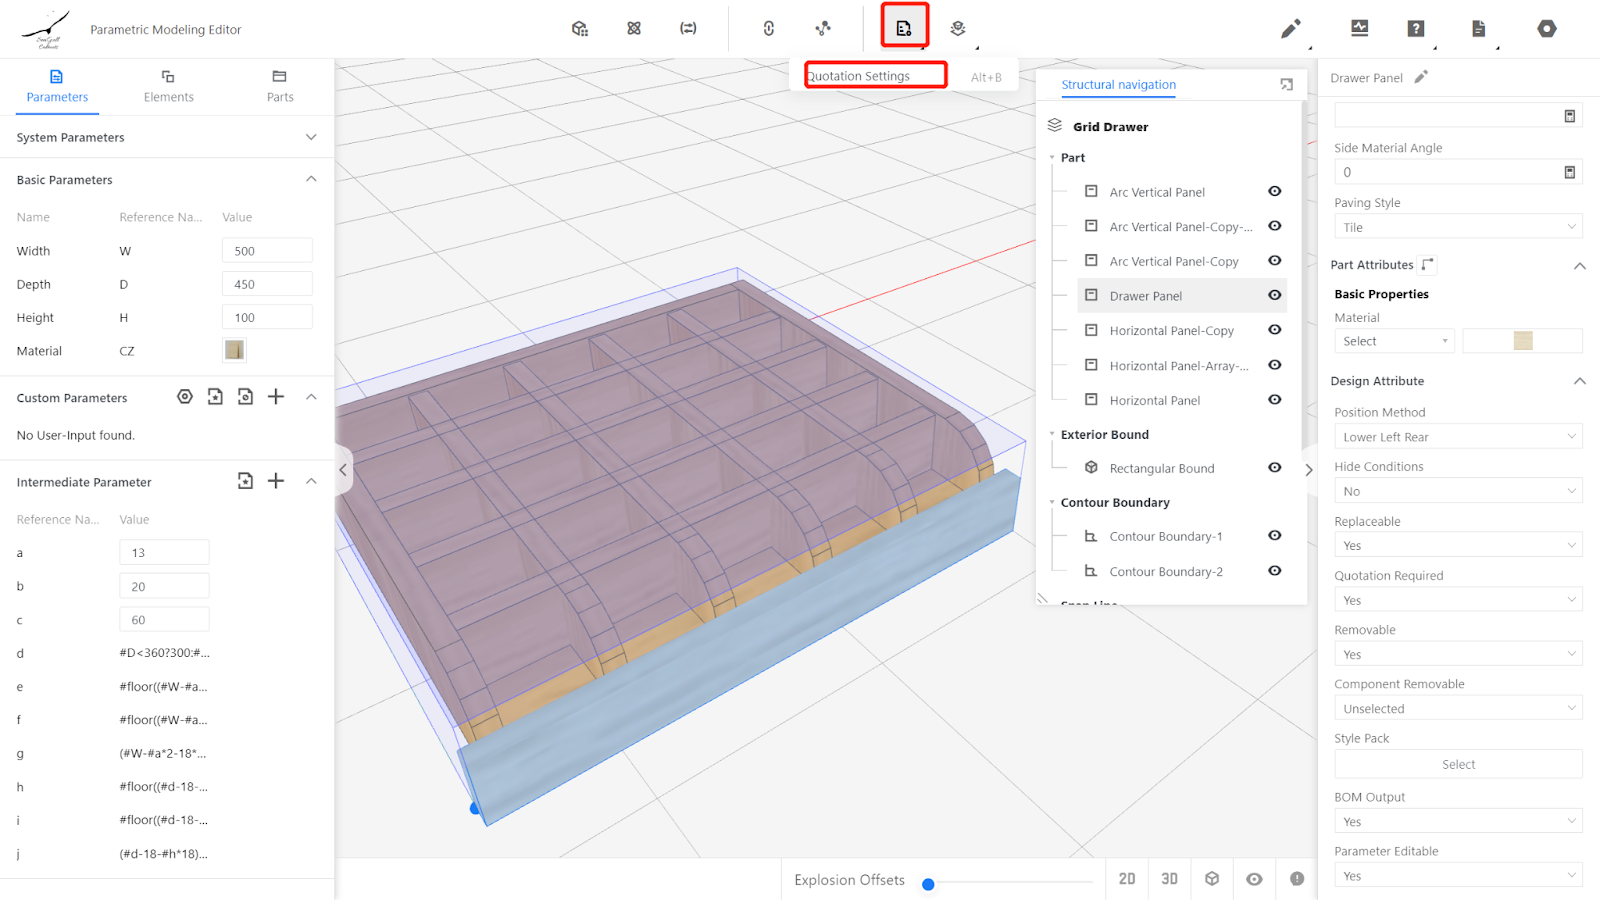
3.7. Output Property Settings
The dimensions functions (W, D, H) referred to when quoting are the output width, output depth, and output height of the output properties. Therefore, it is necessary to set the output properties accordingly. Here we will explain the method of setting the output properties for drawer fronts and drawer boxes separately when quoting using drawer box pricing and grid frame output properties. You can adjust the output properties based on your actual quoting method.
(Note: When using this method for quoting, drawer fronts also need to be individually quoted. For details, please refer to the quotation settings for drawer front pricing.)
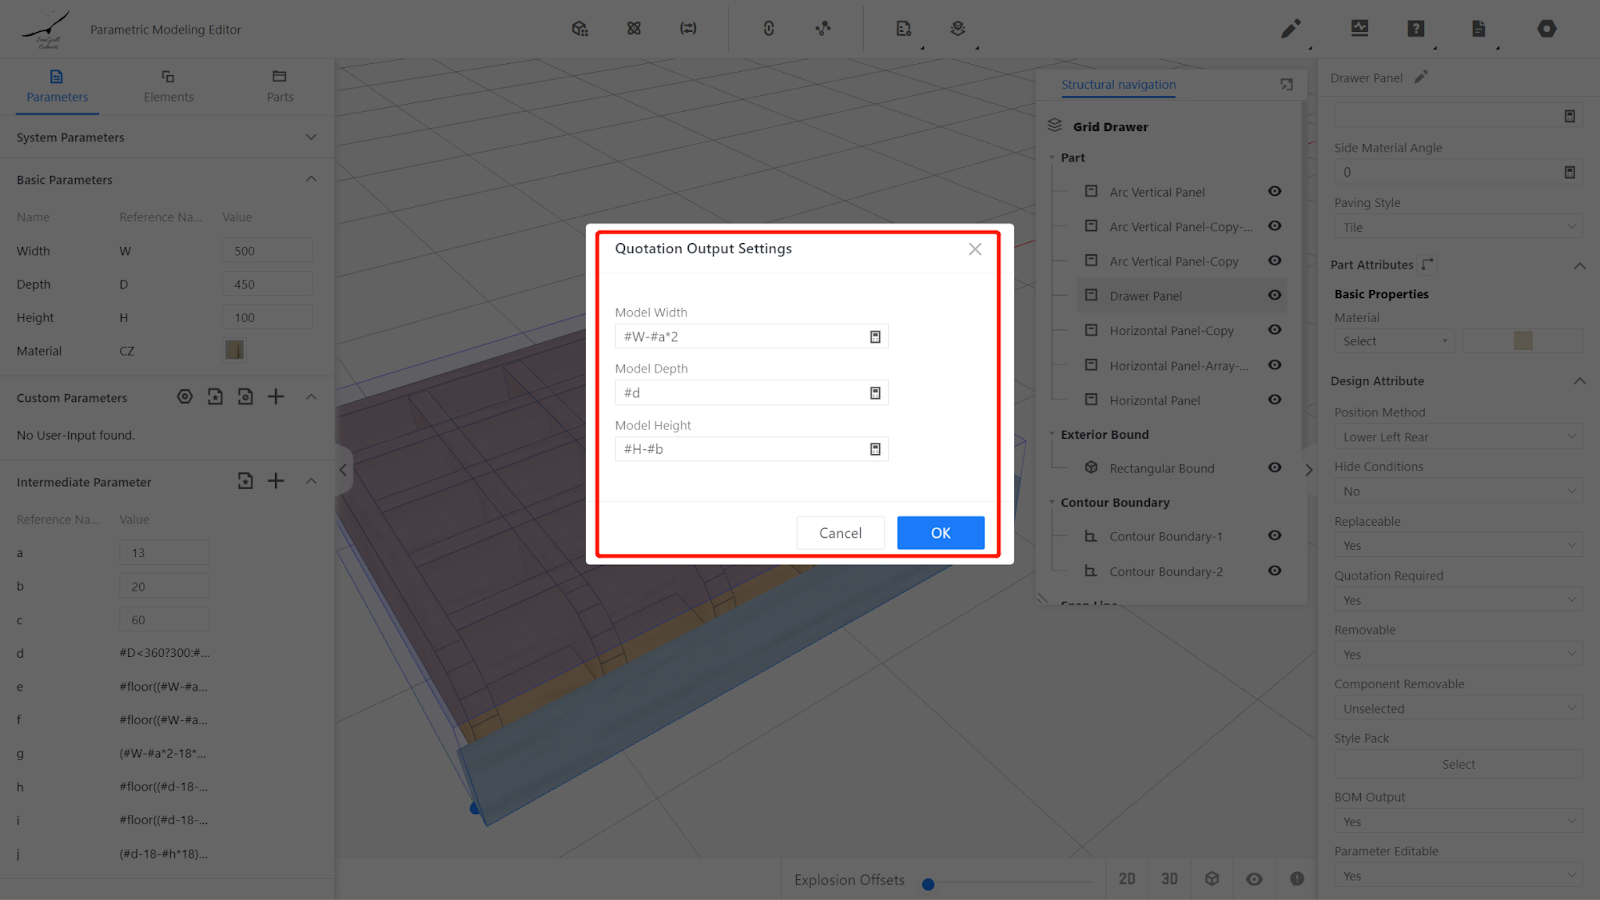
Model Width: #W-#a*2
Model Depth: #d
Model Height: #H-#b
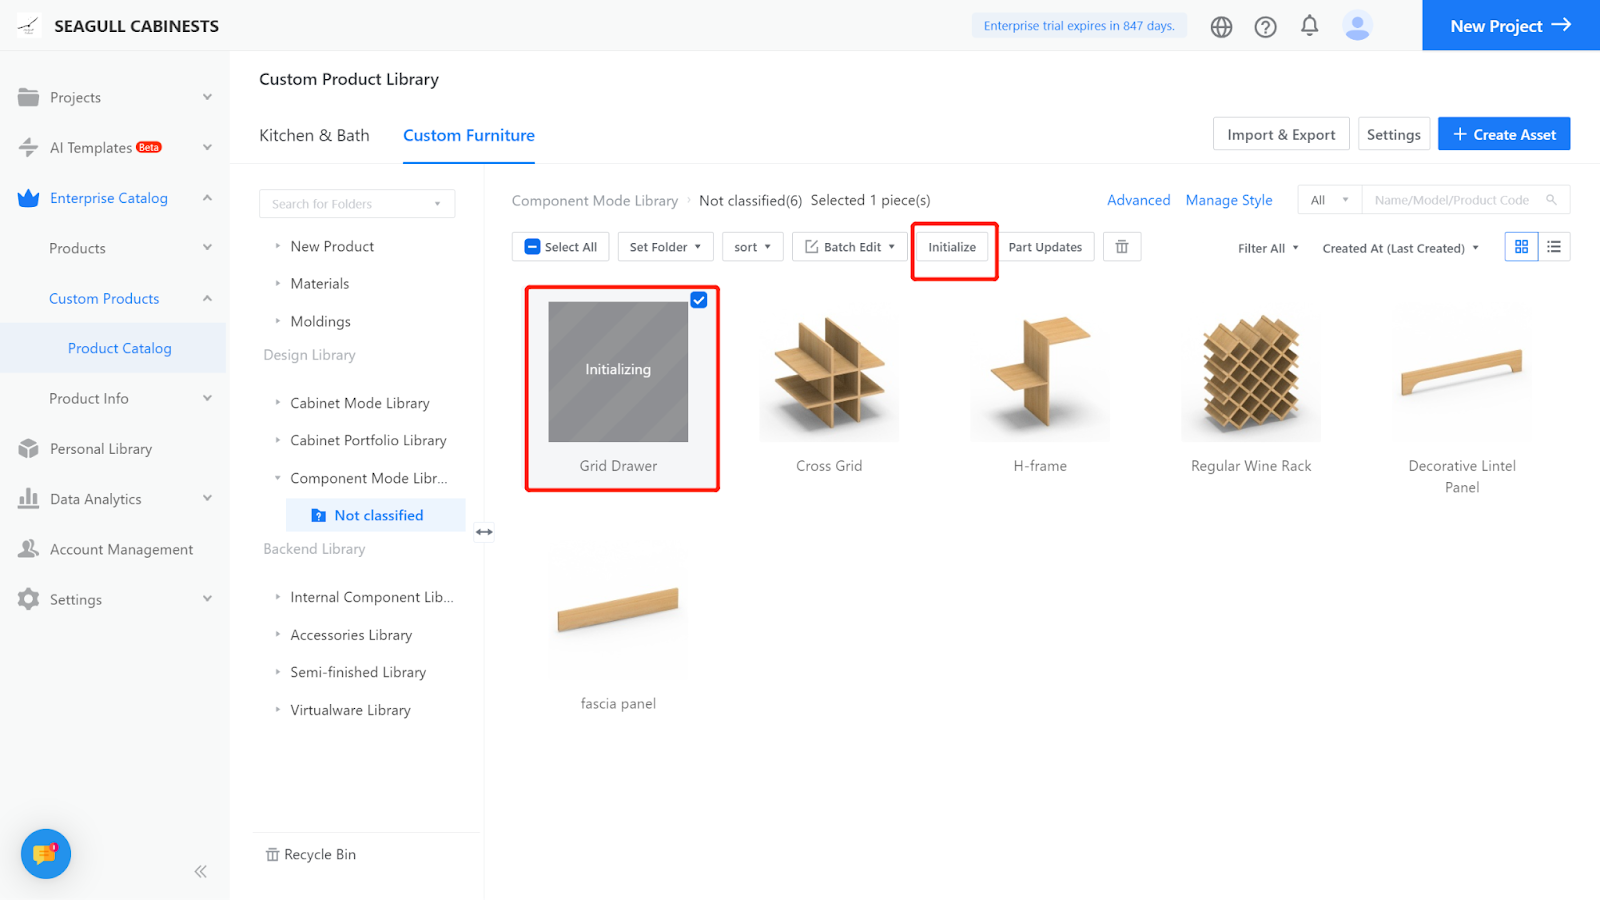
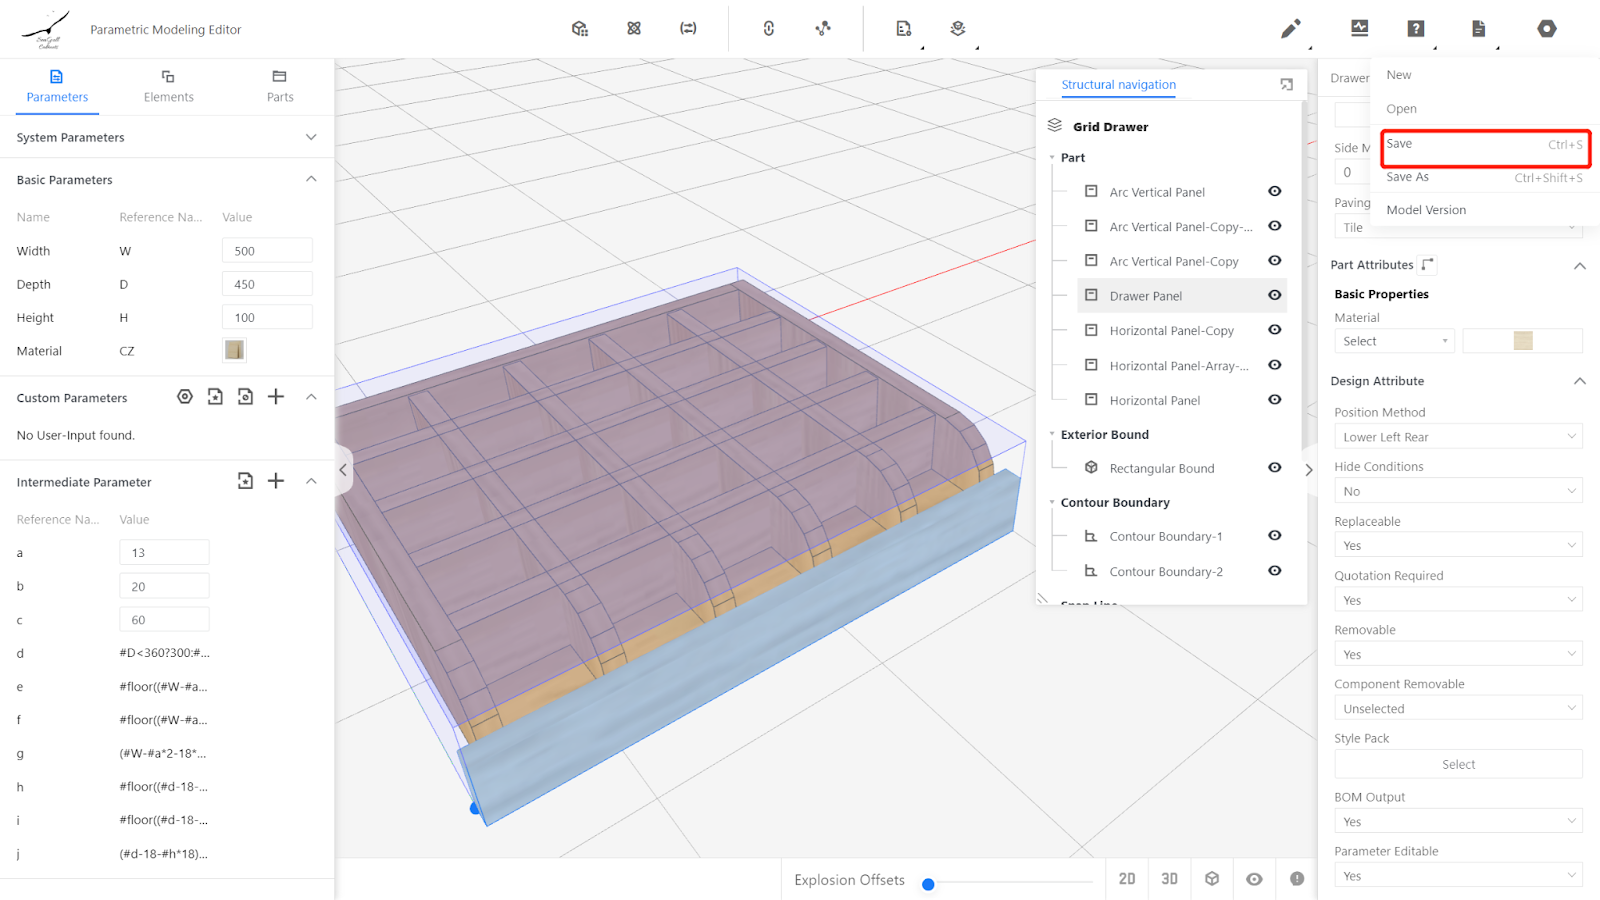
IV.Save and Initializing
Click on the file in the top right corner and select "Save". Choose the desired subdirectory and give it a name, then click "Save".
On the backend page, locate the model, select it, and choose "Stock-In" to add it to inventory.