Definition
Establish the cabinet structure model in the form of components to adapt to the cabinet.
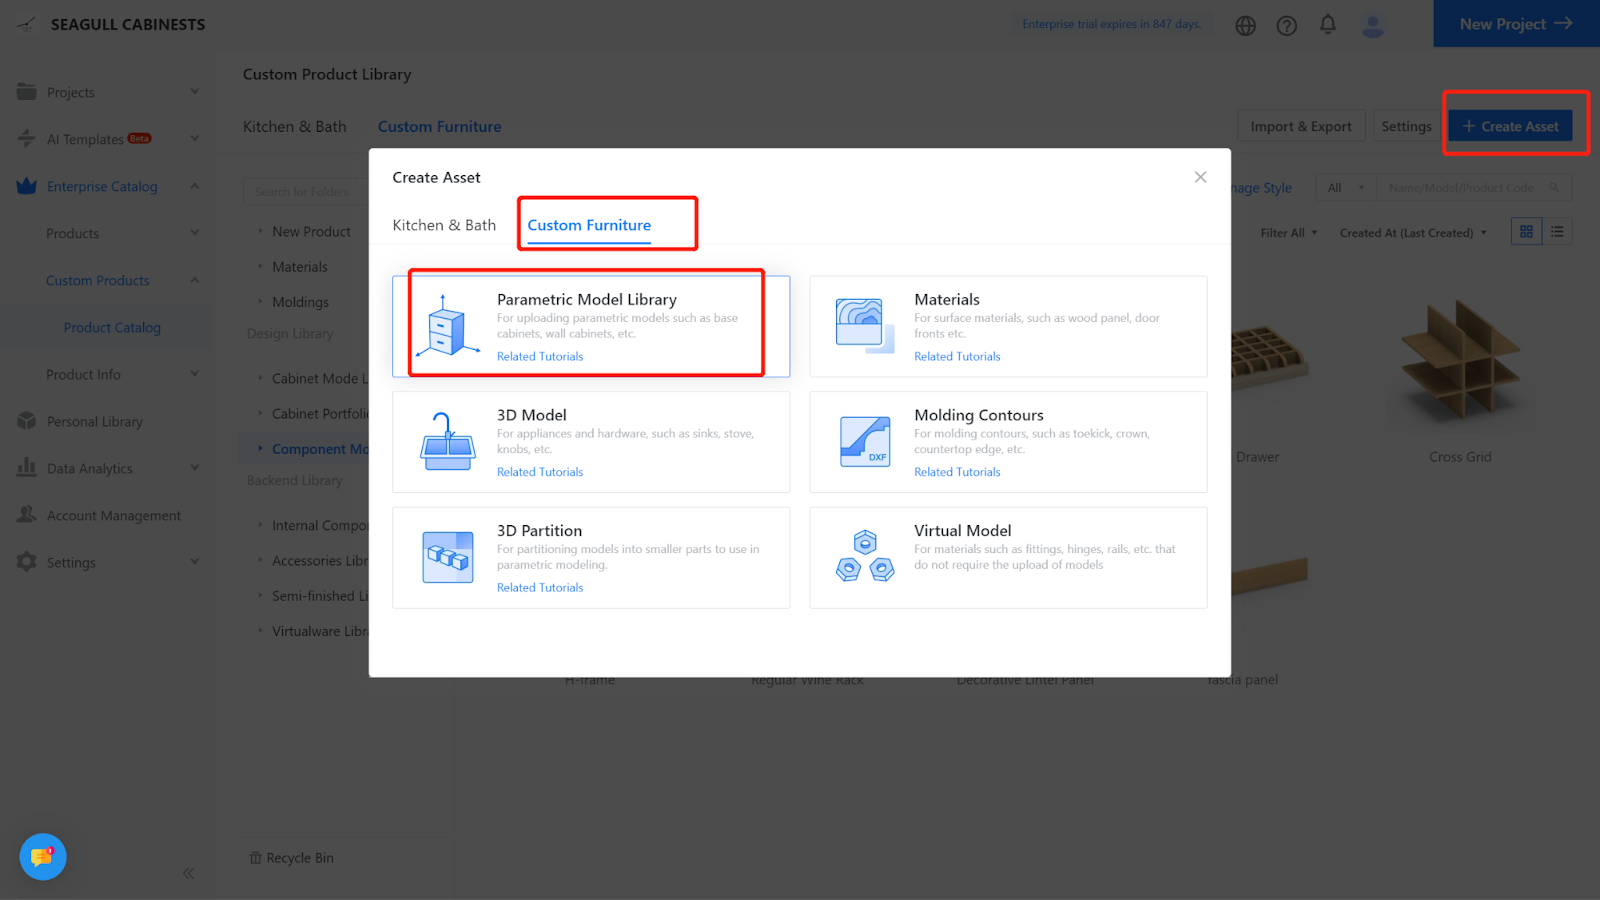
I. Creation Position
Custom Furniture—Create Asset—Parametric Model Library— New—
![](https://helpcenter.coohom.com/hubfs/Knowledge%20Base%20Import/coohom-f8347f72ad46.intercom-attachments-7.comio807767886be0a0d7c239f1a6b2c19817000tQF94EVtYnoqX4zyHh0DUILCLQ3LhcHEPxaqO2uuE1jh-1bPmqPA2tpKRs1oU.png)
![](https://helpcenter.coohom.com/hubfs/Knowledge%20Base%20Import/coohom-f8347f72ad46.intercom-attachments-7.comio807767902cfea5933bf30546bc64c7779j6FdC73OuMCwRyWEmp0ImBHywfH5EX4BEn31qEbiXENeKk5NoTlpukgA-tgIF_e.png)
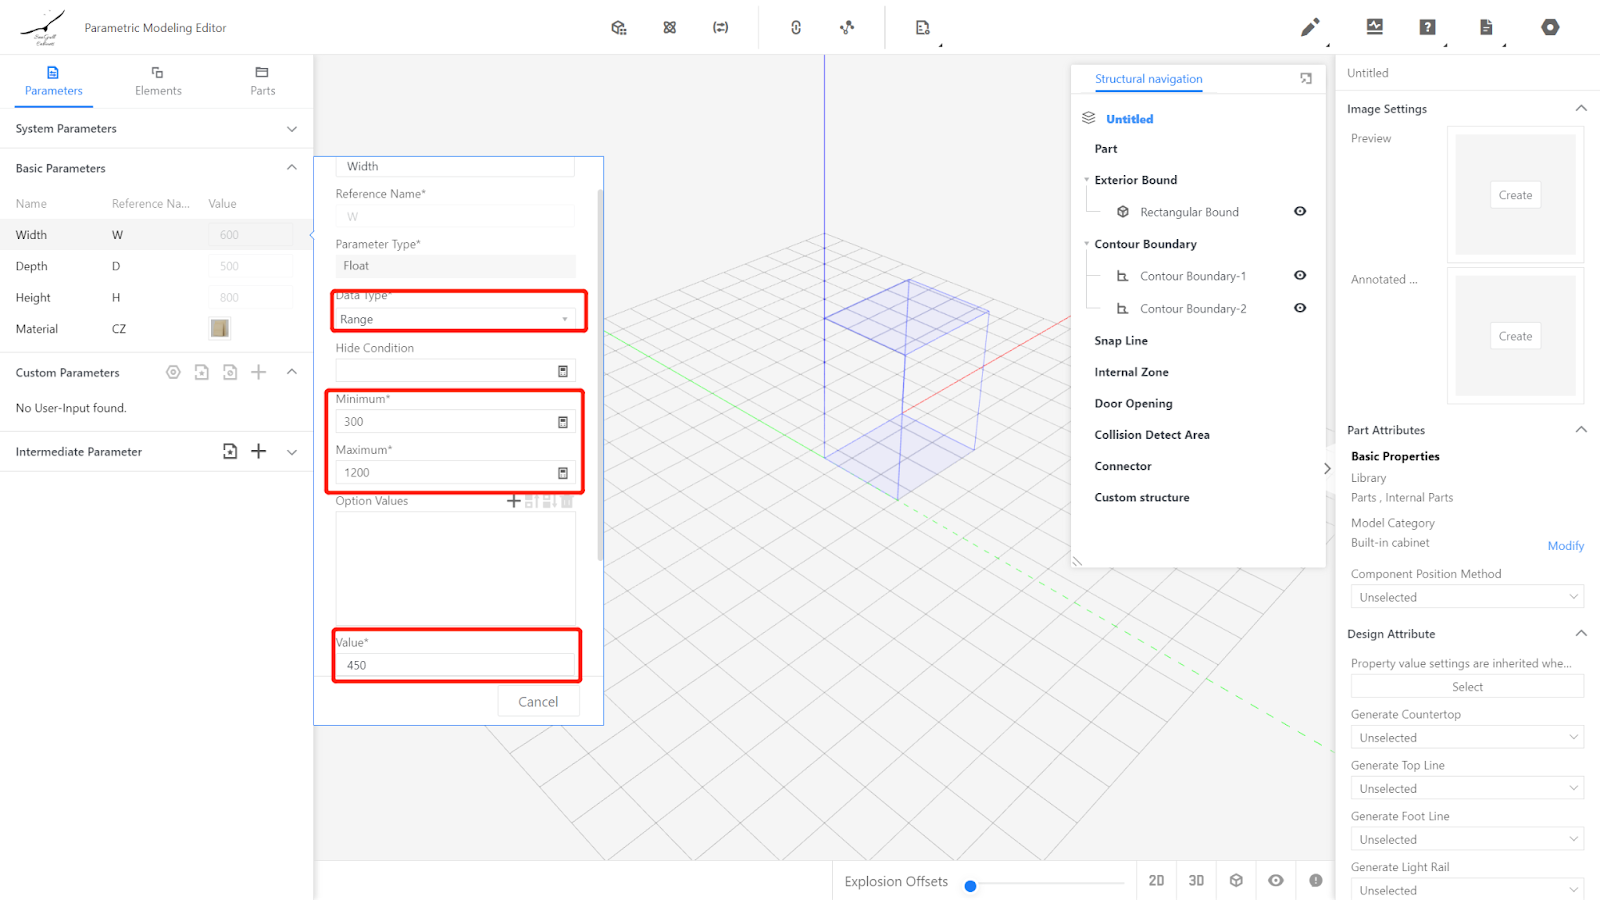
II. Parameter Configuration: Custom Parameters
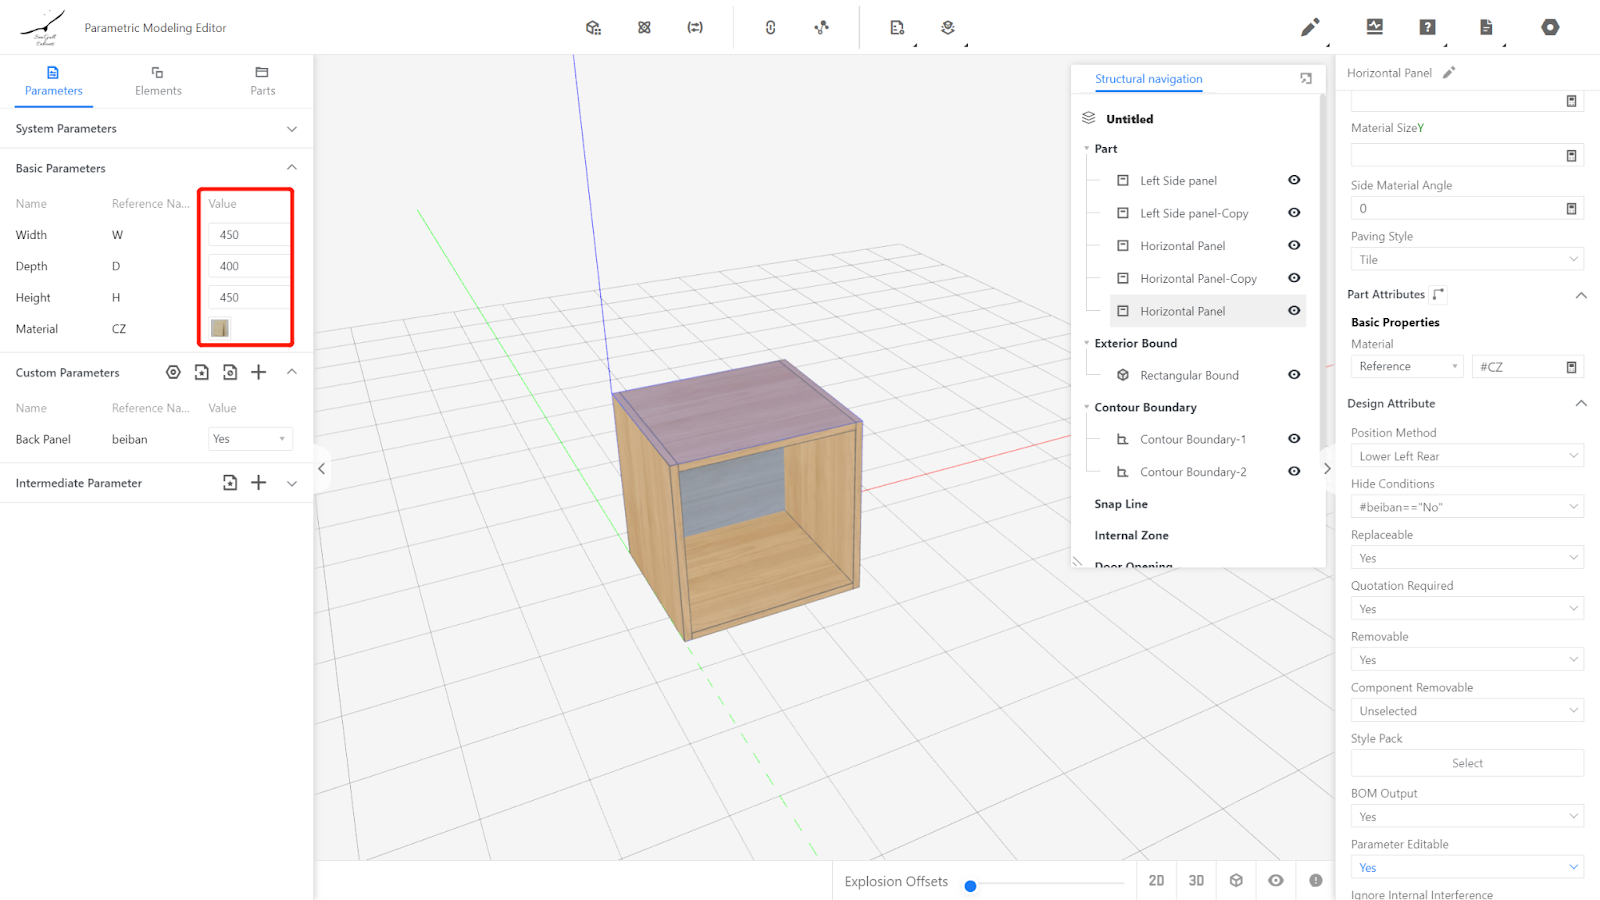
Width (W) - Represents the size of the model in the X direction. The value type can be set as optional or within a range (e.g., range 300-1200, current value 450).
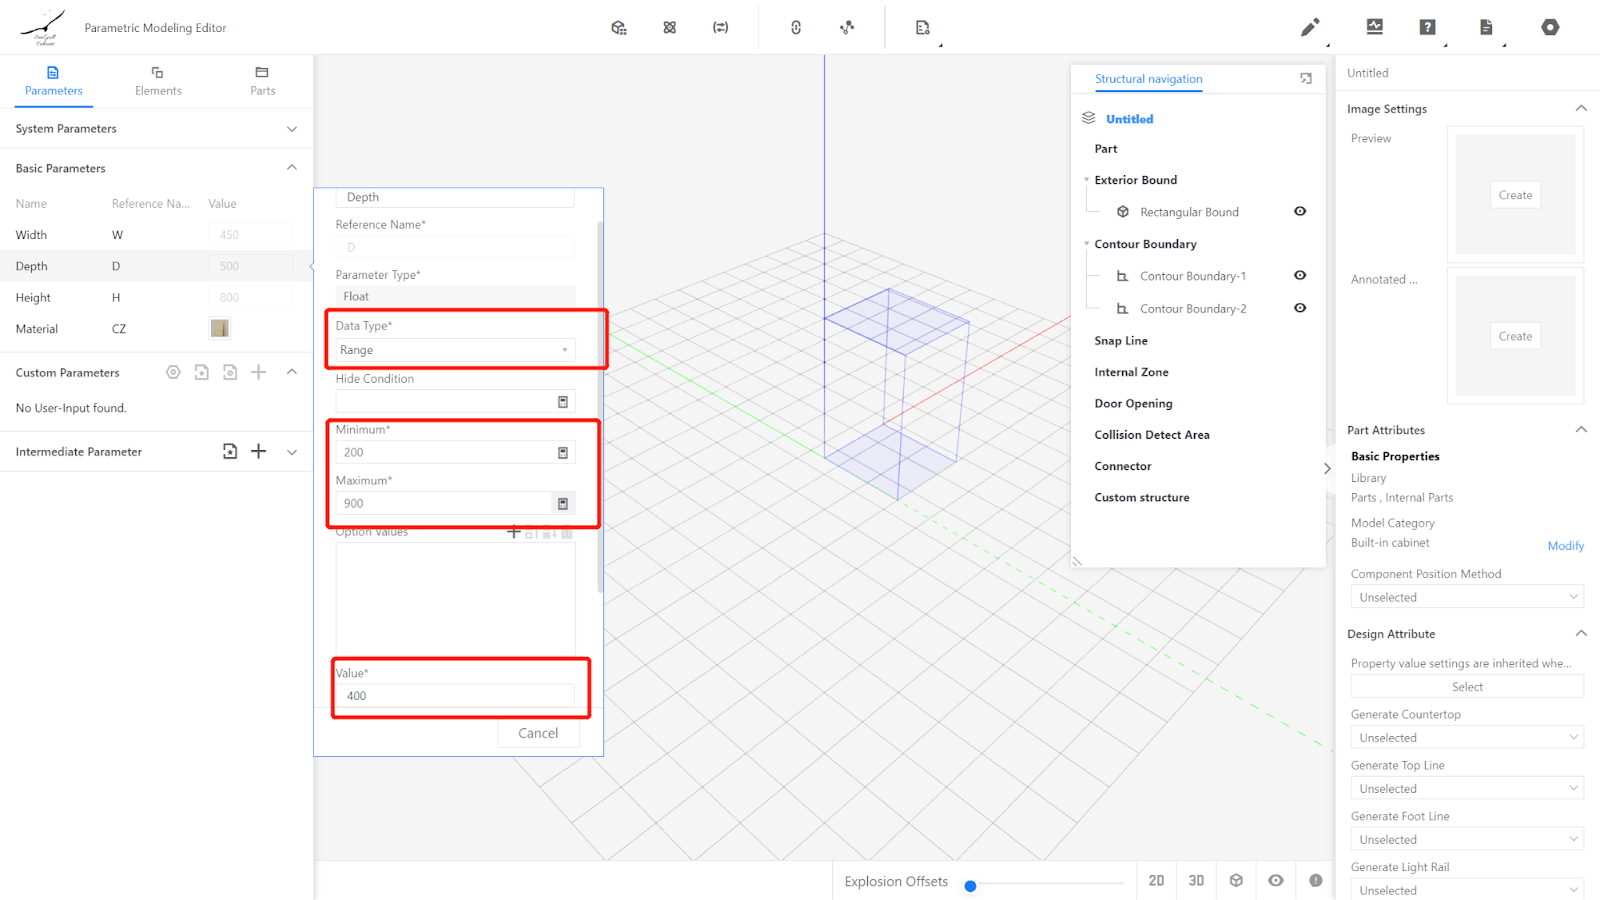
Depth (D) - Represents the size of the model in the Y direction. The value type can be set as optional or within a range (e.g., range 200-900, current value 400).
Height (H) - Represents the size of the model in the Z direction. The value type can be set as optional or within a range (e.g., range 300-1200, current value 450).
![](https://helpcenter.coohom.com/hubfs/Knowledge%20Base%20Import/coohom-f8347f72ad46.intercom-attachments-7.comio807767915ed60159d43e721ace80a9835RR5bWq3xD204K6vCXOS6x52d9oWYhy8963DLwug21-2yw1AvY8Ns2YzJcfXy_f7.png)
![](https://helpcenter.coohom.com/hubfs/Knowledge%20Base%20Import/coohom-f8347f72ad46.intercom-attachments-7.comio807767927089f95895f8a50a7bb45103bpc0BTKAx92HYJcc8VCl6Hbrq6gugl7c_C8ULQKyZtix2iSAOddXbFX9OUAVNWA3.png)
![](https://helpcenter.coohom.com/hubfs/Knowledge%20Base%20Import/coohom-f8347f72ad46.intercom-attachments-7.comio807767948ea48a6f202536e176832bea8aI7_bYu1astOLg0Dp_zw5iP8OhvqMm4WDwJkB2r3qQHjqmMV-hKpuz2dtOQyCZ2.png)
Material selection: Choose a default material, representing the color of the embedded decorative cabinet.
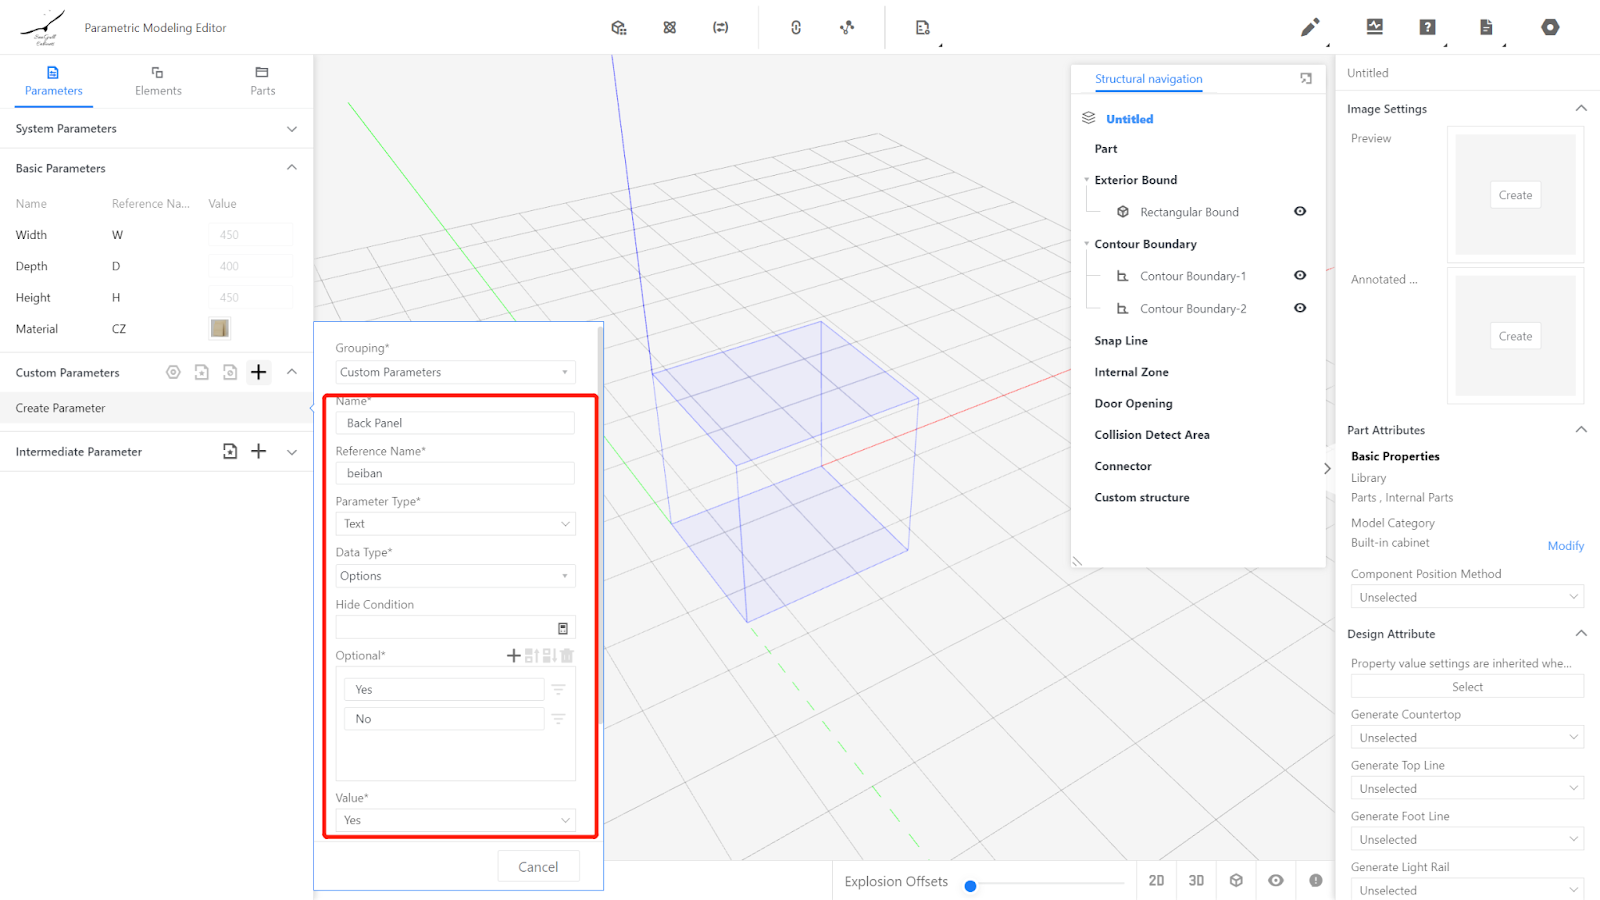
Advanced parameter setting - Facilitate the frontend design selection of whether there is a back panel.
Parameter name: "Back Panel," reference name: "beiban," options: "Yes," "No," default: "Yes."
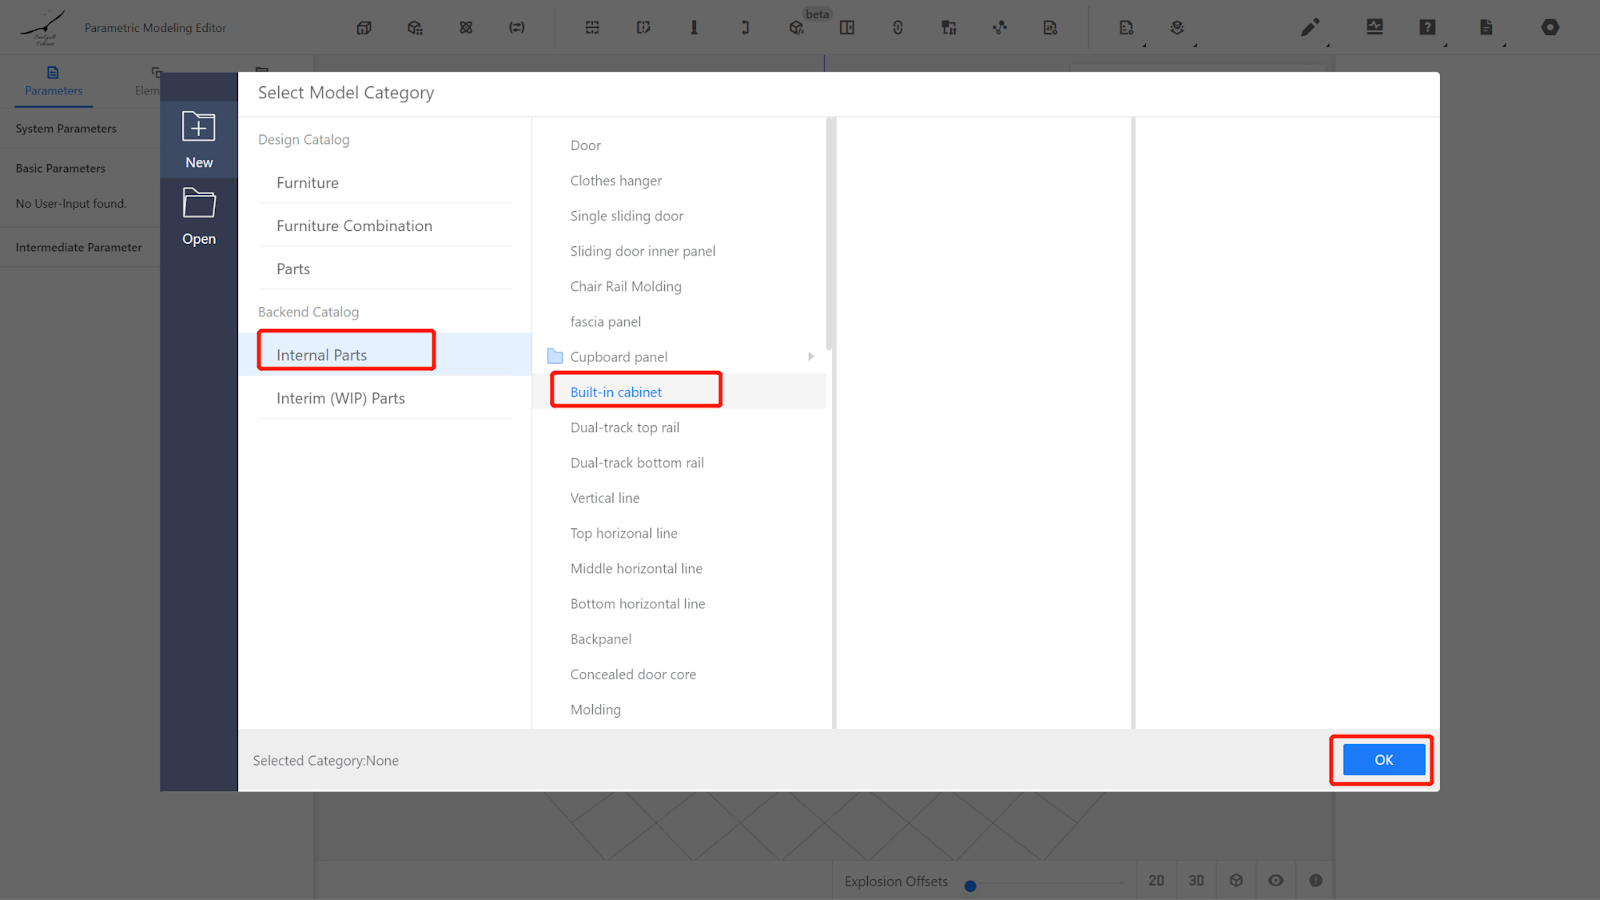
![](https://helpcenter.coohom.com/hubfs/Knowledge%20Base%20Import/coohom-f8347f72ad46.intercom-attachments-7.comio80776796265128e92cee3ce4a8d98af15QE3hdvqHATp25o4MuJf_gvOwzSxAK5UKDqhByw_1K59qccCutC8XqZbDFURy8ej.png)
III. Modeling
Click on the component library - Semi-finished Products Library to call up the pre-made vertical panel.
![](https://helpcenter.coohom.com/hubfs/Knowledge%20Base%20Import/coohom-f8347f72ad46.intercom-attachments-7.comio80776797760650d88cf1f0fdced95c801semIEgBVcpo8oJ3Amp5CHFmmPx5ba1egFrgowzM4hbp0je8gjNK-53jblxrUJnE.png)
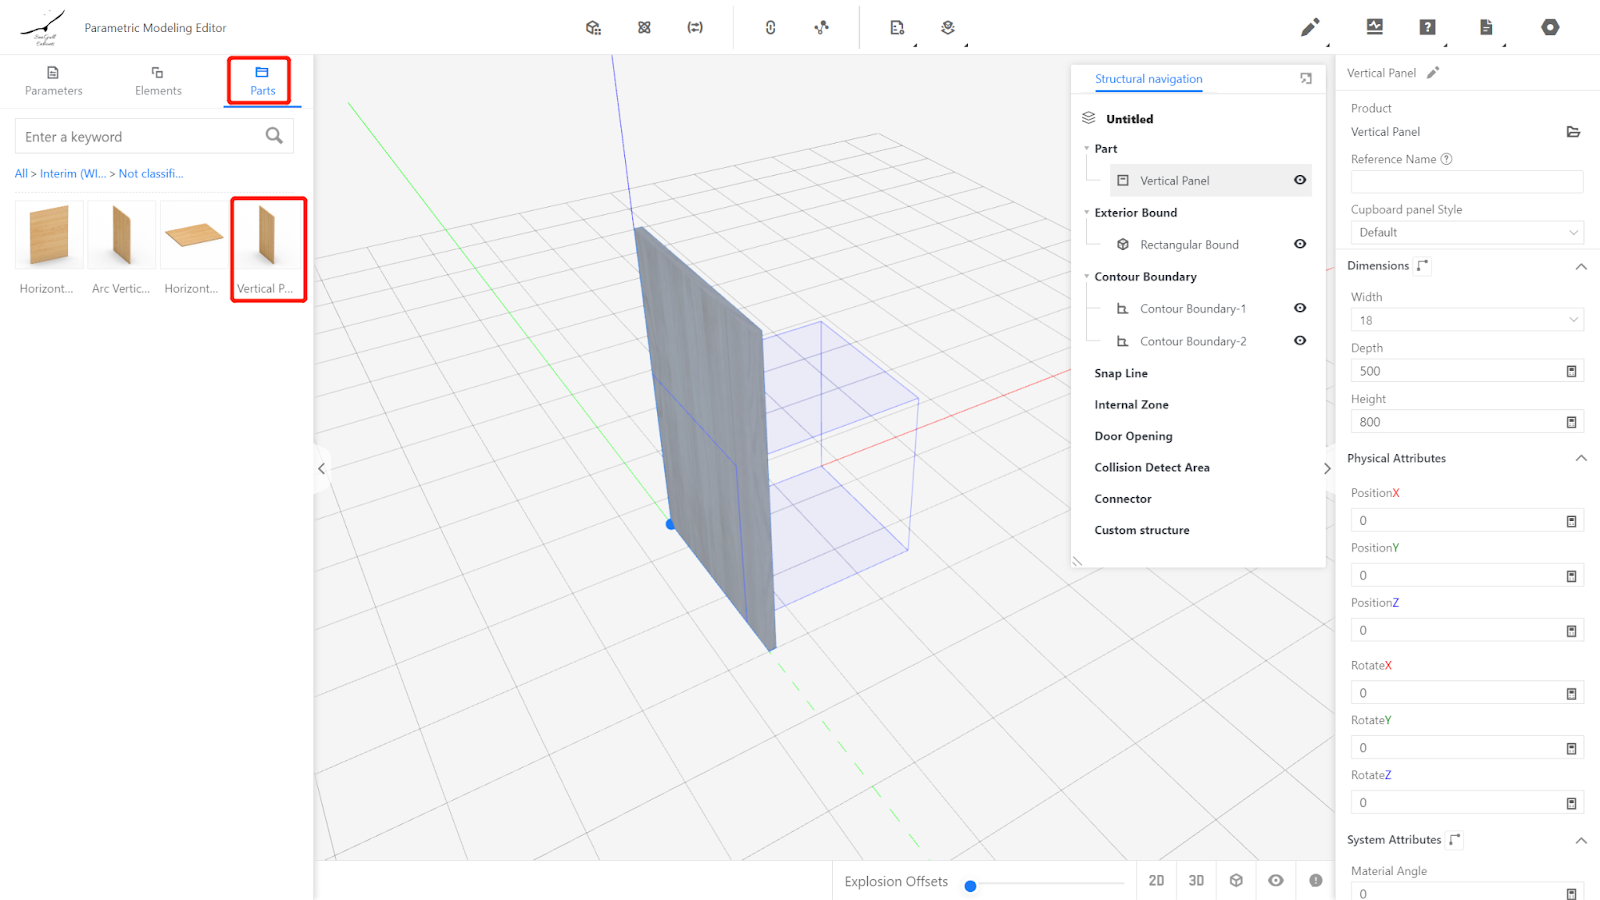
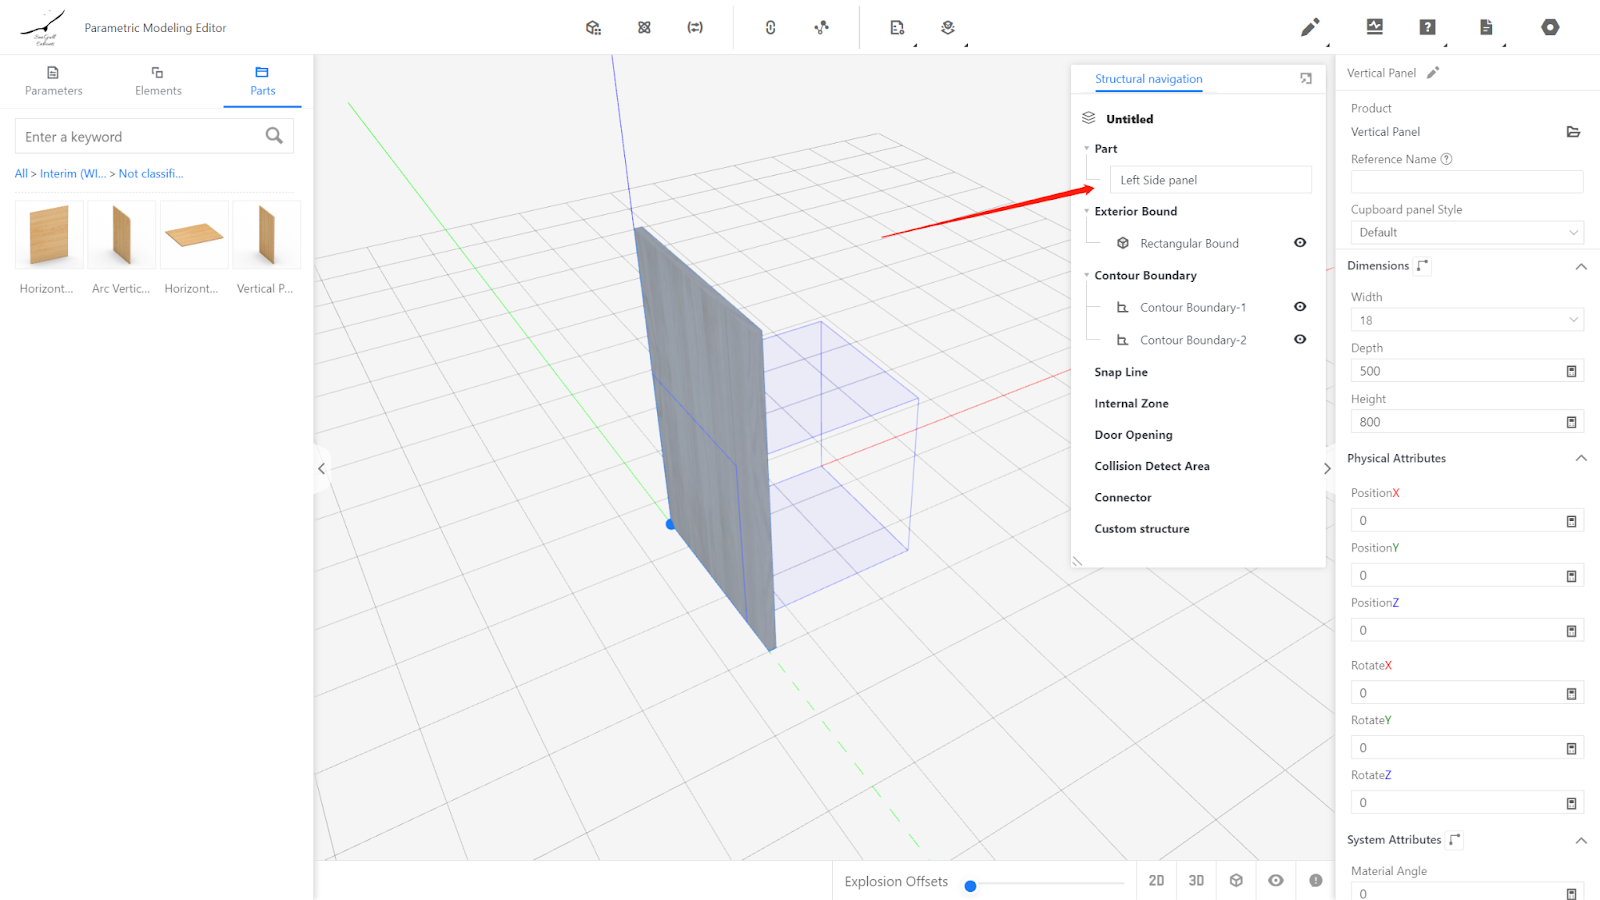
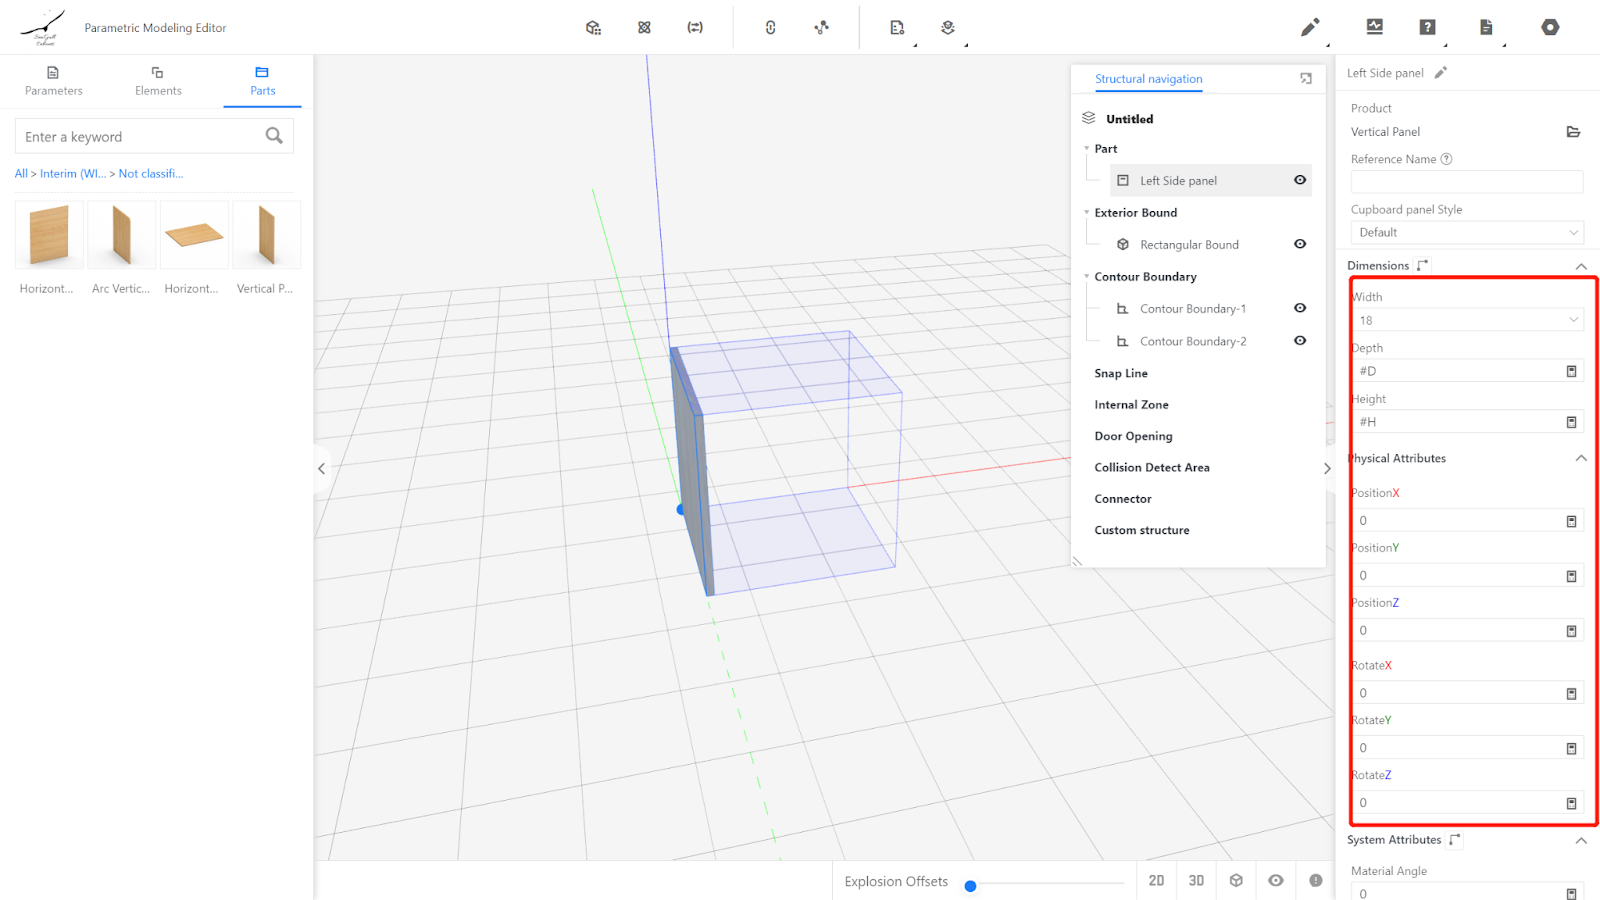
Double-click on the horizontal and vertical panels in the right structure navigation, change the name to "Left Side panel."
![](https://helpcenter.coohom.com/hubfs/Knowledge%20Base%20Import/coohom-f8347f72ad46.intercom-attachments-7.comio80776799538fccb7f0a7f62e57faf0d32B5qGcs8P_u-WAuN08bZlfmk-dFwJ1qq5TfPjasfFsISpy-5Ud55MSWIWQ950Nlz.png)
Set the physical properties of this panel:
Width: 18, Depth: #D, Height: #H.
Position X: 0; Position Y: 0; Position Z: 0.
Rotation X: 0; Rotation Y: 0; Rotation Z: 0.
![](https://helpcenter.coohom.com/hubfs/Knowledge%20Base%20Import/coohom-f8347f72ad46.intercom-attachments-7.comio807768000ce77c57bd629de32d22392c8GqU6XBQ0CrFkV29flZ5S2UG5yjeuuyXx4VW_R7fkPZhwFshjlDqpmx2ue4xzPqv.png)
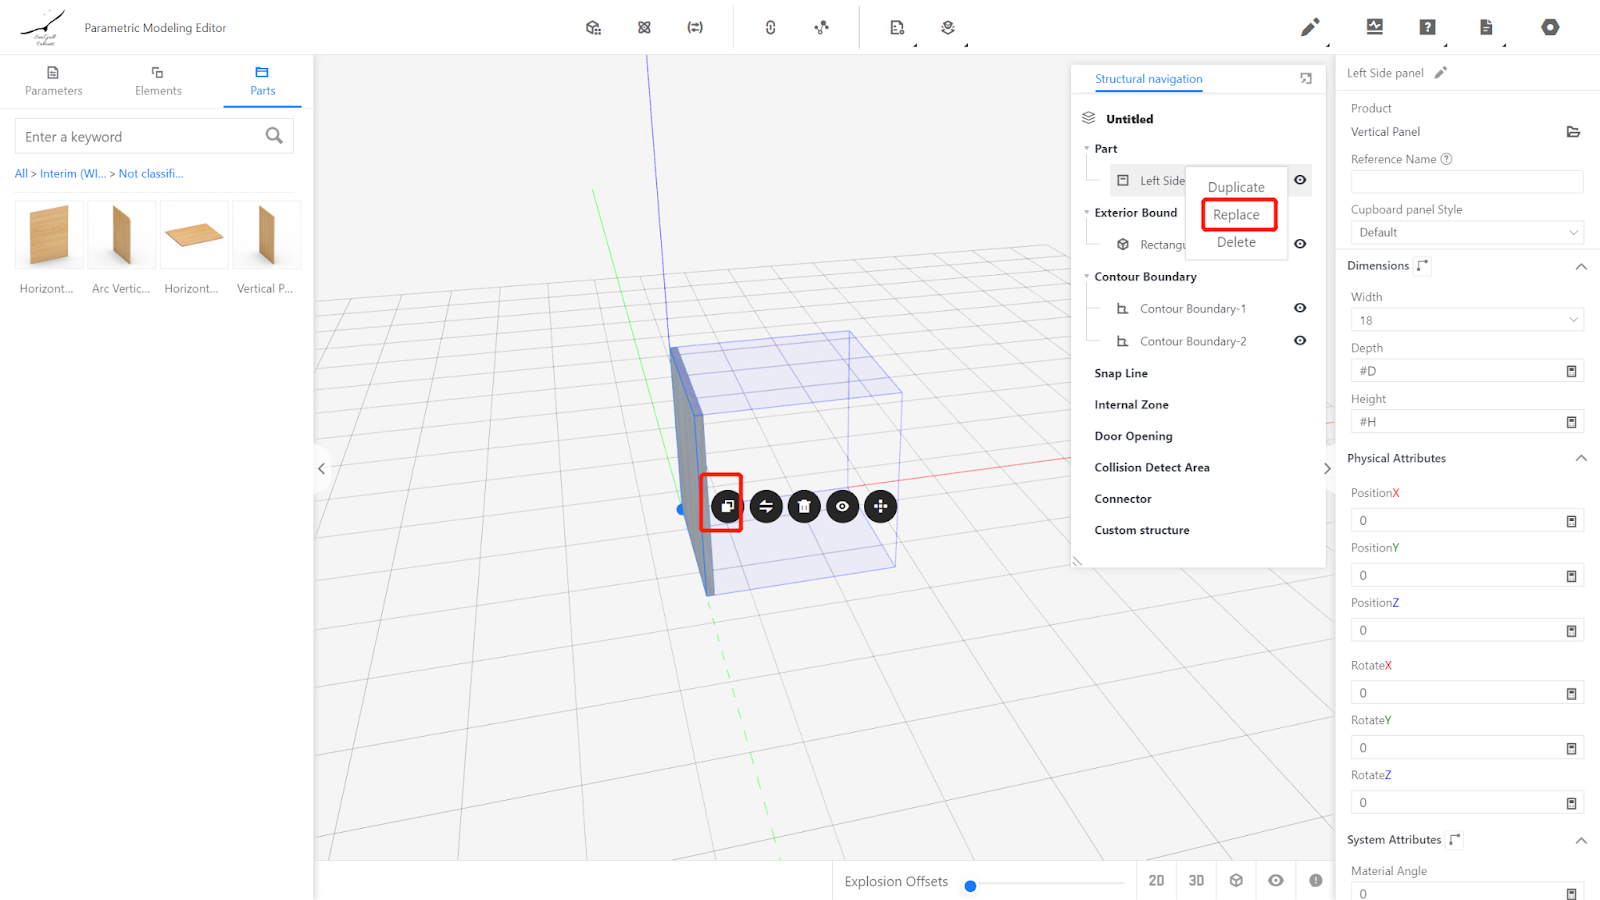
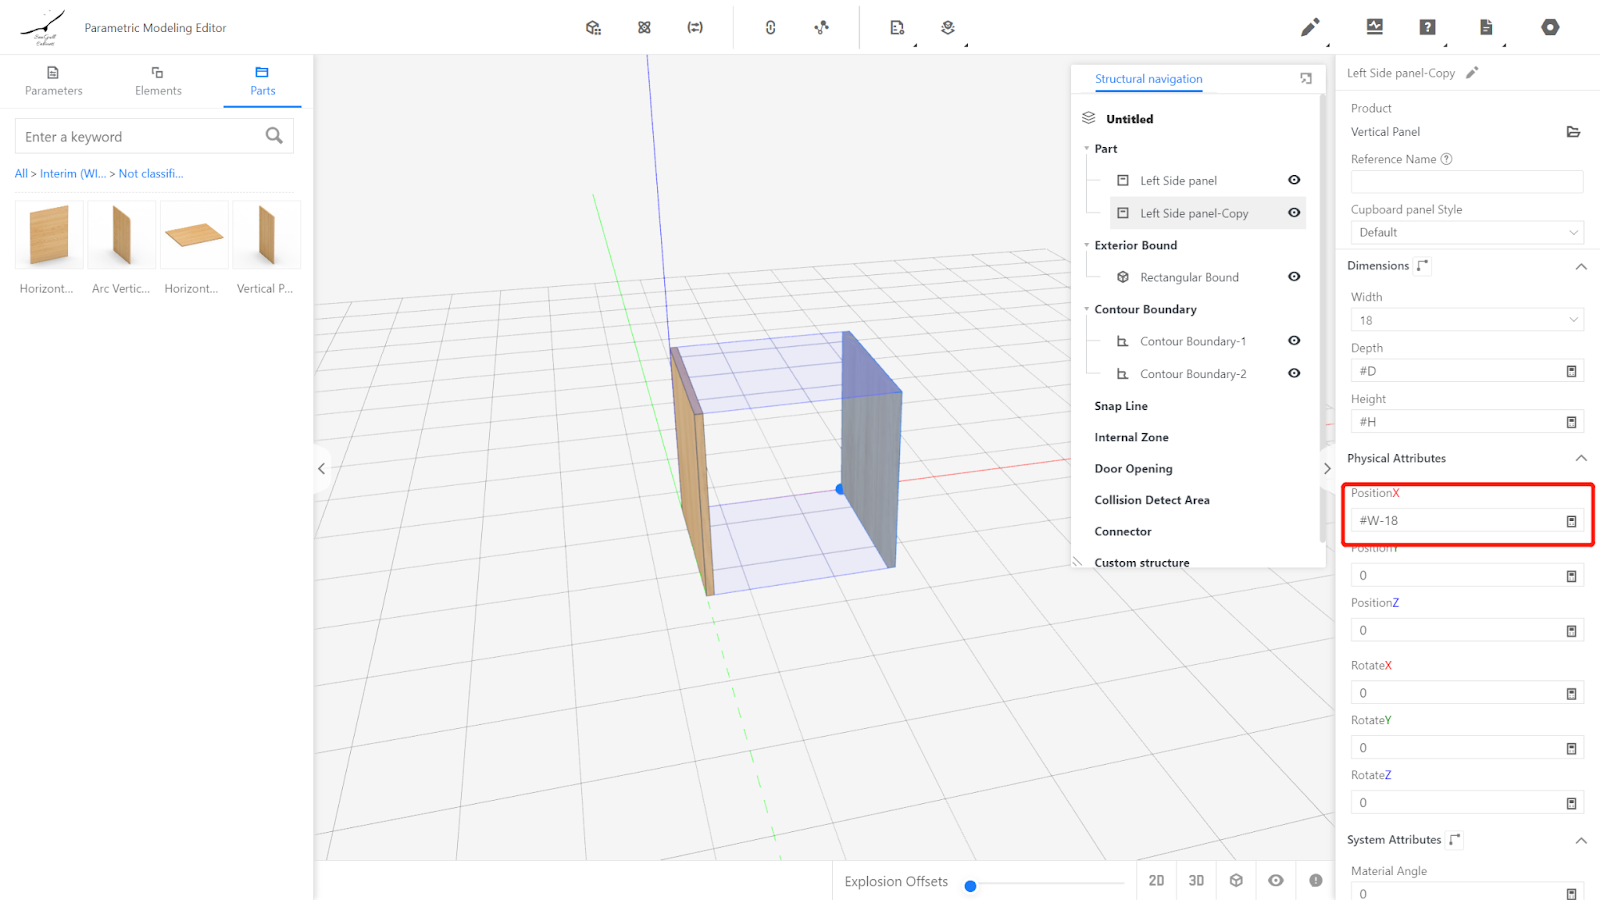
Right-click on the panel model and choose "Copy," or select the model in the structure navigation and right-click to copy, obtaining a copy named "Right Side panel." Similarly, modify the panel name for the right side.
![](https://helpcenter.coohom.com/hubfs/Knowledge%20Base%20Import/coohom-f8347f72ad46.intercom-attachments-7.comio807768014ce5bd3692616588e6e9e2aaeawfnMU1usxZ5dO6QVrtpQLUqzIFqHIoFjahtOJfzezGwDz5C4XzDP1JWtx5ucJA.png)
Set the physical properties of the right side panel:
Width: 18, Depth: #D, Height: #H.
Position X: #W-18; Position Y: 0; Position Z: 0.
Rotation X: 0; Rotation Y: 0; Rotation Z: 0.
![](https://helpcenter.coohom.com/hubfs/Knowledge%20Base%20Import/coohom-f8347f72ad46.intercom-attachments-7.comio8077680430be047dfdacf4b284136af12MyhOCI39Hm4y1s-L7BEj-IJN9kvgGDkX35L05C4yLzdRbYqI7JsD6LDrV-46IVR.png)
Click on the Part library - Semi-finished Products Library, and insert a flat panel.
![](https://helpcenter.coohom.com/hubfs/Knowledge%20Base%20Import/coohom-f8347f72ad46.intercom-attachments-7.comio807768056e70f03949a6531bb97cb8e61ICbNqajQVx8QCufeM5i4F9zmX4e2FRcrpSiVXodccyET48kDeIzfwdHYiIRsbhS.png)
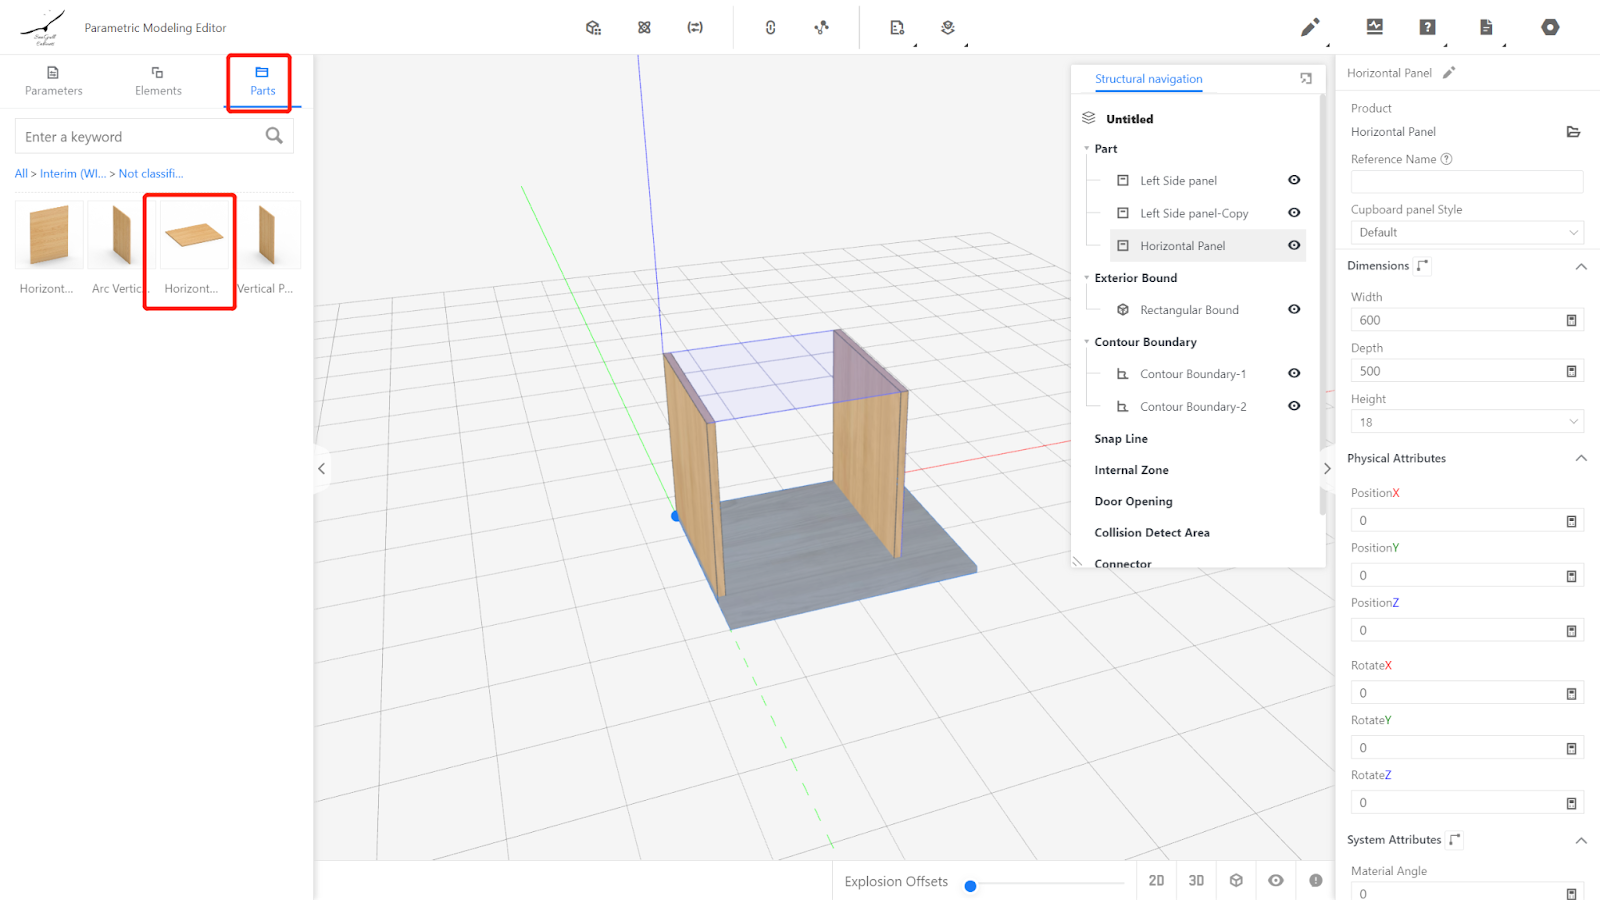
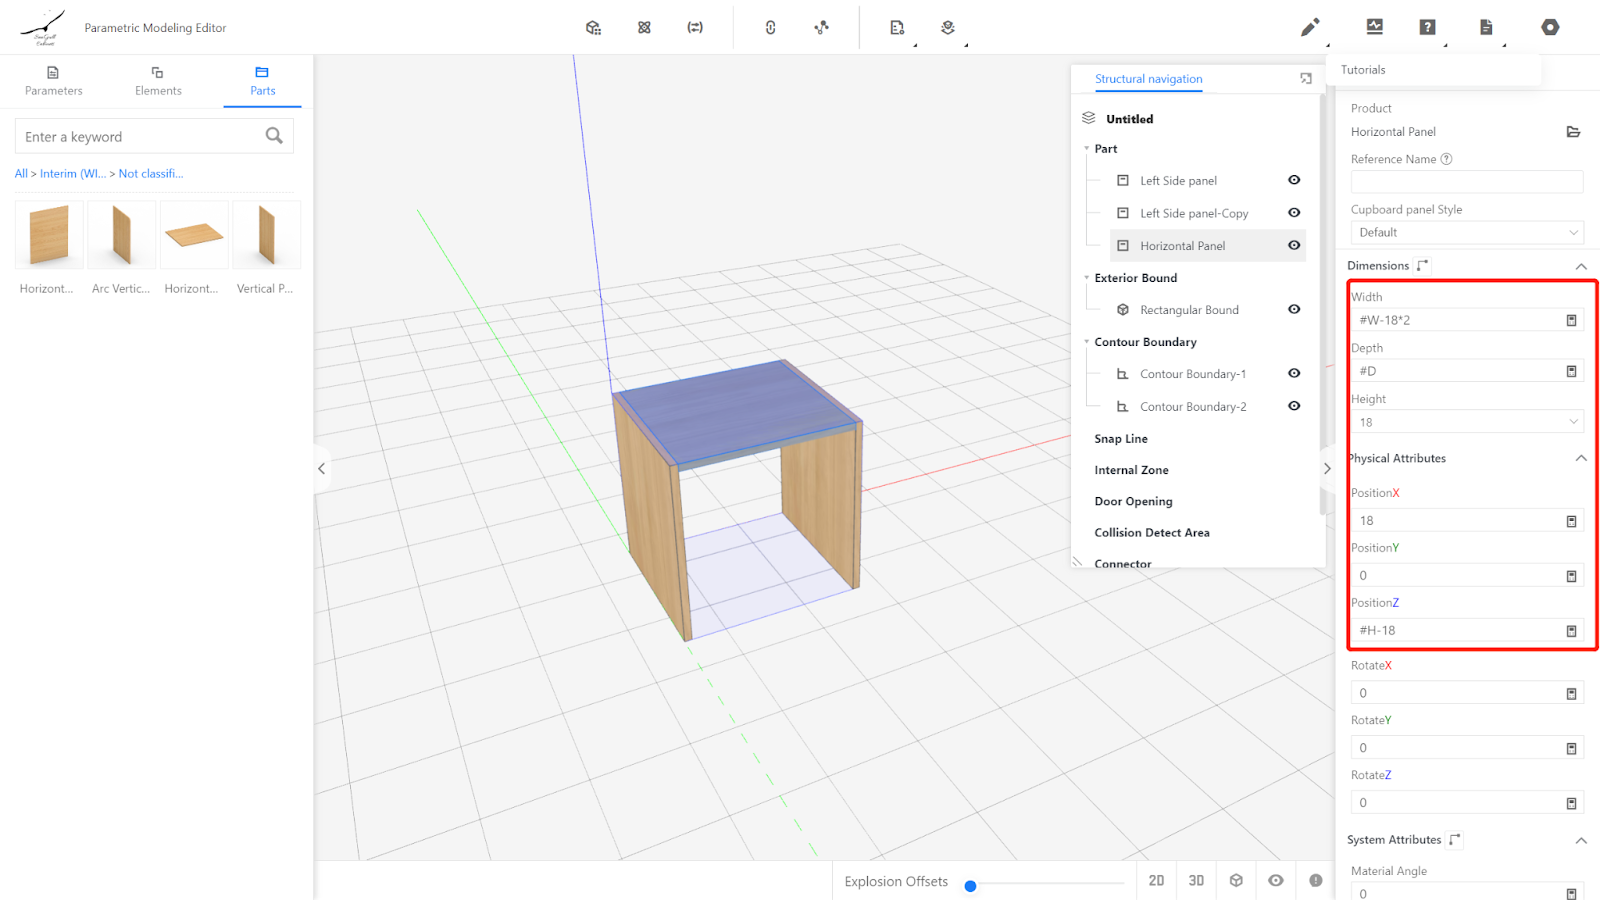
Change the name to "Top panel" and set the physical properties:
Width: #W-18*2, Depth: #D, Height: 18.
Position X: 18; Position Y: 0; Position Z: #H-18.
Rotation X: 0; Rotation Y: 0; Rotation Z: 0.
![](https://helpcenter.coohom.com/hubfs/Knowledge%20Base%20Import/coohom-f8347f72ad46.intercom-attachments-7.comio807768072dc43ce3318c47ef8988c27davOFR19tnoboM9LvCbVn_Q2Y6Sa1lFalfHUCD_gE3u8WLpANzcvvyutW1IT4KFFL.png)
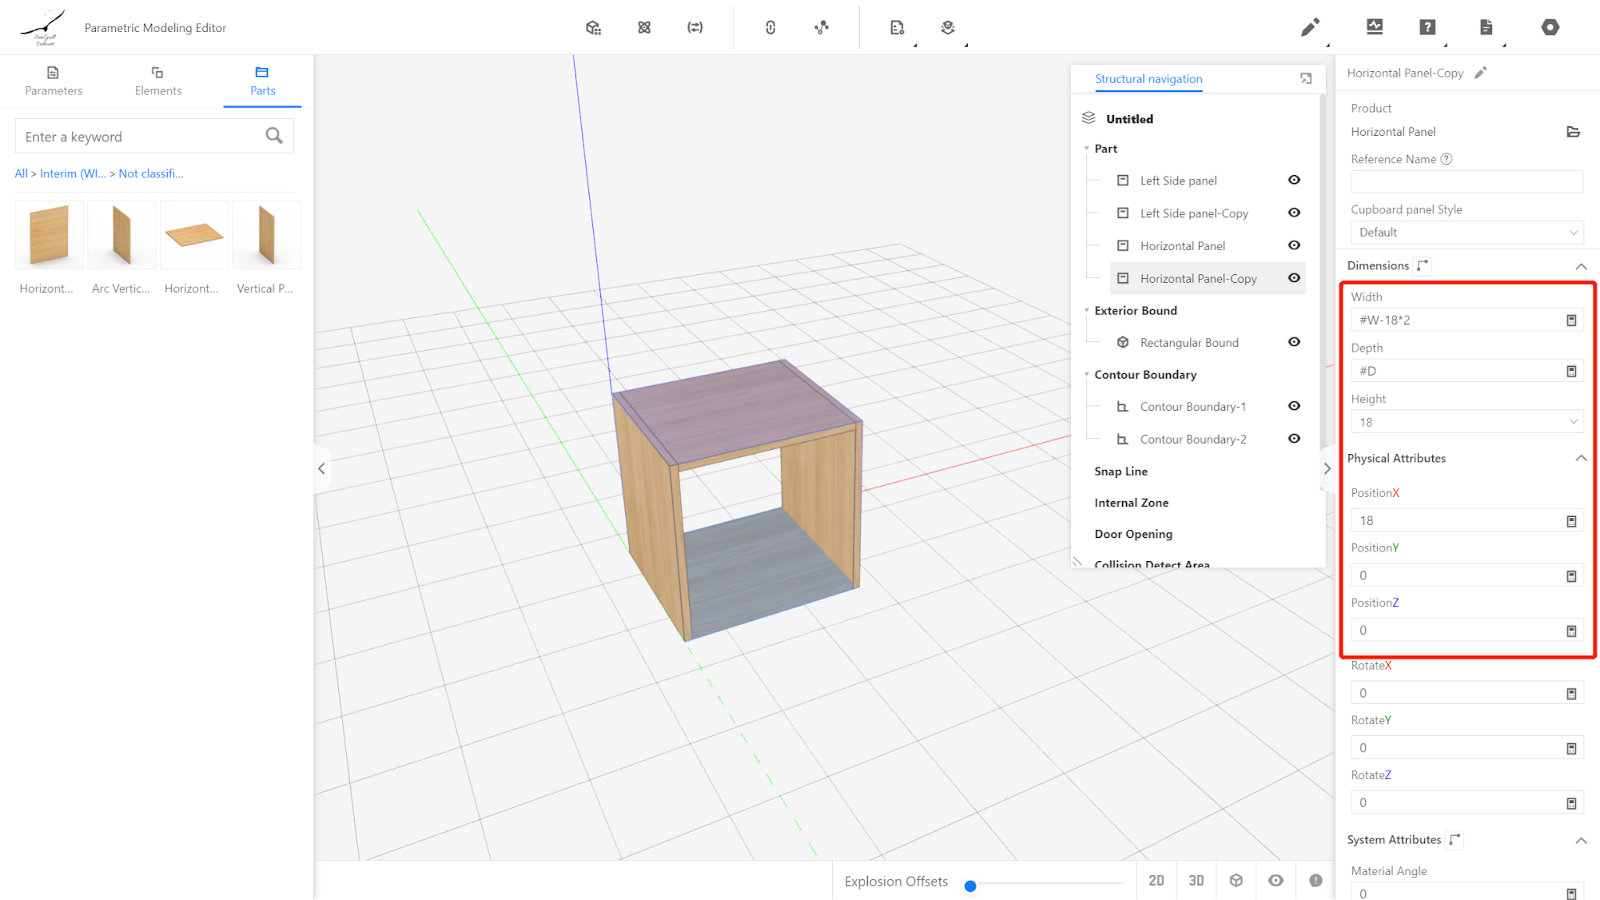
Copy the top panel and edit the physical properties to obtain the bottom panel.
Width: #W-18*2, Depth: #D, Height: 18.
Position X: 18; Position Y: 0; Position Z: 0.
Rotation X: 0; Rotation Y: 0; Rotation Z: 0.
![](https://helpcenter.coohom.com/hubfs/Knowledge%20Base%20Import/coohom-f8347f72ad46.intercom-attachments-7.comio8077680865911f891fa9a5a634ced4ee3FHukLtq4S4fyX16MmeahYdO5VvrP7aODIKHi7PnNA4CCrl9VVTO_3J59XCwRnlp.png)
Click on the sub-model library - Semi-finished Products Library, insert a vertical panel, and rename it as "Back Panel."
![](https://helpcenter.coohom.com/hubfs/Knowledge%20Base%20Import/coohom-f8347f72ad46.intercom-attachments-7.comio80776811079052b13925110a244e27ca9O0QOu9Uz93MDblVnYO9PykGkcPeDgLsf2t64zUrtt9aUPCo-aGYmtcya3_Bq3Tz.png)
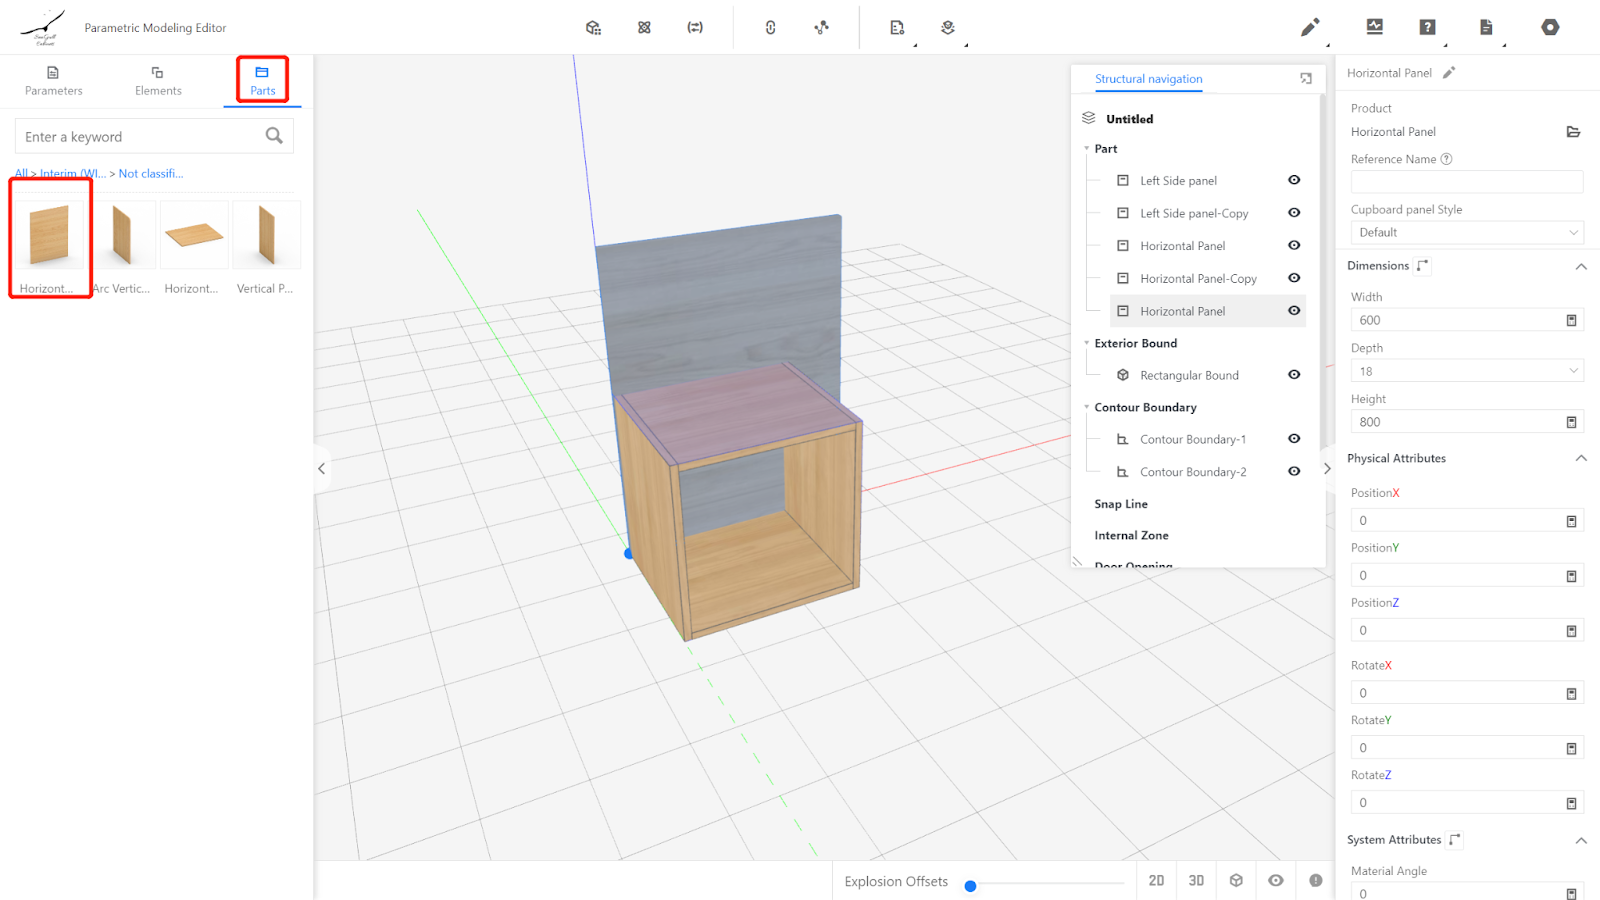
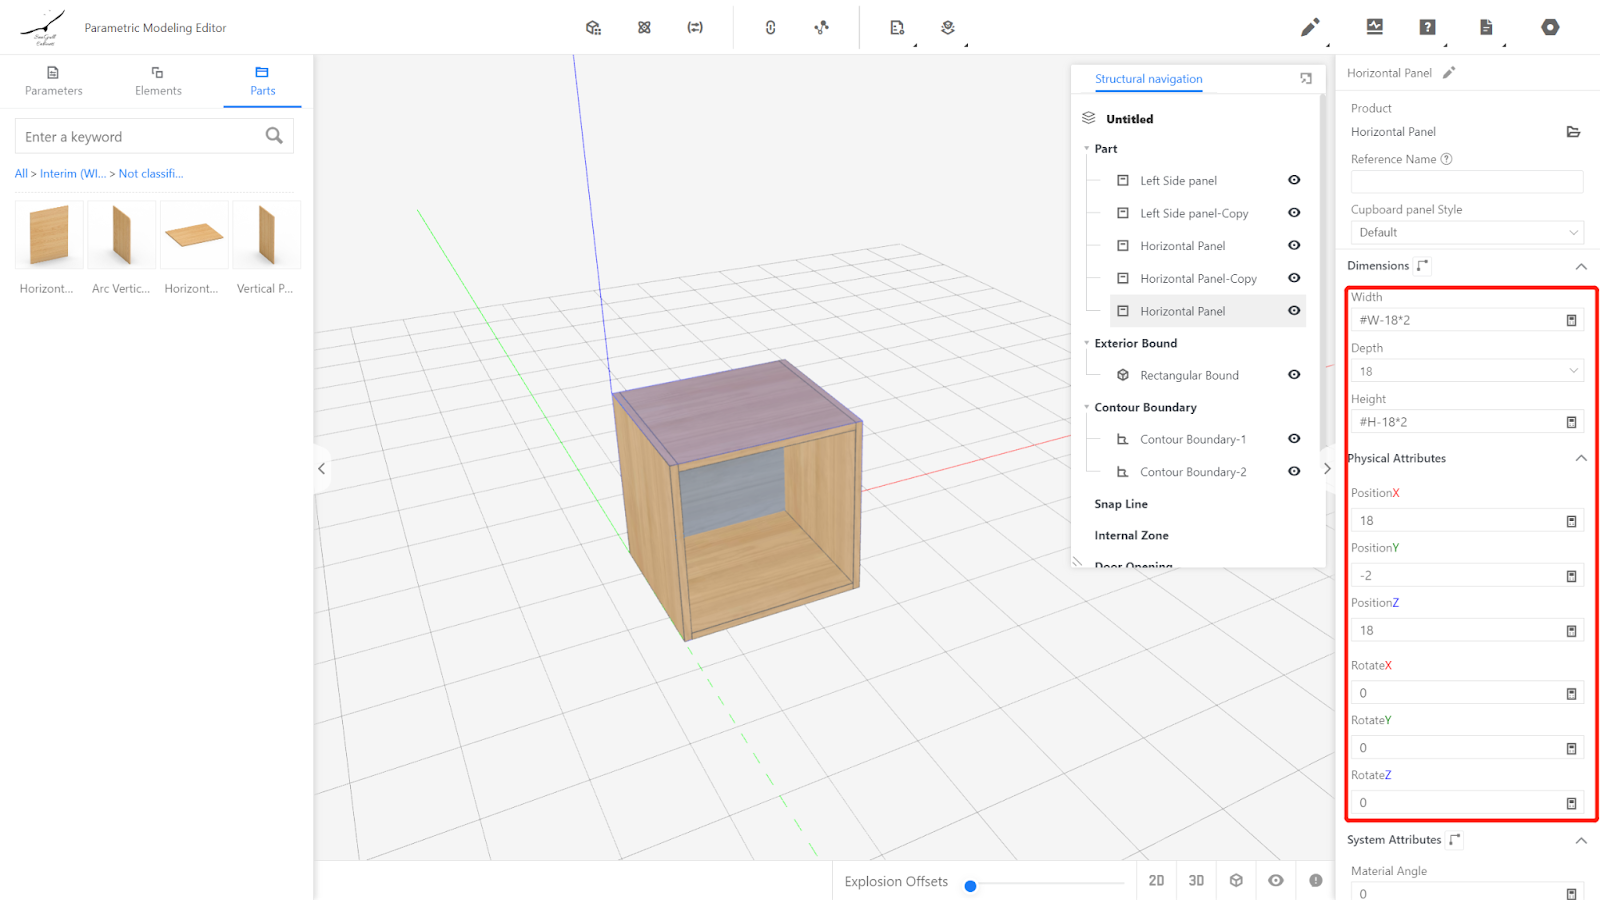
Set the physical properties of the back panel:
Width: #W-18*2, Depth: 18, Height: #H-18*2.
Position X: 18; Position Y: -2; Position Z: 18.
Rotation X: 0; Rotation Y: 0; Rotation Z: 0.
![](https://helpcenter.coohom.com/hubfs/Knowledge%20Base%20Import/coohom-f8347f72ad46.intercom-attachments-7.comio8077681239d6b2af85c94fbc607162e851b_u6tkepegVuEzAlzXdltr000Z_sF8nf5XigCMPSKg9jqMfmlLZRhPSEzDOBb8.png)
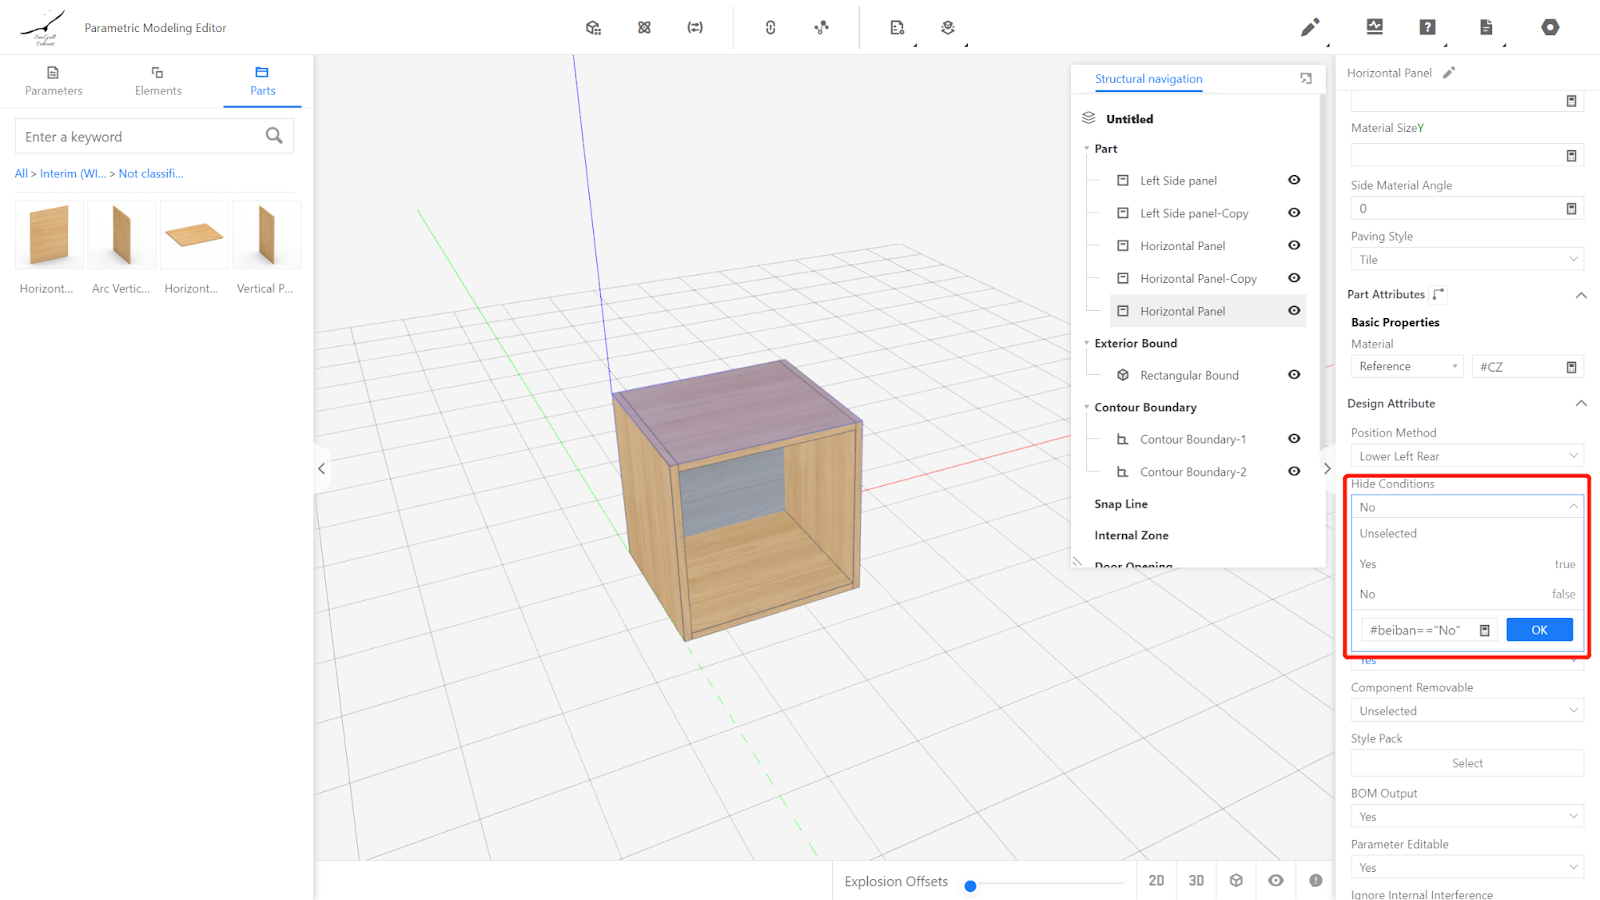
Set the hide condition for the back panel:
#beiban=="No"
![](https://helpcenter.coohom.com/hubfs/Knowledge%20Base%20Import/coohom-f8347f72ad46.intercom-attachments-7.comio807768149dccd248d415fbe3c9c734167hd_c8XiLFUk2WSb3tAowKCBuoqpNl4lnwPz_asrsw-OmBZc-hAW77BTcly7QYWs.png)
IV. Check the model and save it to the library:
Modify the extreme dimensions of the model and see if the model changes correctly.
![](https://helpcenter.coohom.com/hubfs/Knowledge%20Base%20Import/coohom-f8347f72ad46.intercom-attachments-7.comio807768164aebea446d13a70780da4e483UluIob3JKPRe75TfnYK7aXO2X5_DELxiW8mJ7OJegEsCr5T8C3cRHqS3sV7wEcU.png)
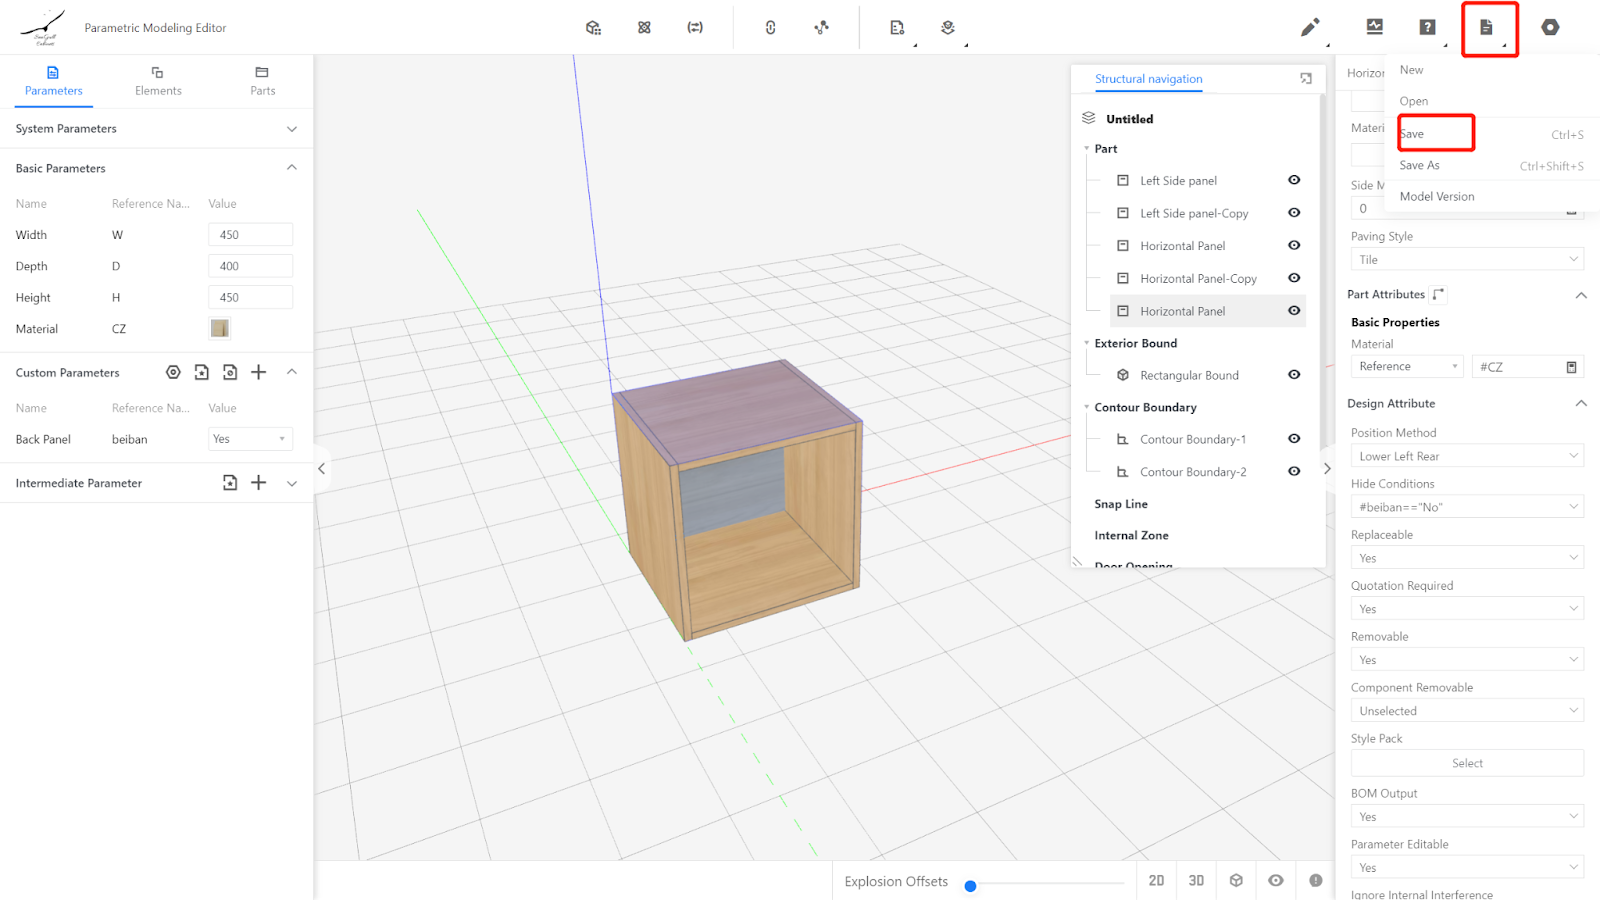
After confirming there are no errors, click on the file in the upper right corner, select "Save," choose the subdirectory for saving, give it a name, and click "Save."
![](https://helpcenter.coohom.com/hubfs/Knowledge%20Base%20Import/coohom-f8347f72ad46.intercom-attachments-7.comio8077681829a57ae0a3fd5d2259b7fabe6pXbLaUhuH8VPZt9eJcU6qLUVTuv98C7imftlE0ez3pv8zDFWVD03cC7F9ezlR2E.png)
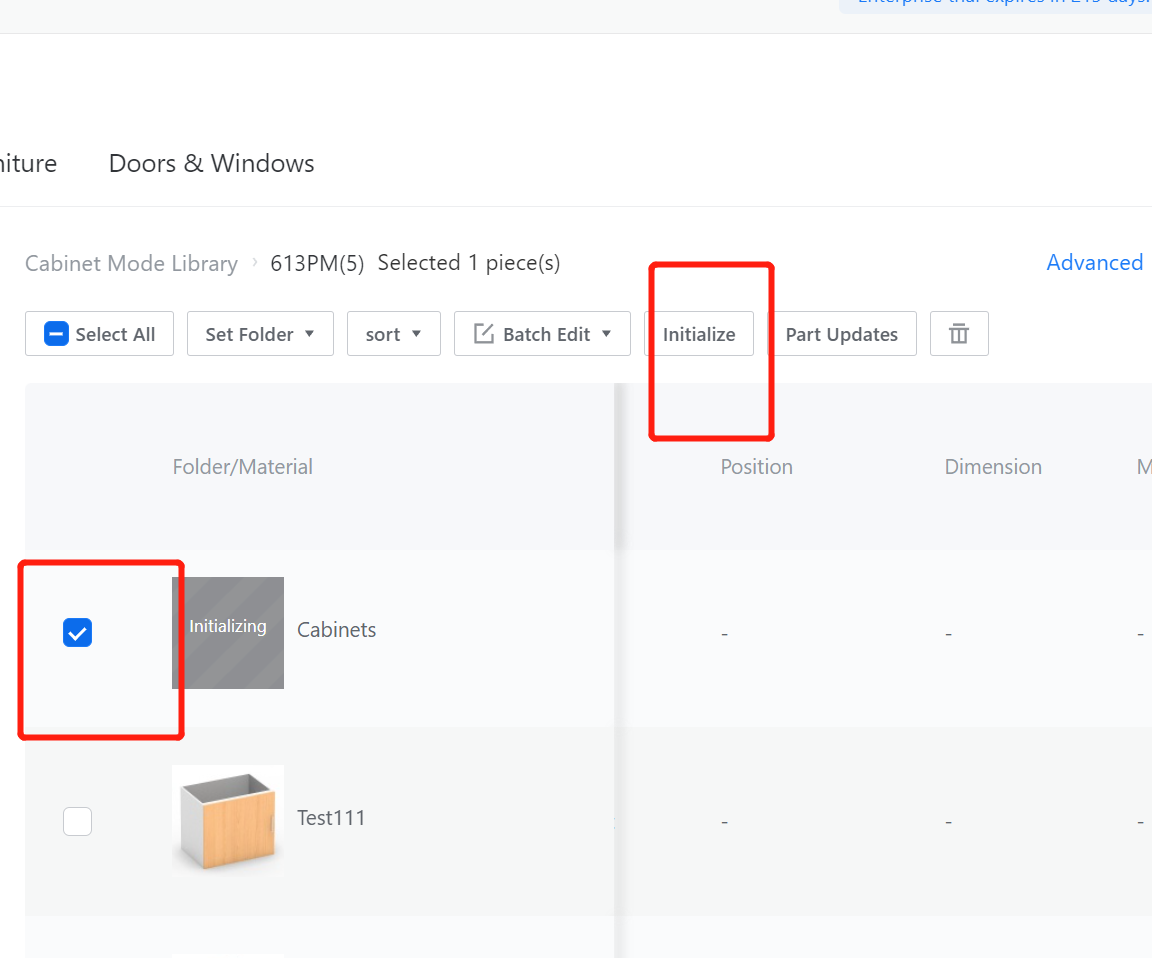
On the backend page, find the model, select it, and click "Initialize" to place it in the library.
![](https://helpcenter.coohom.com/hubfs/Knowledge%20Base%20Import/coohom-f8347f72ad46.intercom-attachments-7.comio8077681929c609456b915ea15aab6f8e4IR9Za0Lgdrc86OwJPbn9E-M4Ke-Sl8E3RrH1h-vVtIxIvBw11f0hEhMyc74fZ4n.png)