1.Function introduction
Through style constraints, you can quickly and uniformly set style-related parameters for the models in the design plan, such as modifying the design panel colors of all wall cabinets, modifying the handle style of all door panels, etc. At the same time, when it is applied, it will continue to produce the above effect on subsequent newly dragged models into the scene. Designers only need to select the corresponding style template, and then perform personalized editing on the style items in the template to complete the operation. Therefore, when it is necessary to make unified style adjustments to the scheme, this function can quickly achieve global and overall modifications and ensure subsequent consistency.
This article is a background configuration tutorial description of this function.
2. User-oriented
Merchant users with corresponding functional permissions
2. Backend configuration instructions
-
Entrance
Entrance
Corresponding to customized tool lines --》Advanced Configuration--》Style Constraints
-
The style constraints of different tool lines are not universal. For example, the style constraint template made by kitchen and bathroom customization does not exist and is not available in the wardrobe tool line.
-
The style constraints of different tool lines are not universal. For example, the style constraint template made by kitchen and bathroom customization does not exist and is not available in the wardrobe tool line.
-
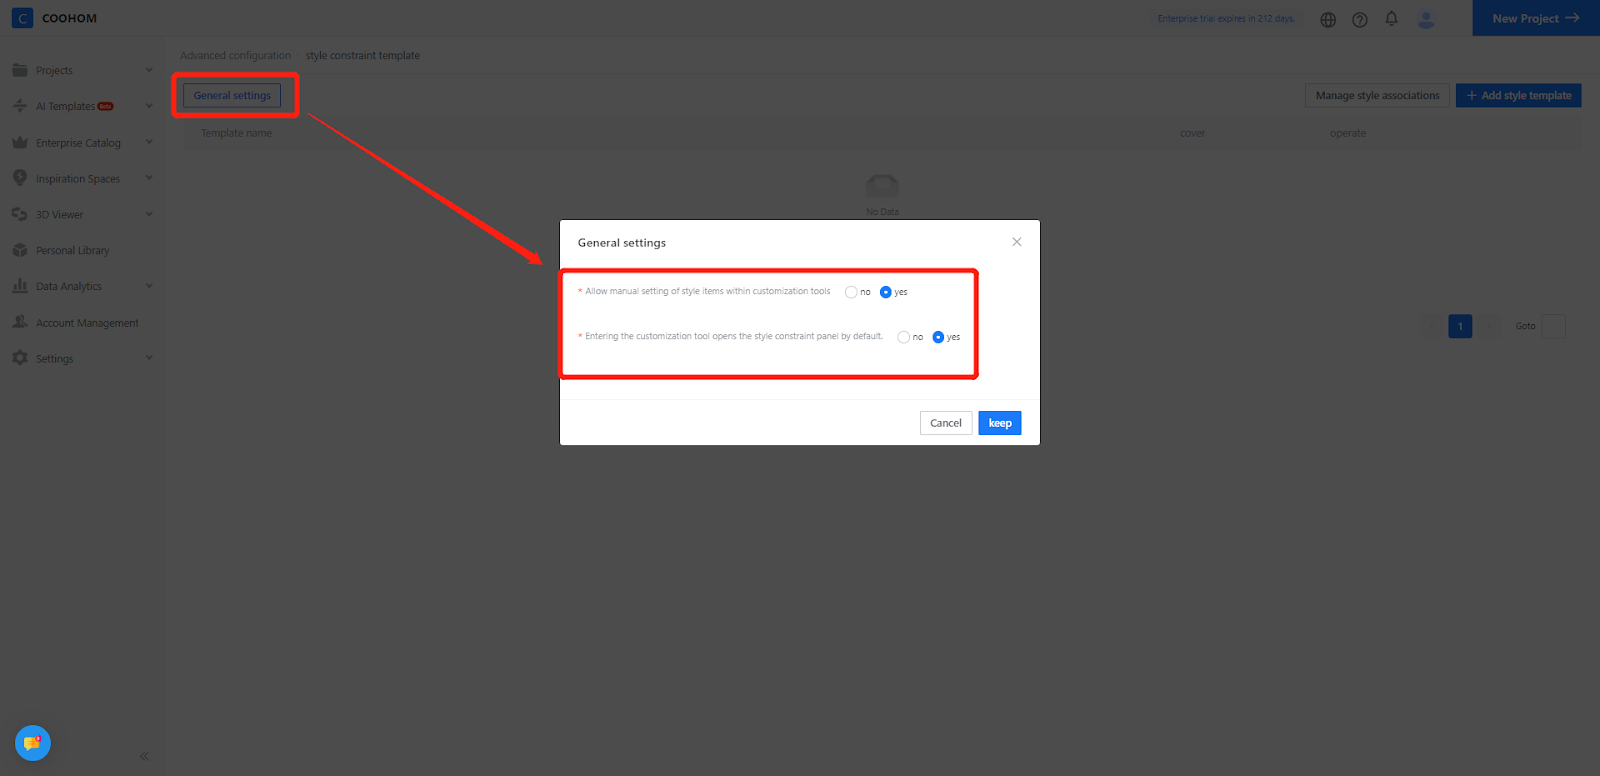
General settings
General settings
as literally:
-
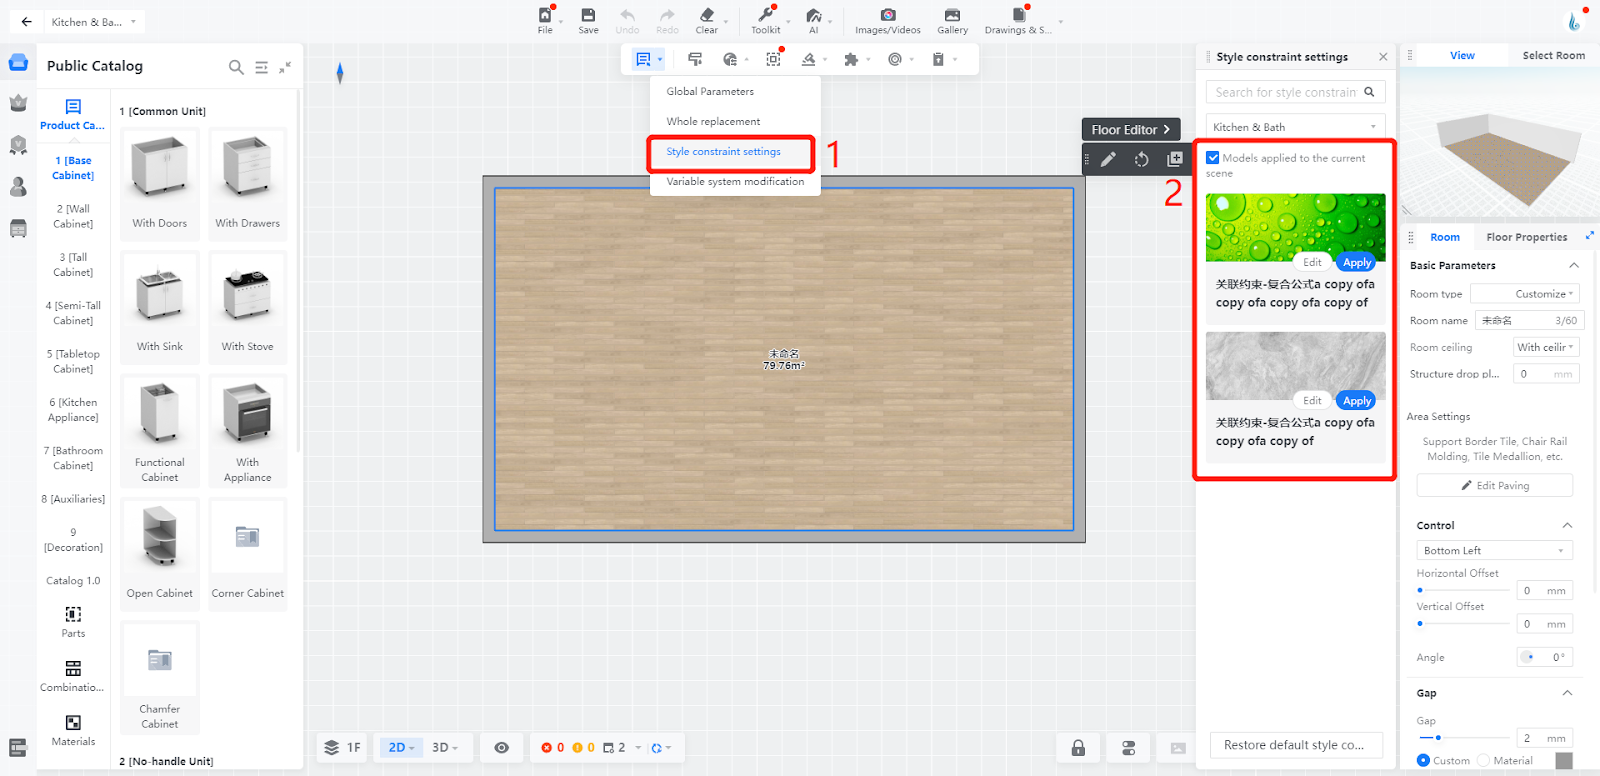
Allow manual setting of style items in the tool, select Yes, then button ① will appear as shown in Figure 2; otherwise, there will be no button ①
-
When entering the customization tool, the style constraint panel will be opened by default. If you select Yes, the style constraint window will automatically pop up as shown in Figure 2 below. Otherwise, it will not open automatically. You need to manually click the button ① before the window pops up ②
Allow manual setting of style items in the tool, select Yes, then button ① will appear as shown in Figure 2; otherwise, there will be no button ①
When entering the customization tool, the style constraint panel will be opened by default. If you select Yes, the style constraint window will automatically pop up as shown in Figure 2 below. Otherwise, it will not open automatically. You need to manually click the button ① before the window pops up ②
3. Default template settings
-
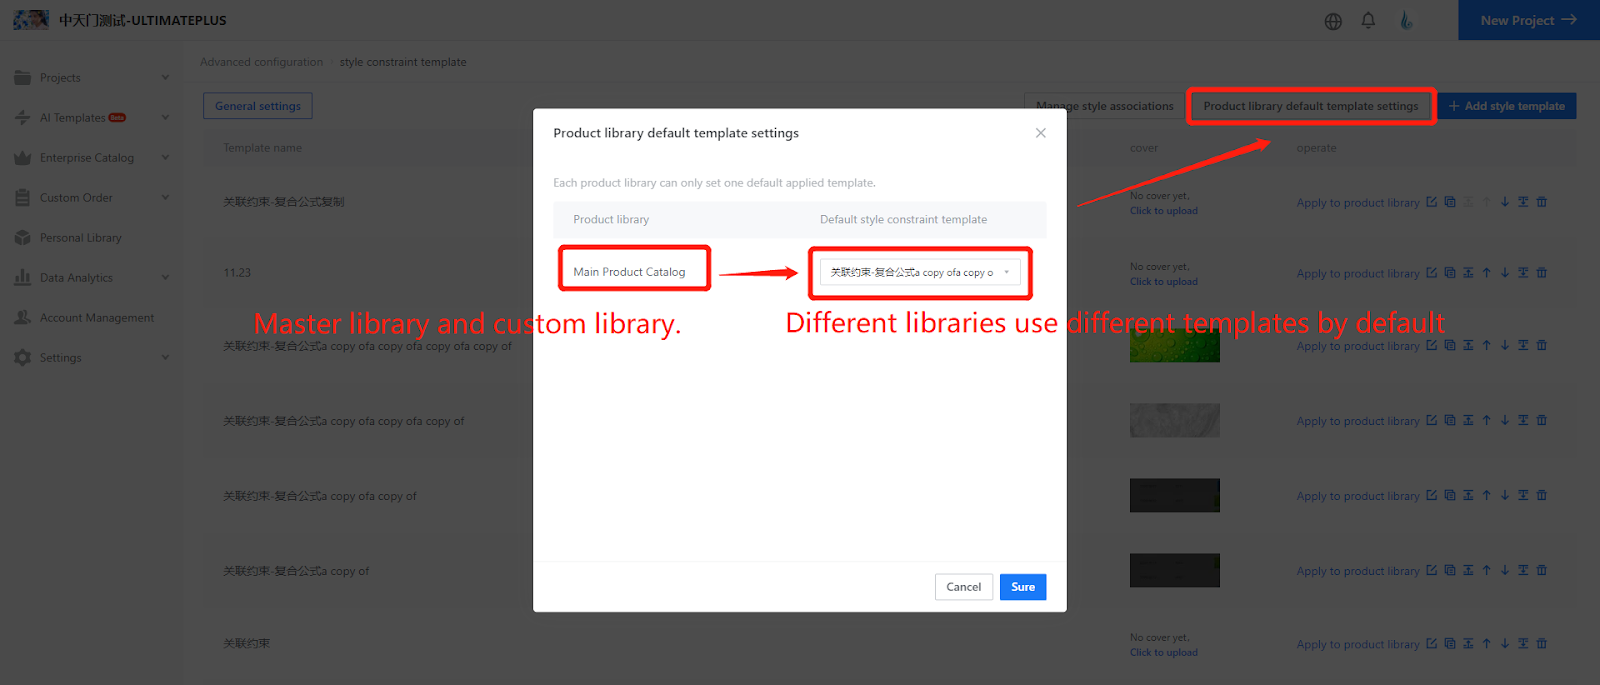
The role of the default template: every newly dragged model into the scene will automatically apply the settings in the template (prerequisite: meets condition) . For example: I set the base cabinet body material to "ABC" in the style template, then I drag the base cabinets that meet the requirements, the material of the cabinet will automatically change to “ABC"
-
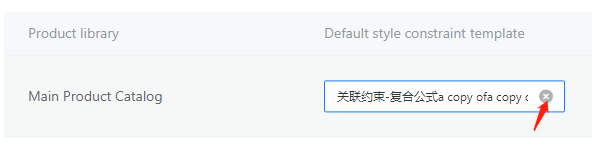
Each library can set up to one default template (or not set it)
The role of the default template: every newly dragged model into the scene will automatically apply the settings in the template (prerequisite: meets condition) . For example: I set the base cabinet body material to "ABC" in the style template, then I drag the base cabinets that meet the requirements, the material of the cabinet will automatically change to “ABC"
Each library can set up to one default template (or not set it)
If you set a default template and no longer want it, you can click "×" to clear it.
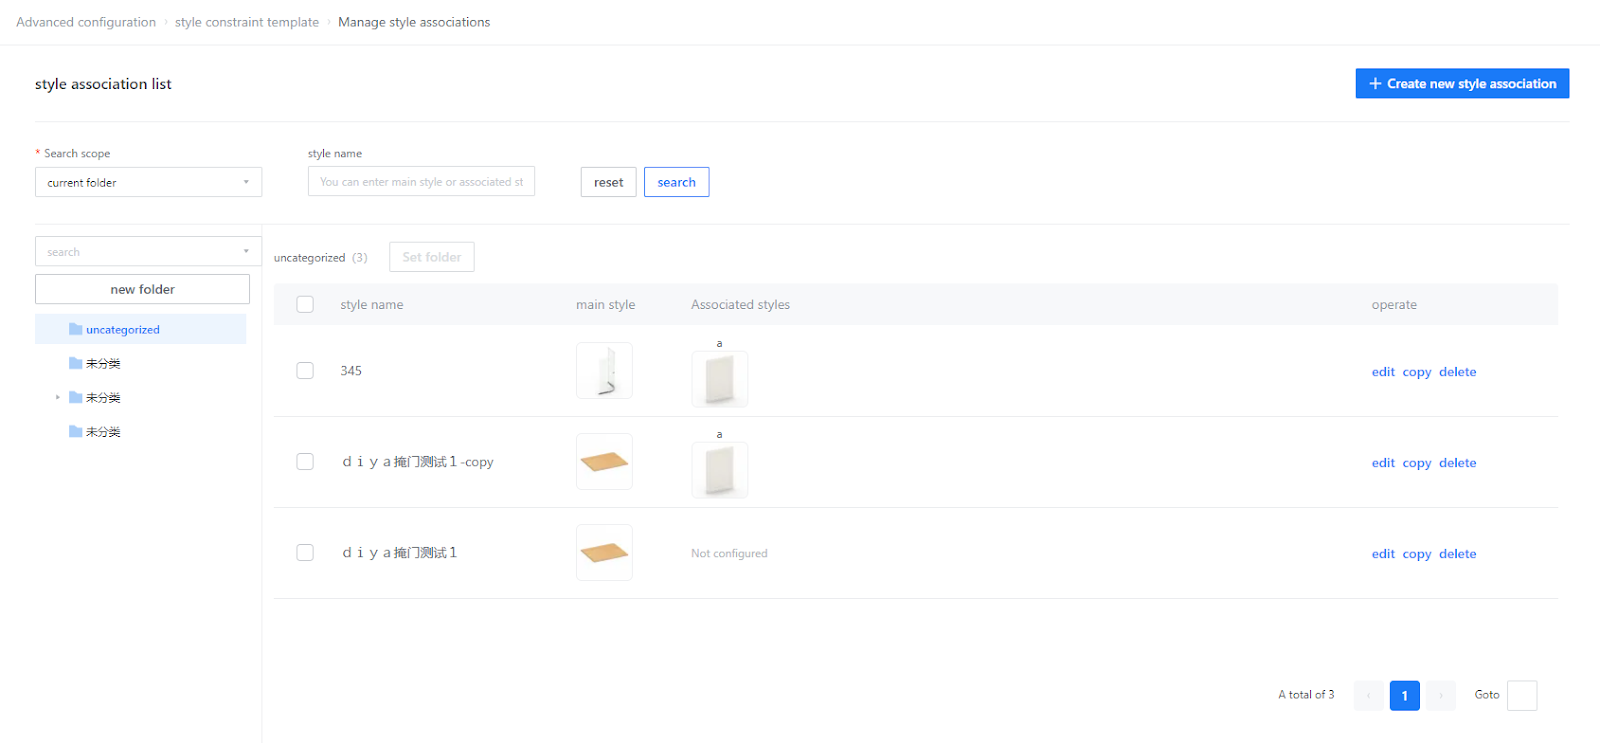
4. Manage style associations
The purpose of style association is to perform one-click replacement based on the mapping relationship
For example:
-
In the background
In the background
-
Model A has an opening door, A withdrawable surface, A flip door, and A national door.
Model A has an opening door, A withdrawable surface, A flip door, and A national door.
-
B model has B opening door B sliding surface B flip door B fixed door
B model has B opening door B sliding surface B flip door B fixed door
-
[Front-end design in progress]
[Front-end design in progress]
-
I am a designer, of course I want simple AB
I am a designer, of course I want simple AB
-
Instead of performing 4 replacements respectively: A opens the door for B to open, A opens the door to B, A flips the door to B,
Instead of performing 4 replacements respectively: A opens the door for B to open, A opens the door to B, A flips the door to B,
A fixed door replaced with B fixed door
4.1.Create style association (please refer to 7 examples)
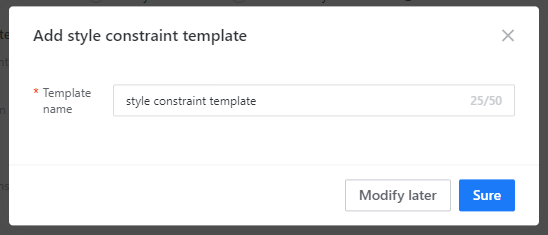
5. Add style template
5.1 Create a new style template and modify the name of the style template
5.2 Create a folder and modify the folder name (optional)
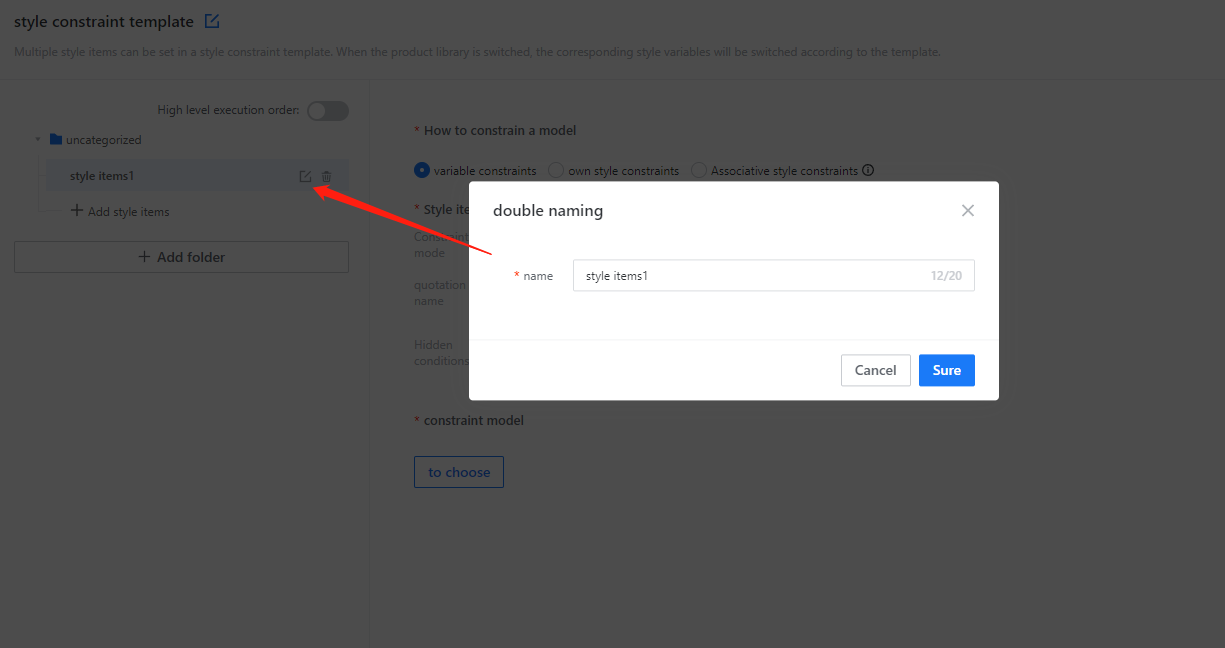
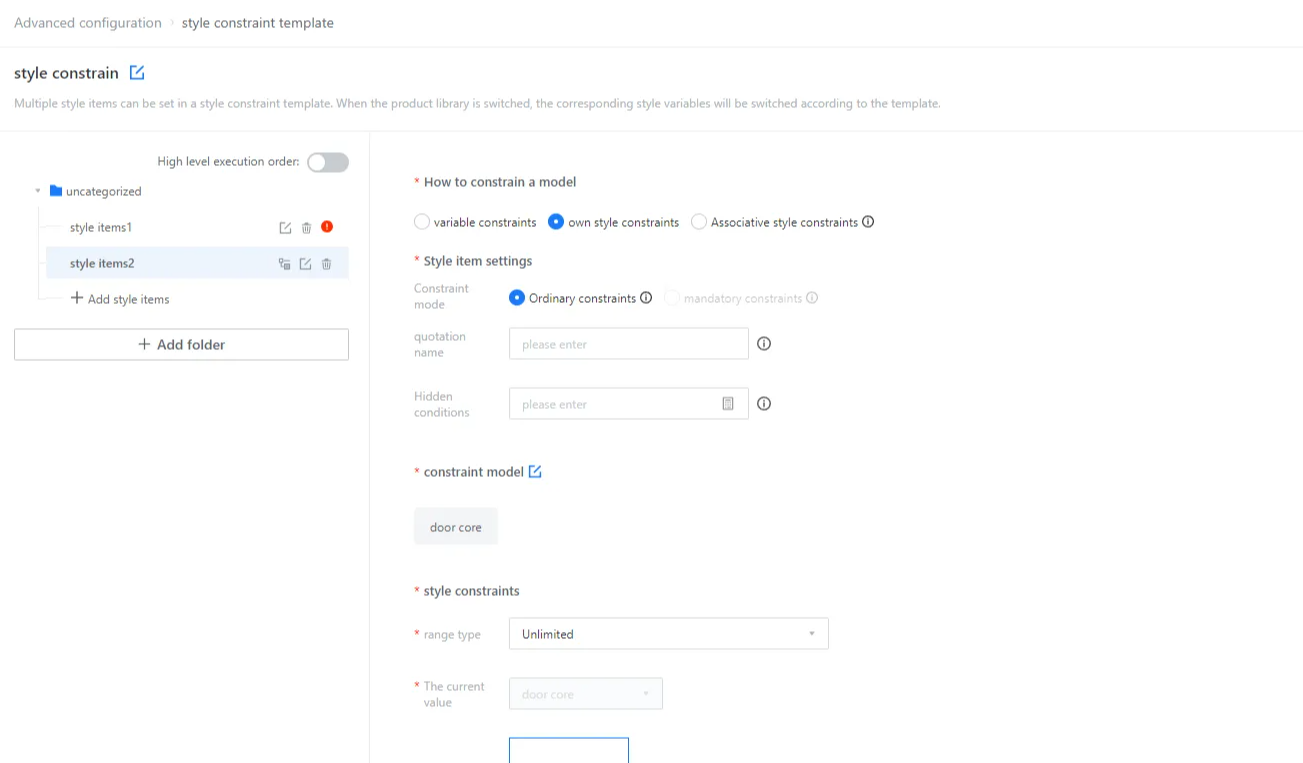
5.3 Create style items
①How to constrain the model
Variable constraints: The meaning of this style item setting is to modify the variables of the model, which is a variable constraint.
Style constraints: The meaning of setting this style item is to modify the style of the model (such as door panel style, handle style)
It is a style constraint
Associative constraints: An upgraded version of style constraints.
-
Style constraints: Only the model itself can be replaced
Style constraints: Only the model itself can be replaced
-
Associated appointments: When the model itself is replaced, a series of other matching styles are also replaced.
Associated appointments: When the model itself is replaced, a series of other matching styles are also replaced.
-
(For example: if the designer wants to replace all A-type door panels in the scene with B-type door panels, the designer only needs to select "A" → "B" in the scene, A opens the door instead of B's opening, A's side replaces B's side, and A's fake door replaces false door B, flip door A replaces flip door B)
(For example: if the designer wants to replace all A-type door panels in the scene with B-type door panels, the designer only needs to select "A" → "B" in the scene, A opens the door instead of B's opening, A's side replaces B's side, and A's fake door replaces false door B, flip door A replaces flip door B)
· Association constraints need to be configured in advance - the entire set [Management Style Association]
· Sub-style items unique to style constraints and association constraints, see "

Sub-style items" in "5.3.1 Field Description" for details
②Weak constraints or strong constraints
Weak constraint: When applying this style item, the parameter type and range of the model itself will not be changed, only the current value will be modified.
Strong constraints: When applying this style item, the parameter type, range and current value of the model itself will be changed (see the case in 5.3.2 for details)
Example②)
tips:
· When there is a weak constraint, there is verification logic of "whether the current value is within the range", but there will be no prompt.
(For example: the weak constraint style attempts to change all parameters A of the model to 3, but when modeling the model, the parameters can only be selected as 1 or 2. This
The parameter A of the model will not be forced to become 3, and the software will not prompt)· Regardless of strong constraints or weak constraints, after the model is modified by style constraints, the model can still be selected and modified individually!
③Citation name
Example: Suppose there are 2 style items, one A and one B. If the visibility of style item B and the visibility of drop-down options are related to style A, then B must reference the reference name of style item A.
④Hidden conditions
Literally, whether the style item should be displayed in the tool for users to adjust and select.
⑤ True classification and expansion rules
Set what type of model this style item will take effect on.
Q: When do I need to use extended rules?
A: Two scenarios
1. Distinguish style items. For example: "Base Cabinet Door Handle" and "Wall Cabinet Door Handle" are both handles, but how to distinguish whether the handle is for the base cabinet door or the wall cabinet door? At this time, it needs to be achieved through the cooperation of extended rules and identification.
2. A style item, but the objects it acts on are not all models of the true classification. For example, a "light plate material"
The style items are all special panels, but many special panels are used to model exposed panels, veneered sides, closing plates, and fascia boards. I only hope that the true classification is a special panel and the name is "see "Light board" model takes effect
Q: How do you understand "logo"? Which ones can become logos?
A: When we need to classify a type of model, we naturally need to distinguish features based on "identification", such as variable values, product details pages, and custom process attributes. These three categories are currently supported as "identification"
tips:
· A certain model needs to satisfy both true classification and expansion rules before it will respond to the style item
· You can select multiple true categories
· For details on the syntax of expansion rules, please refer to "6. Expression Syntax Description"
· Support typing search when selecting true classification
⑥ sub style item
· Only style items of [own style constraint] and [associated constraint] support the creation of sub-style items
· Sub-style items only support "weak constraints"
· The sub-style item and the corresponding main style item must act on the same model
· Sub-style items are usually used for two related style items (for example, if you select a door style, you naturally need to adjust the door material, but
The optional range of door materials depends on the door style you choose, as shown in the figure below)
-
Initial value: Specific to substyle items. For example: If door panel style is selected as door panel A, then when selecting door panel material, the software will automatically retrieve the CZ variable of door panel A from the background and obtain the current value and material package of CZ as the basis for display and selection in the style item.
Initial value: Specific to substyle items. For example: If door panel style is selected as door panel A, then when selecting door panel material, the software will automatically retrieve the CZ variable of door panel A from the background and obtain the current value and material package of CZ as the basis for display and selection in the style item.
⑦High level execution order
· Turn off advanced execution order: Each style item is executed one by one in the order of arrangement, from top to bottom (serial)
· Turn on advanced execution order: Each style item is executed in order from small to large according to the number. If the number is the same, it will be executed in parallel.
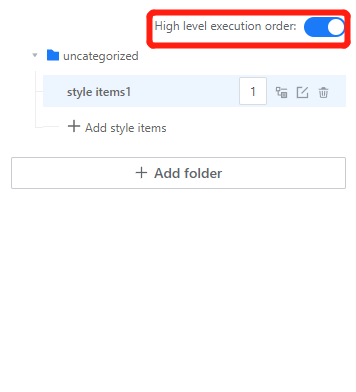
· Turning on this setting will help improve the response speed after applying style constraints in the tool
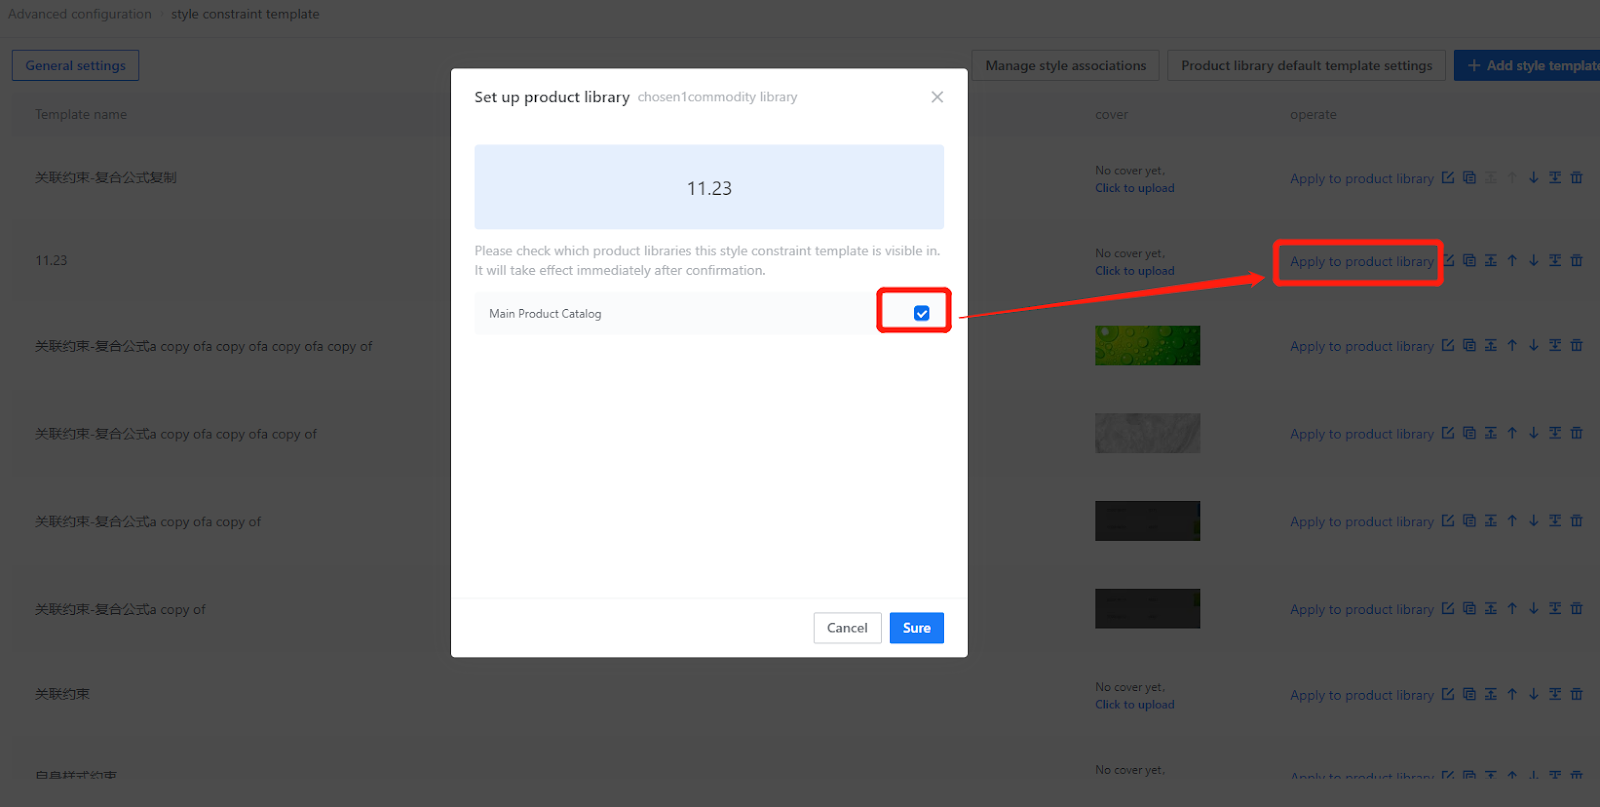
5.4 Apply style templates to the library
· One template can be applied to multiple libraries
· The template is created, but it is not applied to any library, which is equivalent to the template not being used and having no effect.
· It is not necessary to open a custom library to use style constraints. Style constraints can be used even if there is only the main product library.
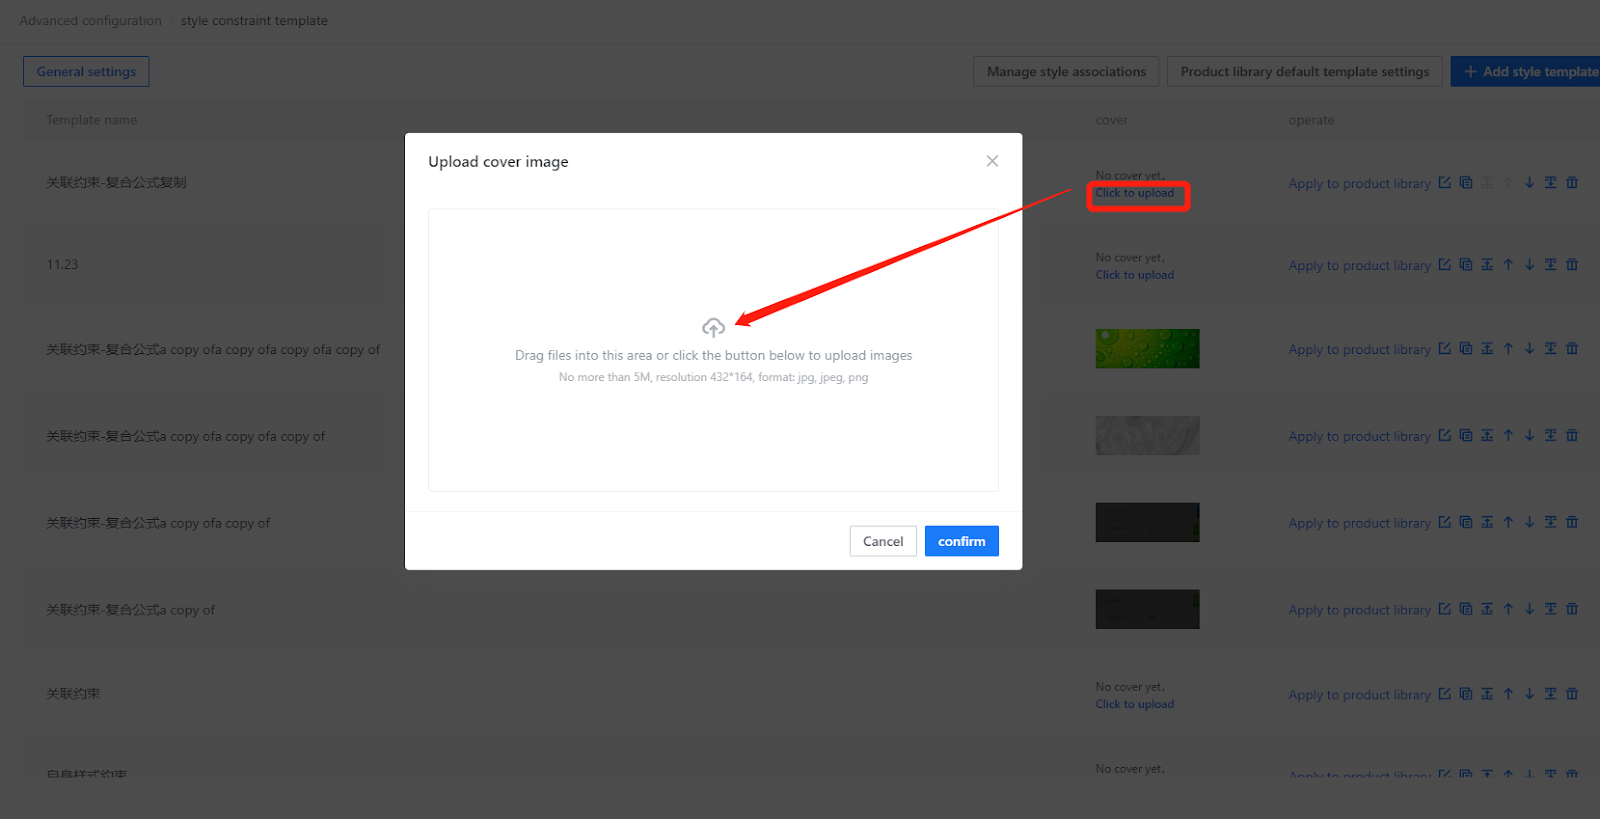
5.5 Style Constrained Cover
Set a cover for the style template that matches the style appearance.
6. Expression syntax description
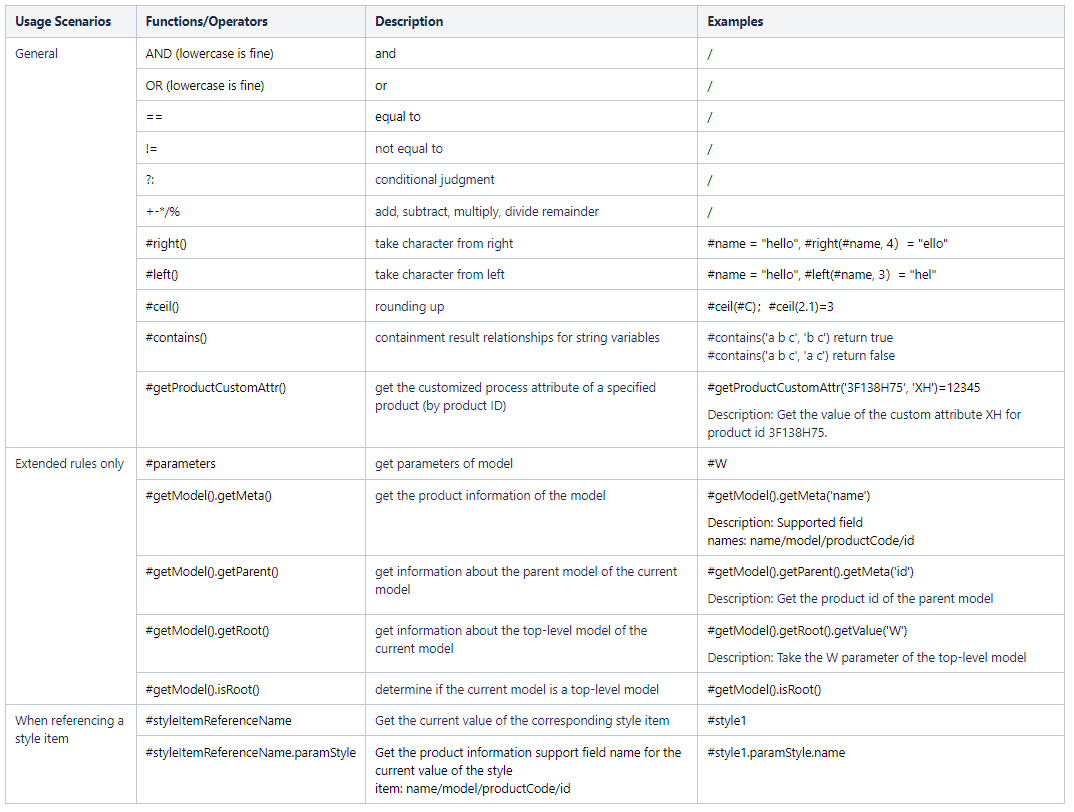
Some common usage examples of combinations
· Extended rules to find models whose product names contain "door" #contains(#getModel() .getMeta('name') ,door)
· Expand the rules to find the model with the top-level model’s custom process attribute XH being 1:
#getProductCustomAttr(#getModel).getRoot().getMeta('id) ,‘XH’ ) == 1
Determine whether the current value of style item A, the product name, contains "glass #contains(#A.paramStyle.name, 'Glass’)
-All the above function usage instructions can be directly queried and associated in the expression editor.