Contents
-
【Design Tool】How to modify the display of "Unnamed" on the cover when sharing a panorama
-
【Rendering】A New Experience for Lightning-Fast Renderings!
-
【Panorama Editor】 Available To All Users
-
【Advanced Tool】Support selecting handles in component mode
-
【Floor Plan Drawing】Drawings show interactive position changes
-
【Floor Plan Drawing】Adding high-resolution file download for floor plan drawing
-
【Floor Plan Drawing】Floor plan supports a wide range of color styles
-
【Enterprise Background】Hidden Sub-Account Projects
-
【Enterprise Catalog】Set Default Currency
-
【Inspiration Spaces】Replacement Items have been increased from 19 to 25
-
【Photo Studio】The new version of the studio shooting adds a studio editor
【Design Tool】How to modify the display of "Unnamed" on the cover when sharing a panorama
【Rendering】A New Experience for Lightning-Fast Renderings!
【Panorama Editor】 Available To All Users
【Advanced Tool】Support selecting handles in component mode
【Floor Plan Drawing】Drawings show interactive position changes
【Floor Plan Drawing】Adding high-resolution file download for floor plan drawing
【Floor Plan Drawing】Floor plan supports a wide range of color styles
【Enterprise Background】Hidden Sub-Account Projects
【Enterprise Catalog】Set Default Currency
【Inspiration Spaces】Replacement Items have been increased from 19 to 25
【Photo Studio】The new version of the studio shooting adds a studio editor
【Design Tool】How to modify the display of "Unnamed" on the cover when sharing a panorama
After drawing the floor plan in the design tool, the room has not been given a name
Solutions
Method 1: Name the rooms in the design tool and then re-render.
Method 2: Go to the gallery and modify the room names below the project. The benefit of this method is that you don't have to re-render.
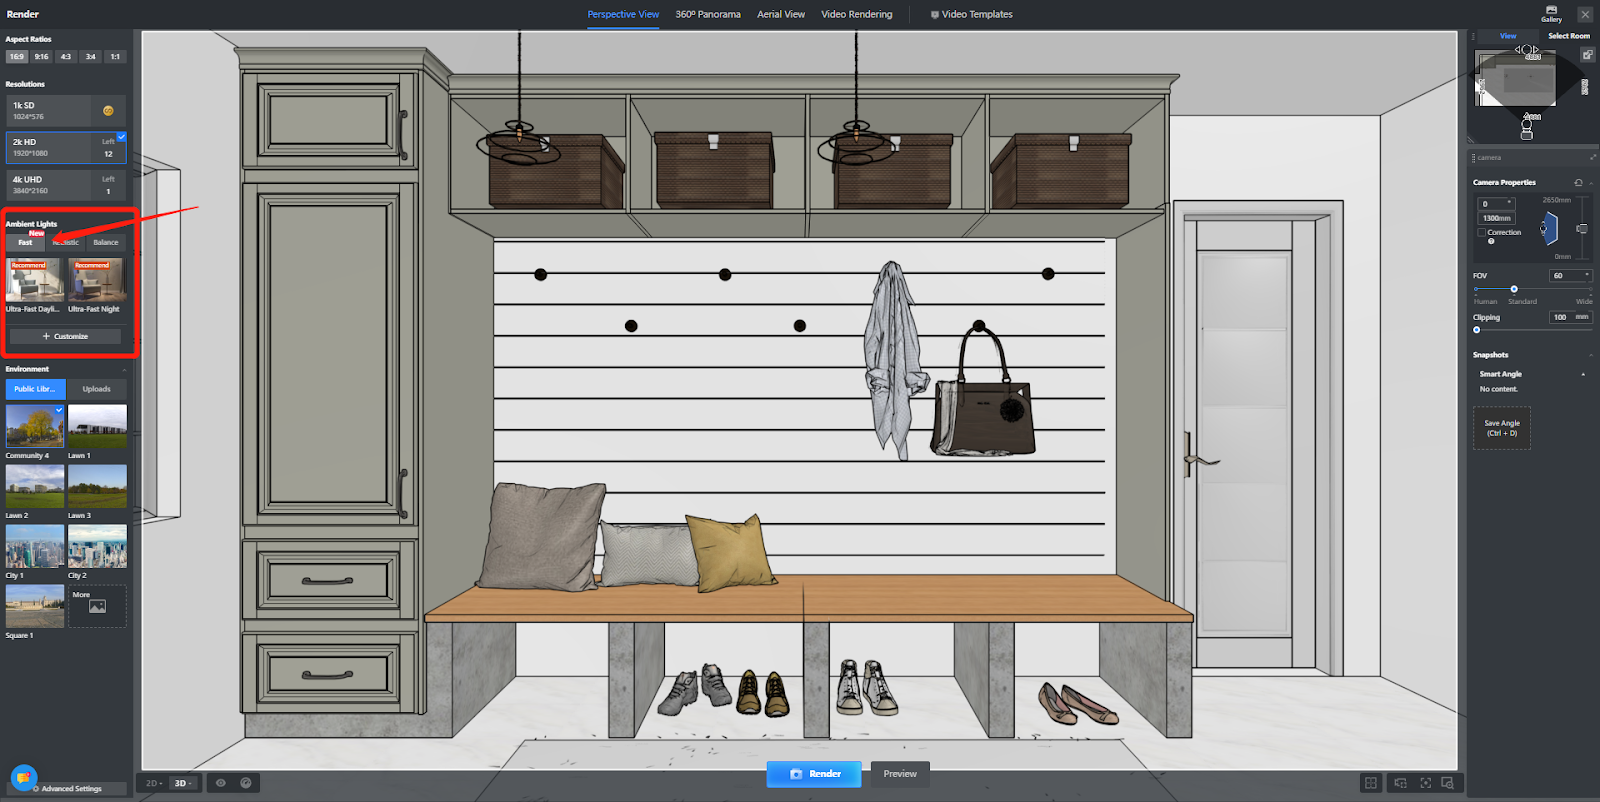
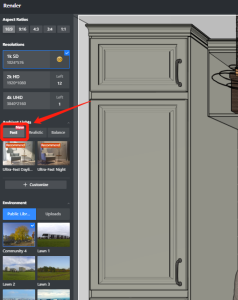
【Rendering】A New Experience for Lightning-Fast Renderings!
Here’s what we update!
At Coohom, we believe in staying one step ahead of the rendering capability and effects, therefore, we’re releasing some major updates to help designers present their designs to clients more efficiently and with higher quality.
Compared to ordinary ambient light templates, Lightning-Fast Renderings is an extremely fast rendering ambient light template provided by Coohom specifically for users with high rendering requirements. It aims to bring an ultimate rendering experience to Coohom Vip users. From clicking "Rendering" to obtaining the rendered image, the fastest time required is only 1 minute, which is a 200% improvement in overall rendering speed!
Steps
Step 1: After completing the design, click on 【Rendering】
Step 2: Select 【Fast】 in the Ambient Light and enjoy extremely fast rendering.
Tips
-
The Lightning-Fast Renderings as fast as 1 minute on rendering, but the actual time may depend on the network and rendering resolution.
-
This feature is currently only available for a part of Coohom VIP users. For specific activation requirements, please consult with CSC
The Lightning-Fast Renderings as fast as 1 minute on rendering, but the actual time may depend on the network and rendering resolution.
This feature is currently only available for a part of Coohom VIP users. For specific activation requirements, please consult with CSC
【Panorama Editor】 Available To All Users
Overview
Panorama Editor, previously exclusive to businesses, is now available to all users! Its features include:
-
Global settings
-
Lens settings
-
Switch settings
-
Opening animation settings
-
-
Beautify
-
Background music
-
Hotspot
-
Share
-
Style replacement
-
Product (Only for Enterprise Users)
-
Product list
-
Product replacement
-
Global settings
-
Lens settings
Lens settings
-
Switch settings
Switch settings
-
Opening animation settings
Opening animation settings
Beautify
Background music
Hotspot
Share
Style replacement
Product (Only for Enterprise Users)
-
Product list
Product list
-
Product replacement
Product replacement
Details
Feature Access:
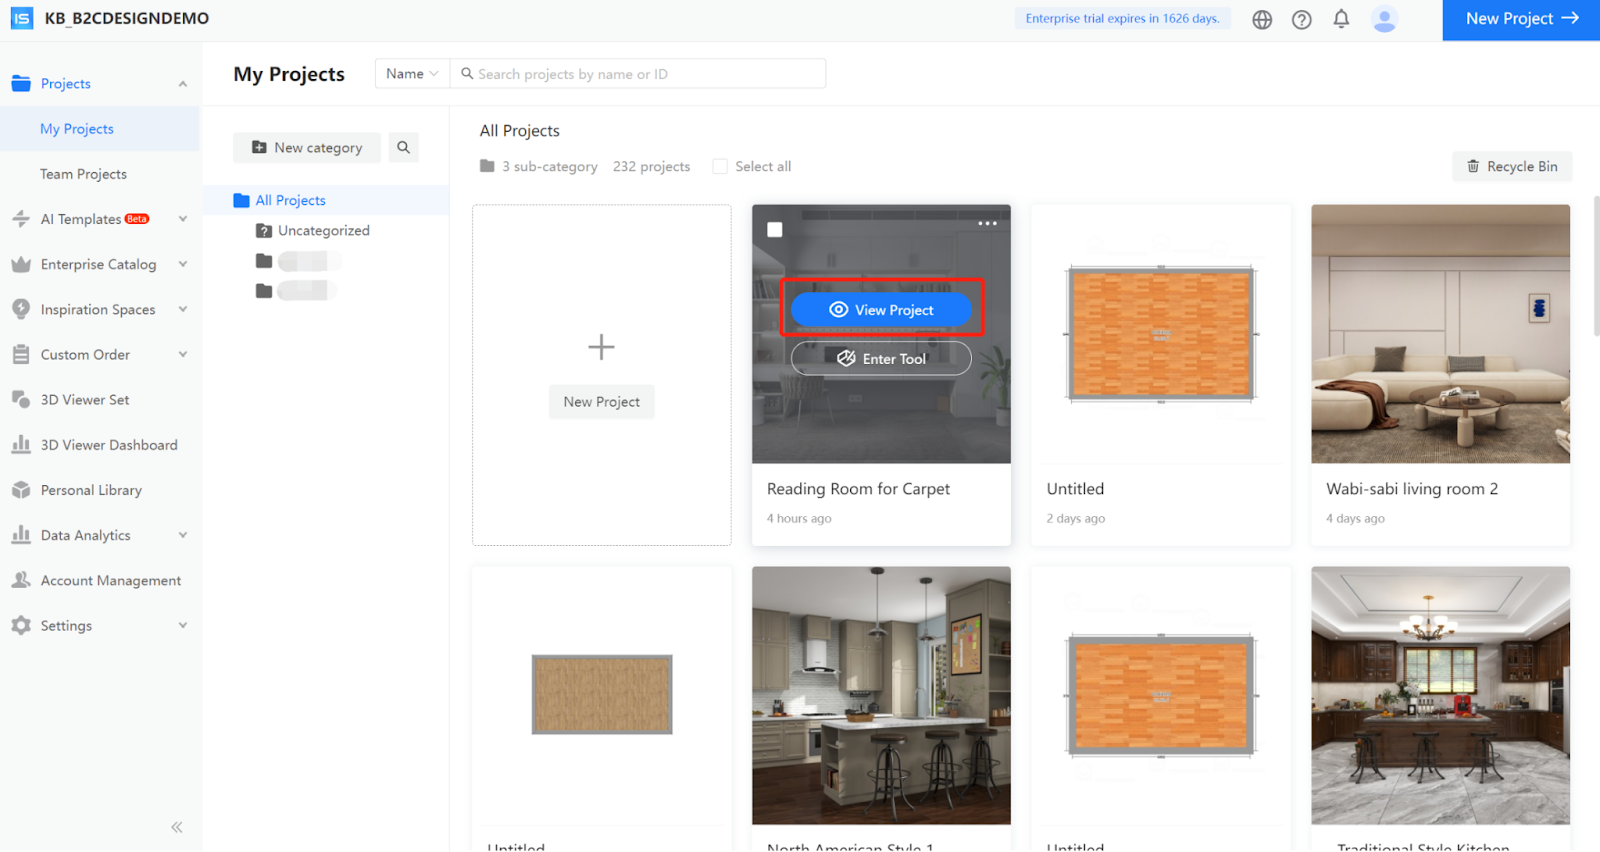
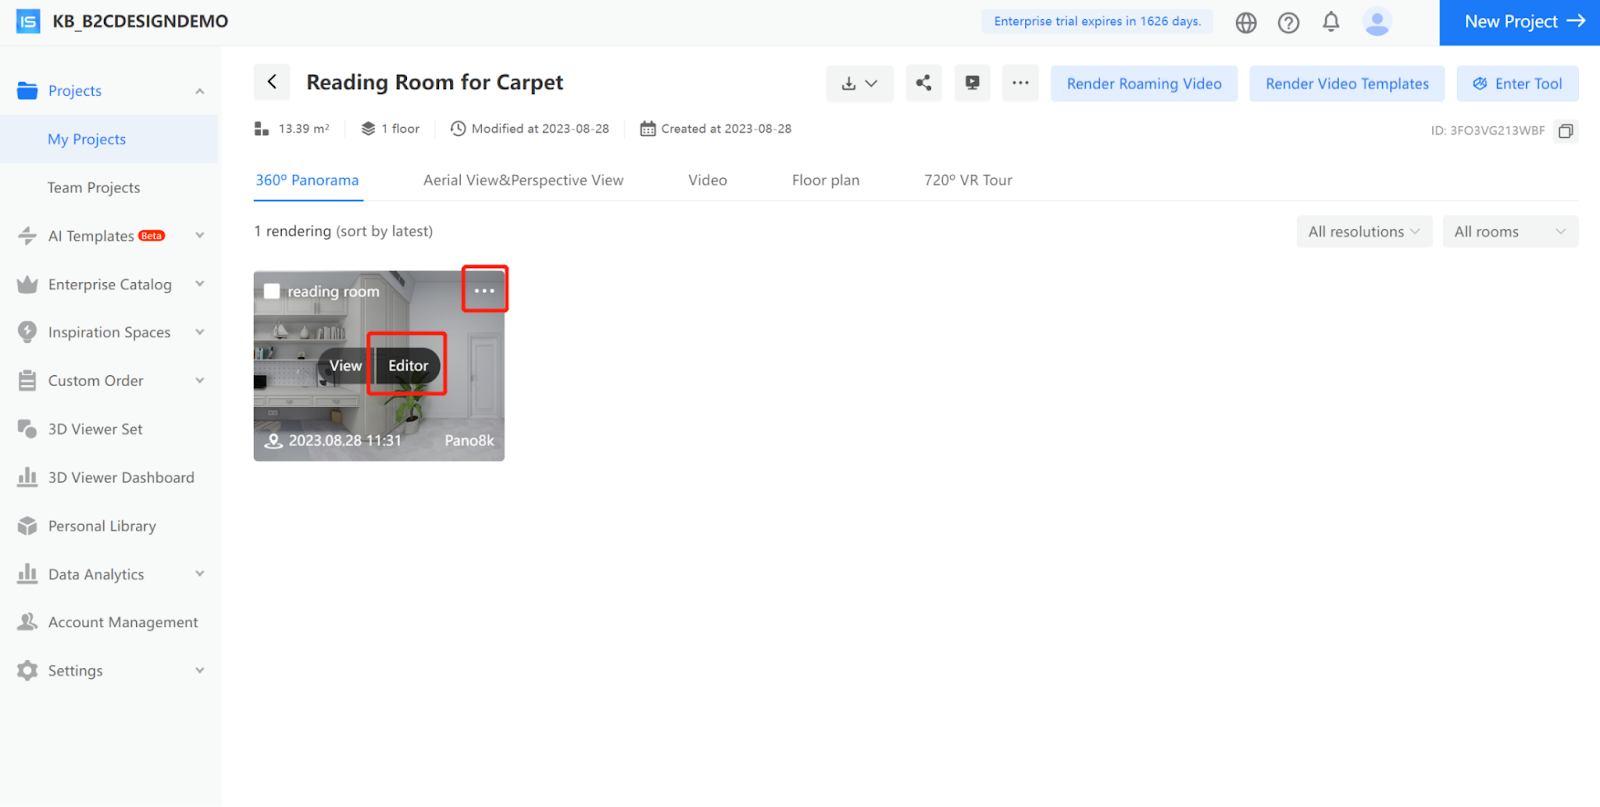
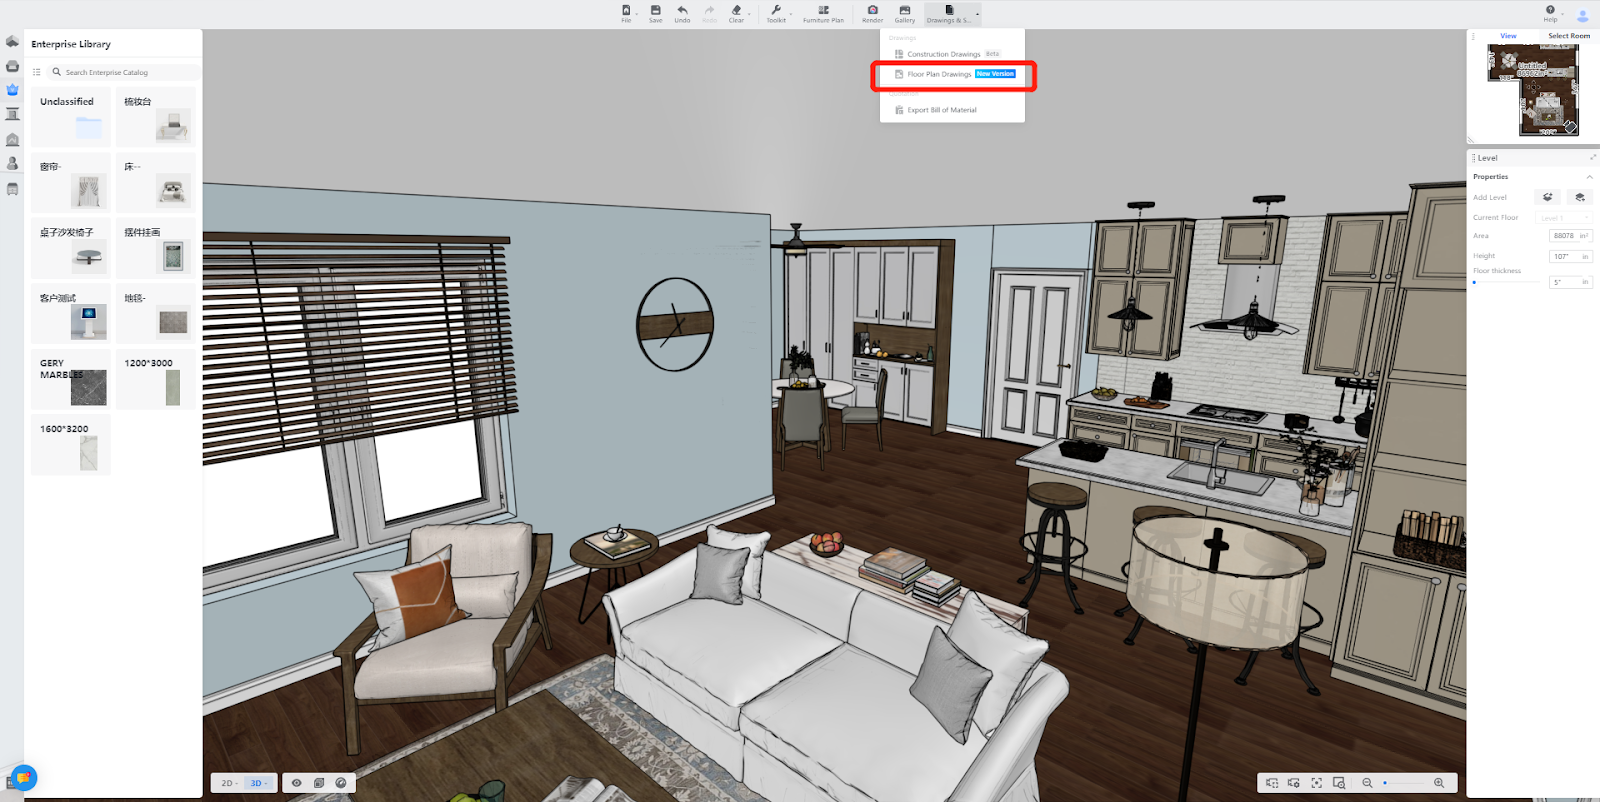
Step 1: On My Projects page, click on "View Project" to access the project details.
Step 2: On the project page, for each panorama card, you can directly identify the editor icon. Alternatively, you can access the editor through the directory in the upper-right corner of the card.
Feature Introduction:
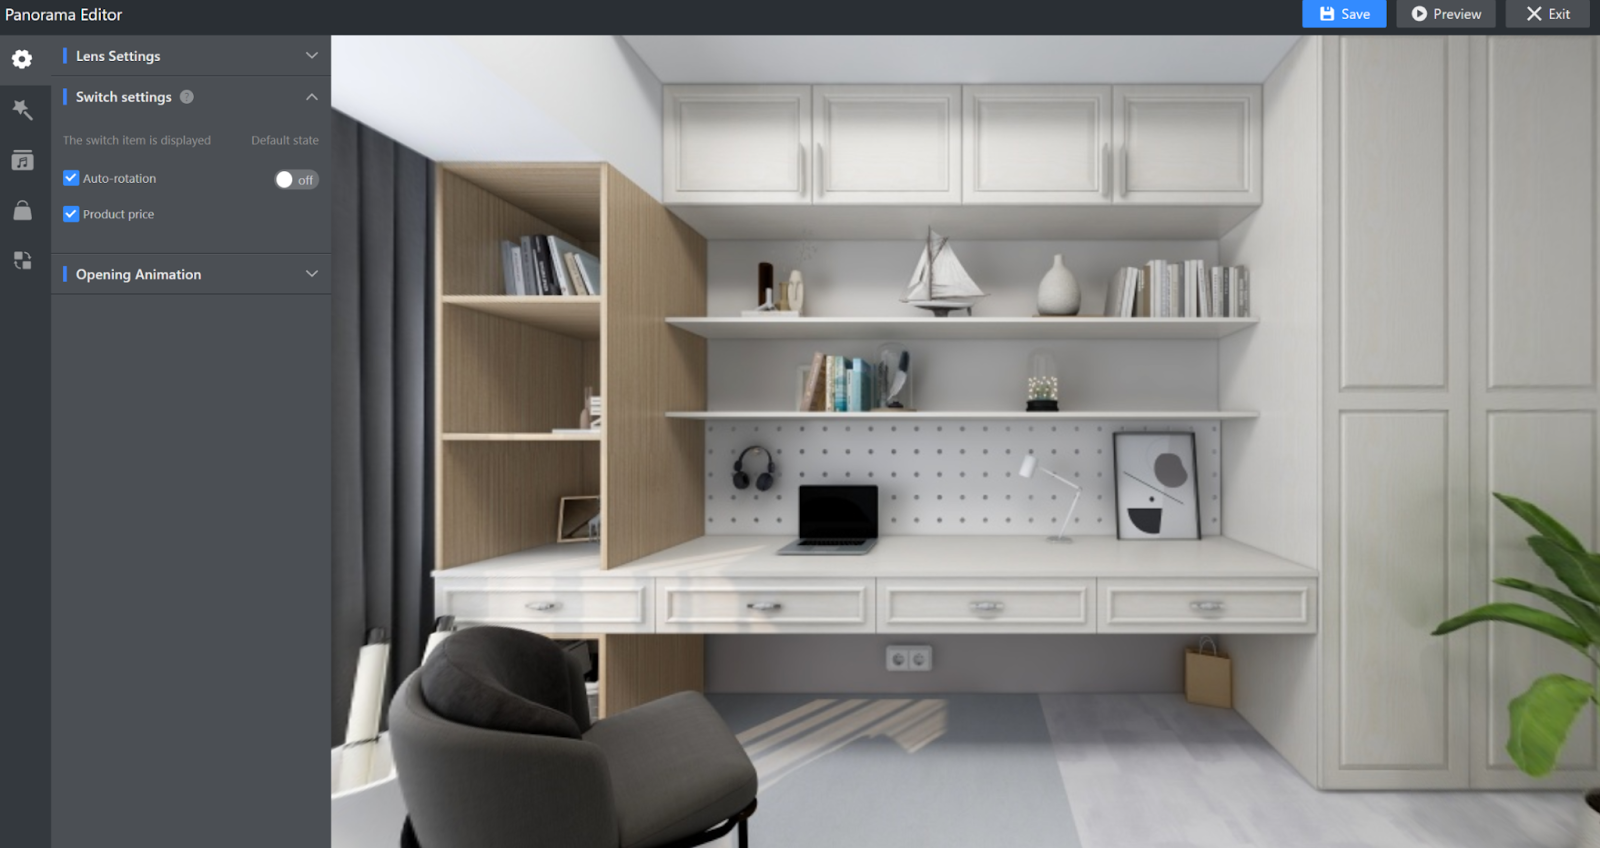
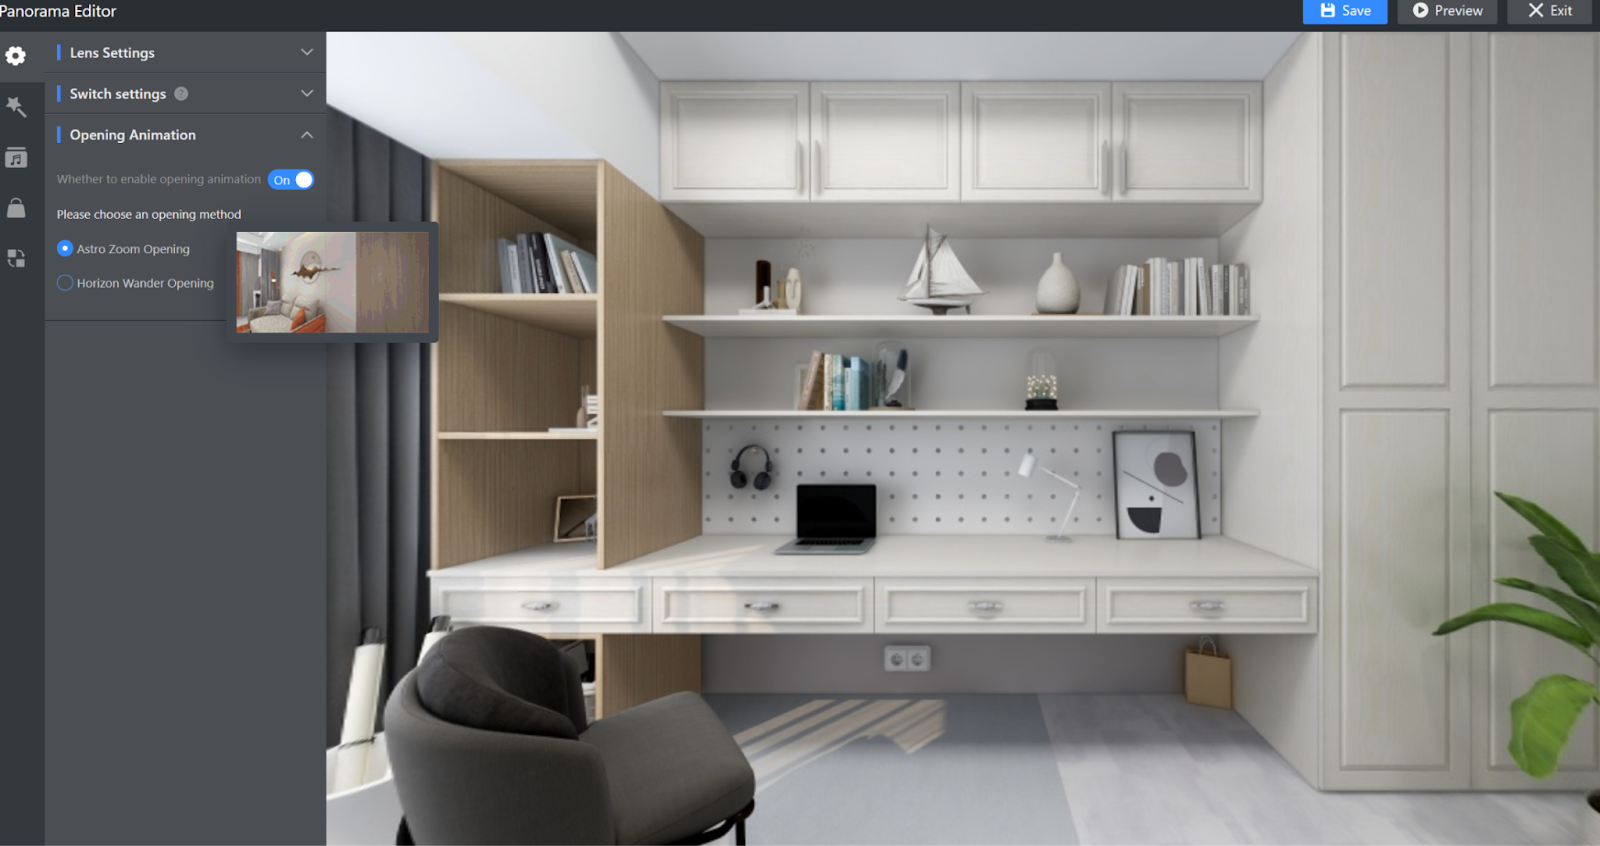
Feature 1: Global Settings
In the global settings, there are functions for lens settings, switch settings, and opening animation.
Lens settings control the initial viewing angle when entering the panorama.
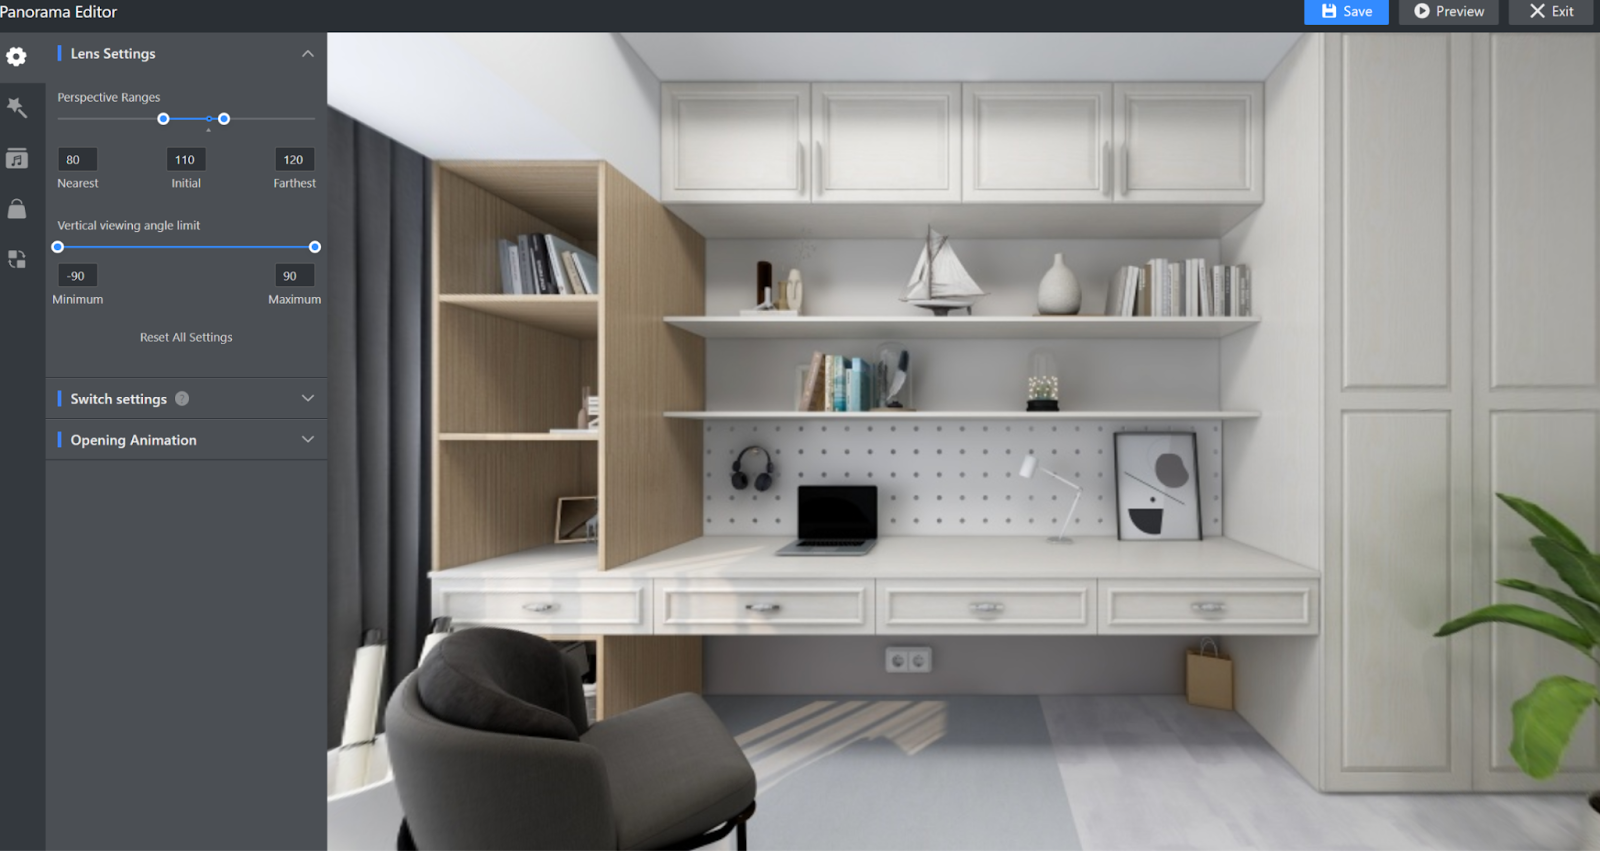
Switch settings control whether the panorama should undergo automatic rotation, and whether the prices of the products should be displayed if there's a product list.
Opening animation settings control the introductory animation effects of the panorama.
Astro Zoom Opening: The panorama will start with a top-down rotation.
Horizon Wander Opening: The panorama will start by panning around horizontally for a full rotation.
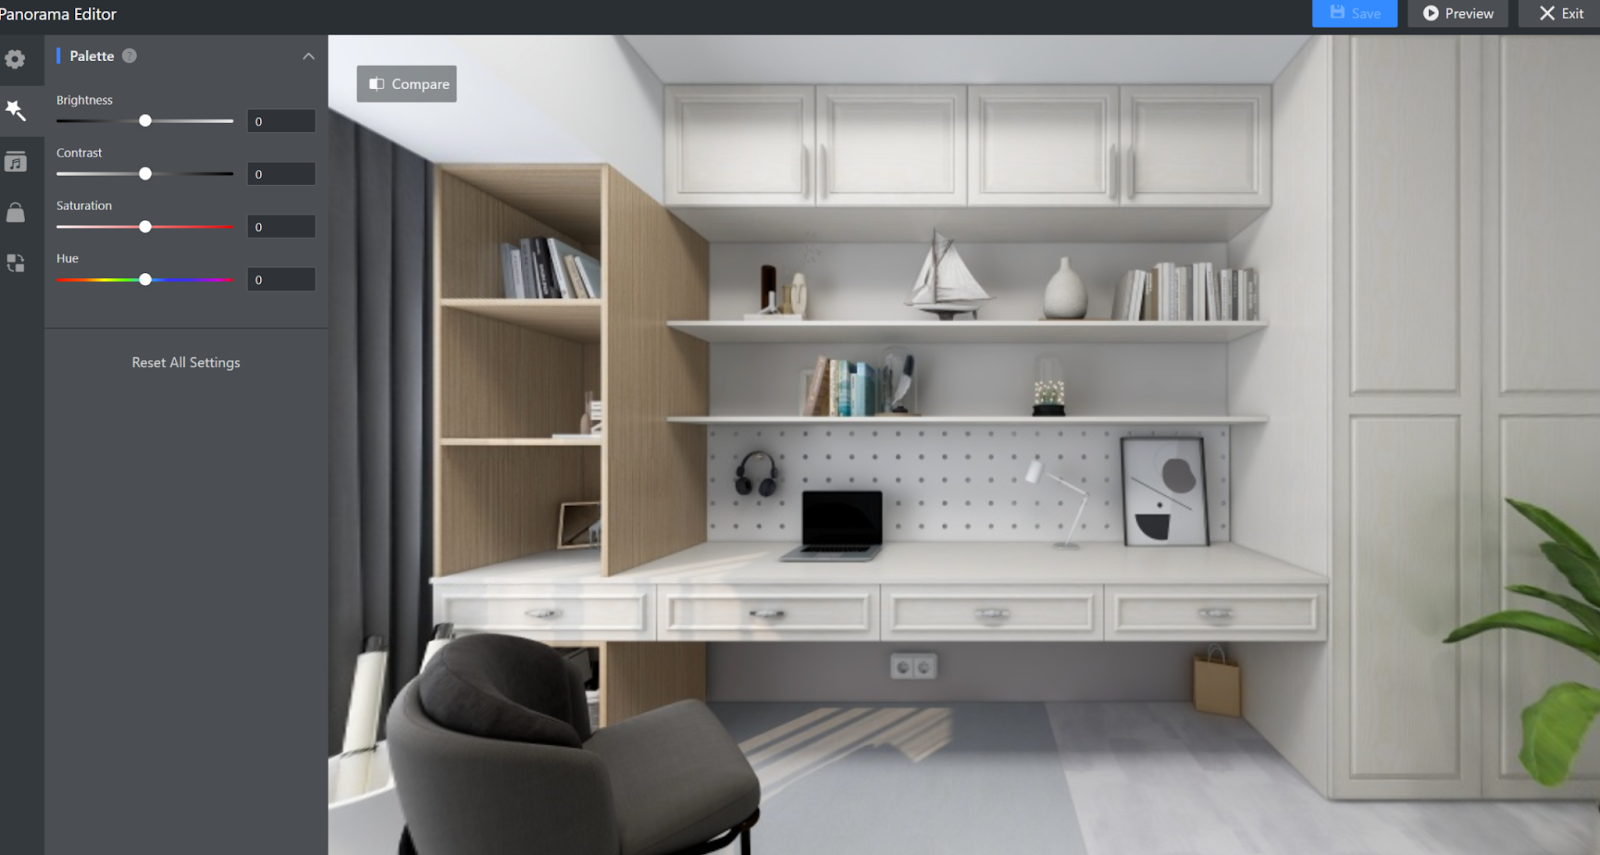
Feature 2: Beautify
This feature optimizes the display effect of the panorama through various parameter adjustments.
Additionally, users can use the Compare button to view and compare the panorama after parameter adjustments with the panorama before adjustments.
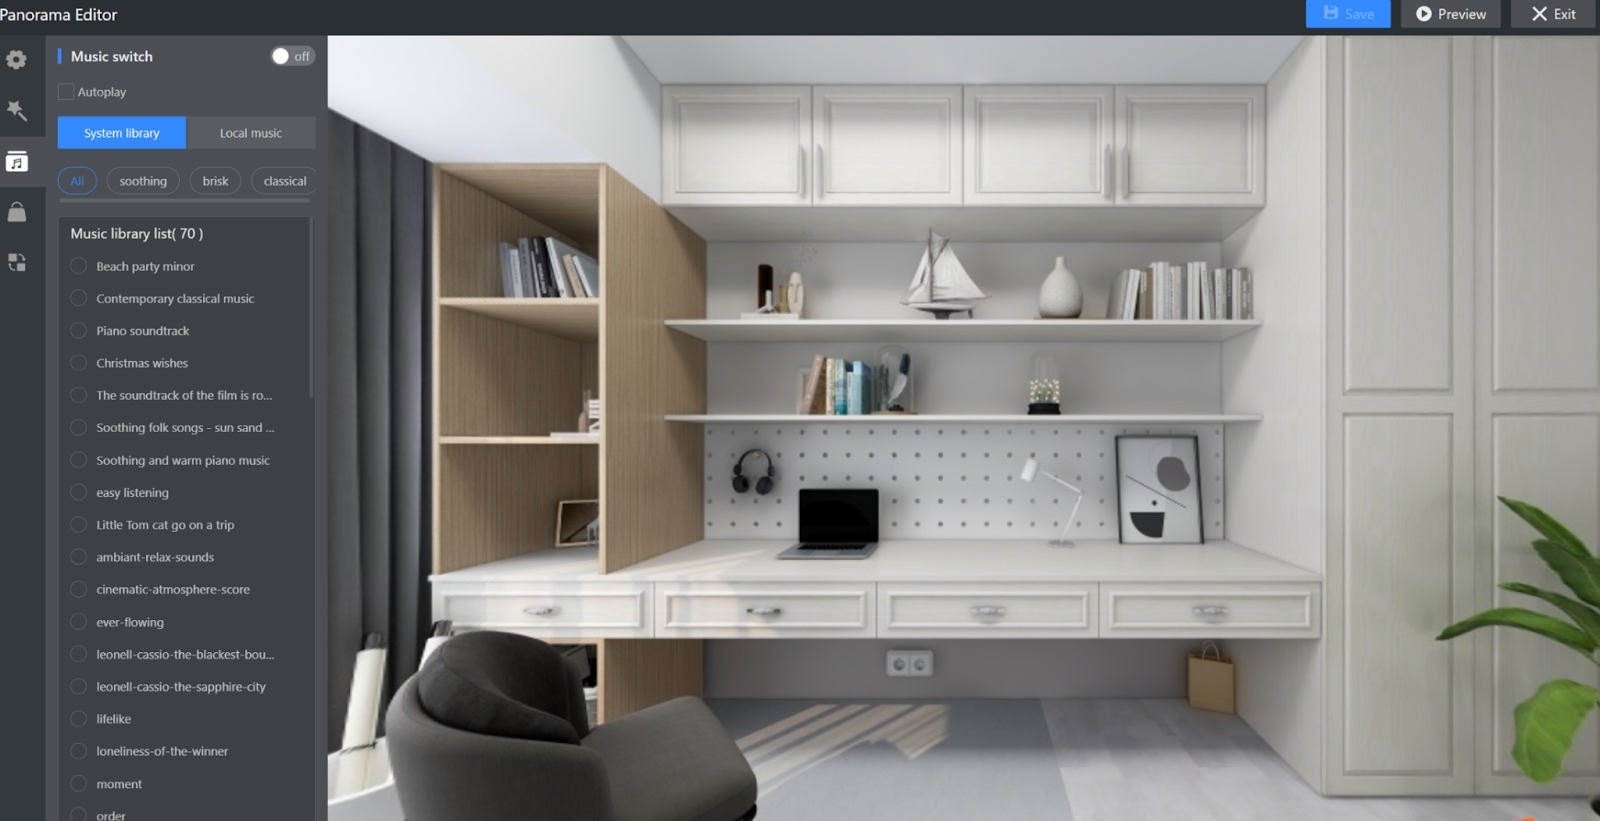
Feature 3: Background Music
This feature controls the background music of the panorama. Users can choose from a selection of 70 pre-installed music options or upload their own music files.
Additionally, users can decide whether the music should play automatically upon entering the panorama by selecting the Autoplay option.
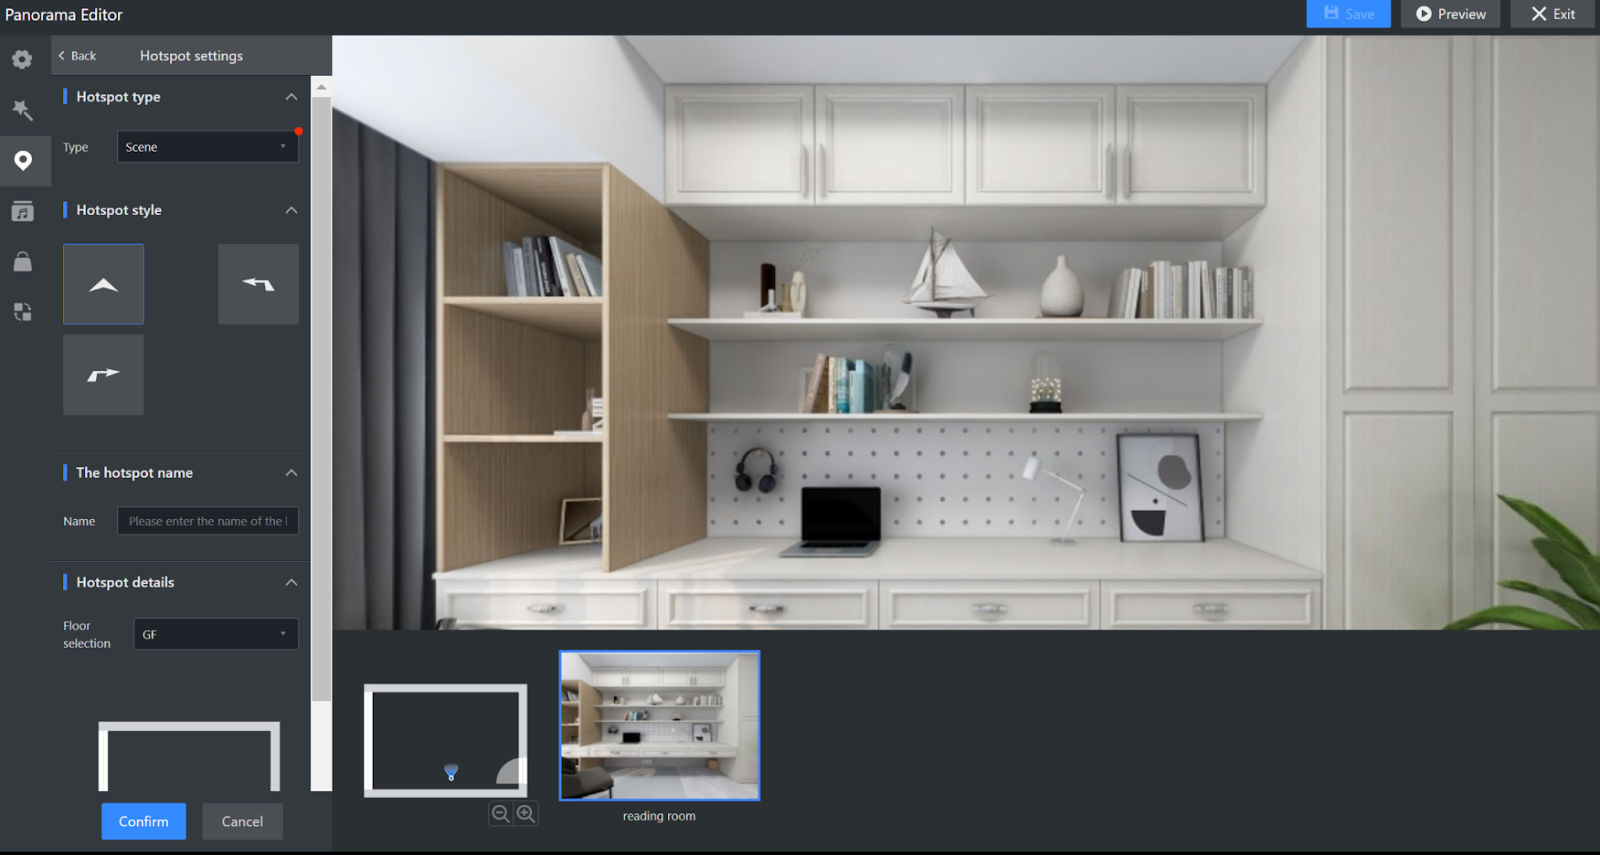
Feature 4: Hotspots
This feature is only available in the 720 Roaming Editor and is used to control the appearance, names, and positions of jump hotspots between different spaces.
Feature 5: Sharing
This feature provides various capabilities related to panorama sharing.
Work Status: You can set the availability and validity period of the panorama. Panoramas that are taken down or have expired cannot be accessed.
Sharing Formats: You can choose between formats such as posters, QR codes, and links. Posters allow customization of the panorama's title, description, and thumbnail.
Sharing Password: To protect the copyright of the panorama, you can set a password. Without the password, access to the panoramic image is restricted.
Sharing Time: For different clients, you can set multiple expiration times for the same panorama and generate different links for sharing.
Feature 6: Style Replacement
This feature allows for the replacement of panoramas with the same angle, often used for changes in lighting and design styles.
Related Documentation: https://helpcenter.coohom.com/en/articles/6761104-enterprise-how-to-use-style-substitution-in-panorama-editor
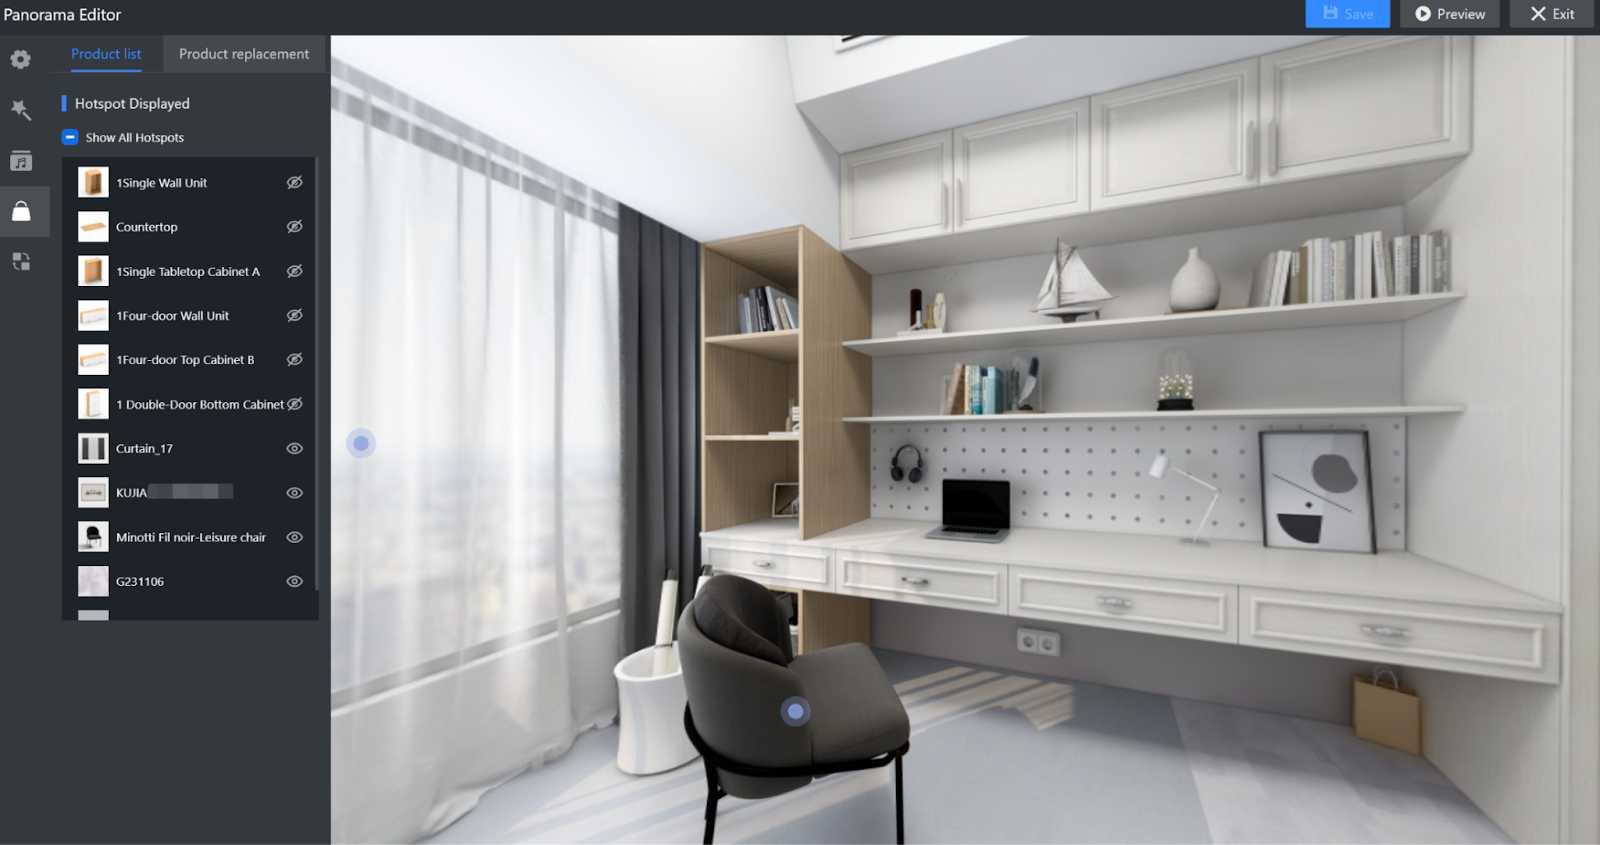
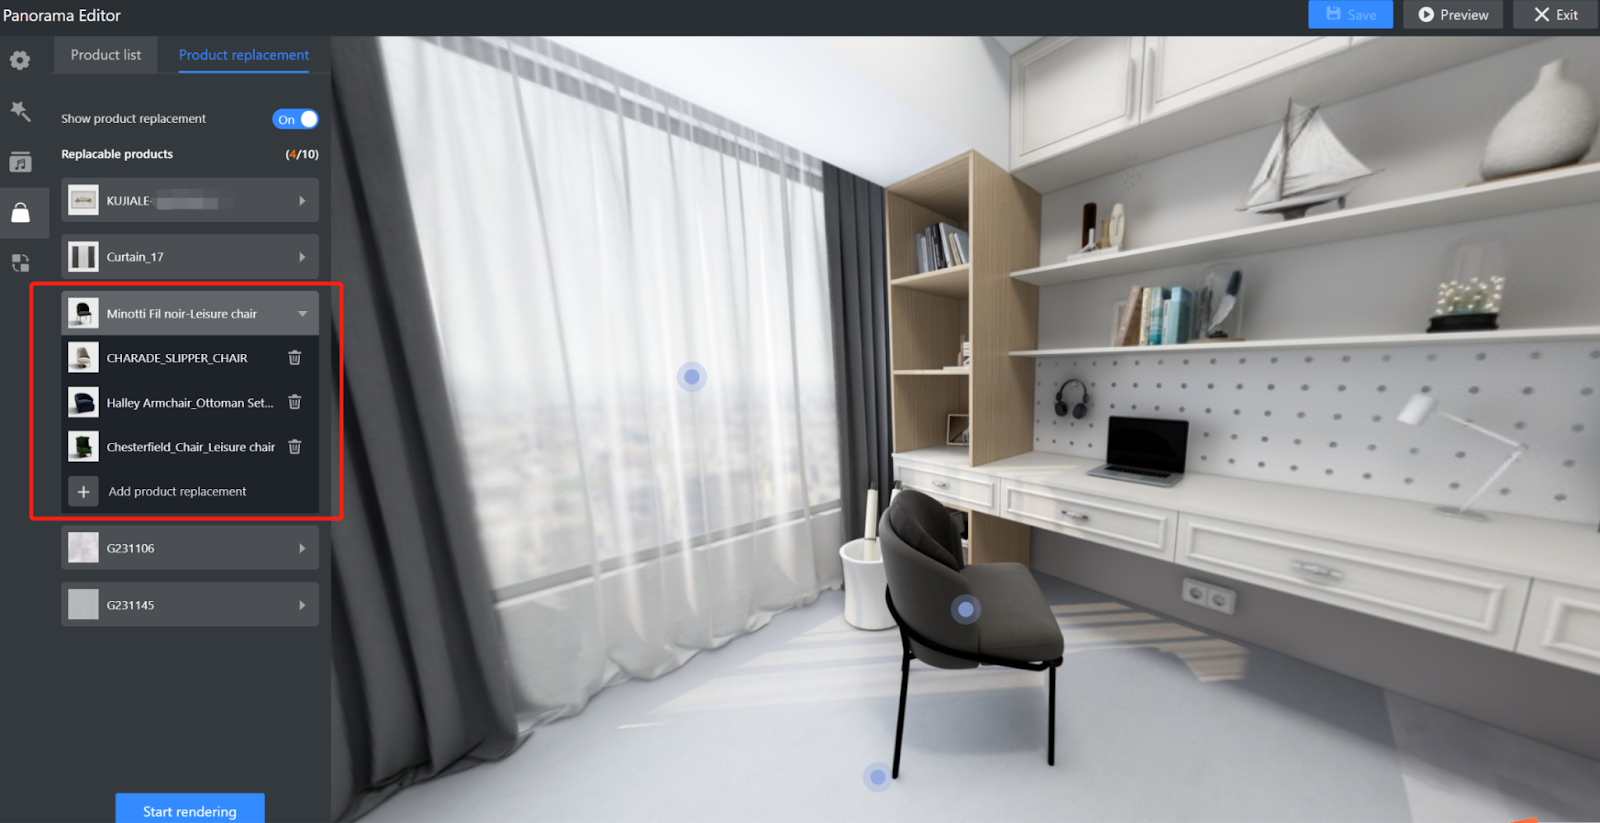
Feature 7: Products
The Products module includes two functional components: Product Replacement and Product List.
-
Product List: This feature is exclusively available to enterprise users. It controls how enterprise product hotspots and product lists are displayed in the panorama.
-
Product Replacement: This feature is available exclusively to enterprise users who have made additional purchases. It is used to replace enterprise product hotspots in the panorama with different products.
Product List: This feature is exclusively available to enterprise users. It controls how enterprise product hotspots and product lists are displayed in the panorama.
Product Replacement: This feature is available exclusively to enterprise users who have made additional purchases. It is used to replace enterprise product hotspots in the panorama with different products.
Related Documentation: https://helpcenter.coohom.com/en/articles/5882116-enterprise-product-replacement-for-panorama-configurator
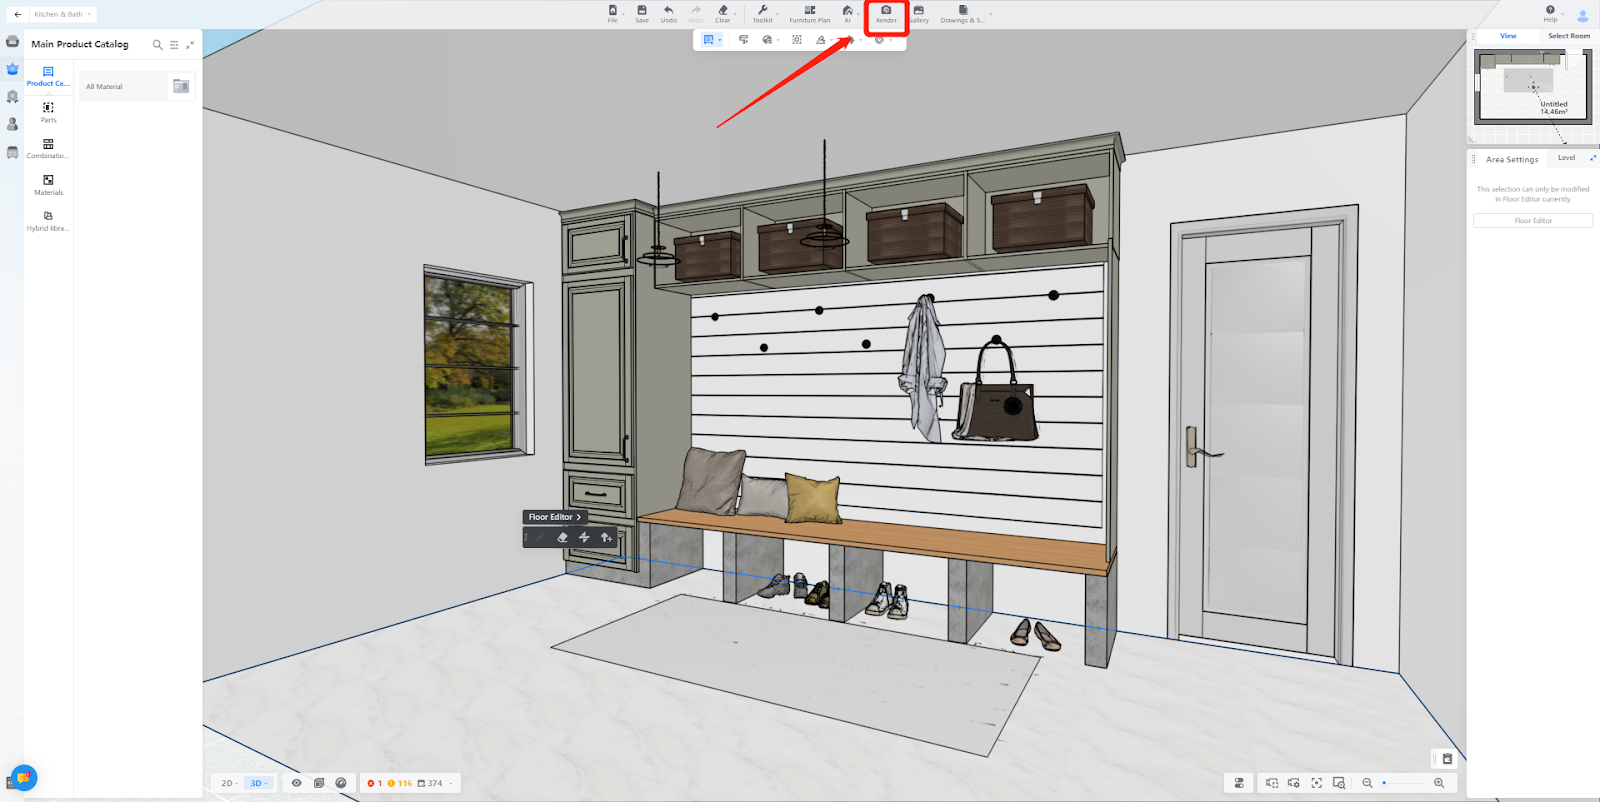
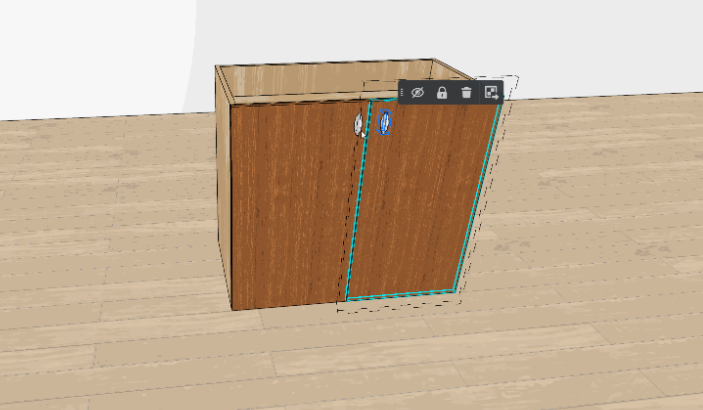
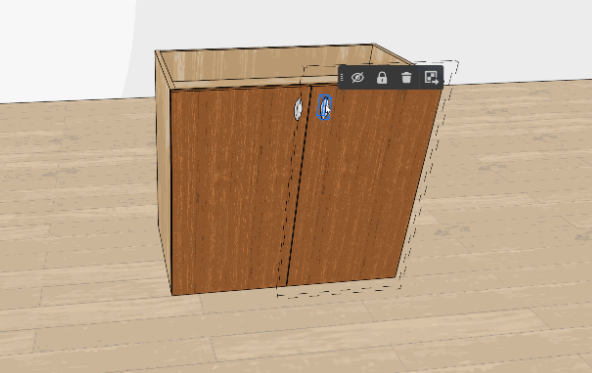
【Advanced Tool】Support selecting handles in component mode
Introduction
For some users, they would like the ability to directly click on handles to modify their style, material, and size. Therefore, we have opened up this option in component mode to make the operation more convenient.
Aim Users
All Coohom Users
Steps
Switch to component mode and click on the target handle
Tips
Please note the modeling guidelines: only models that are classified as "handle" or "embedded handle" will be supported for clicking. If you use other classifications as handles, they will not be clickable.
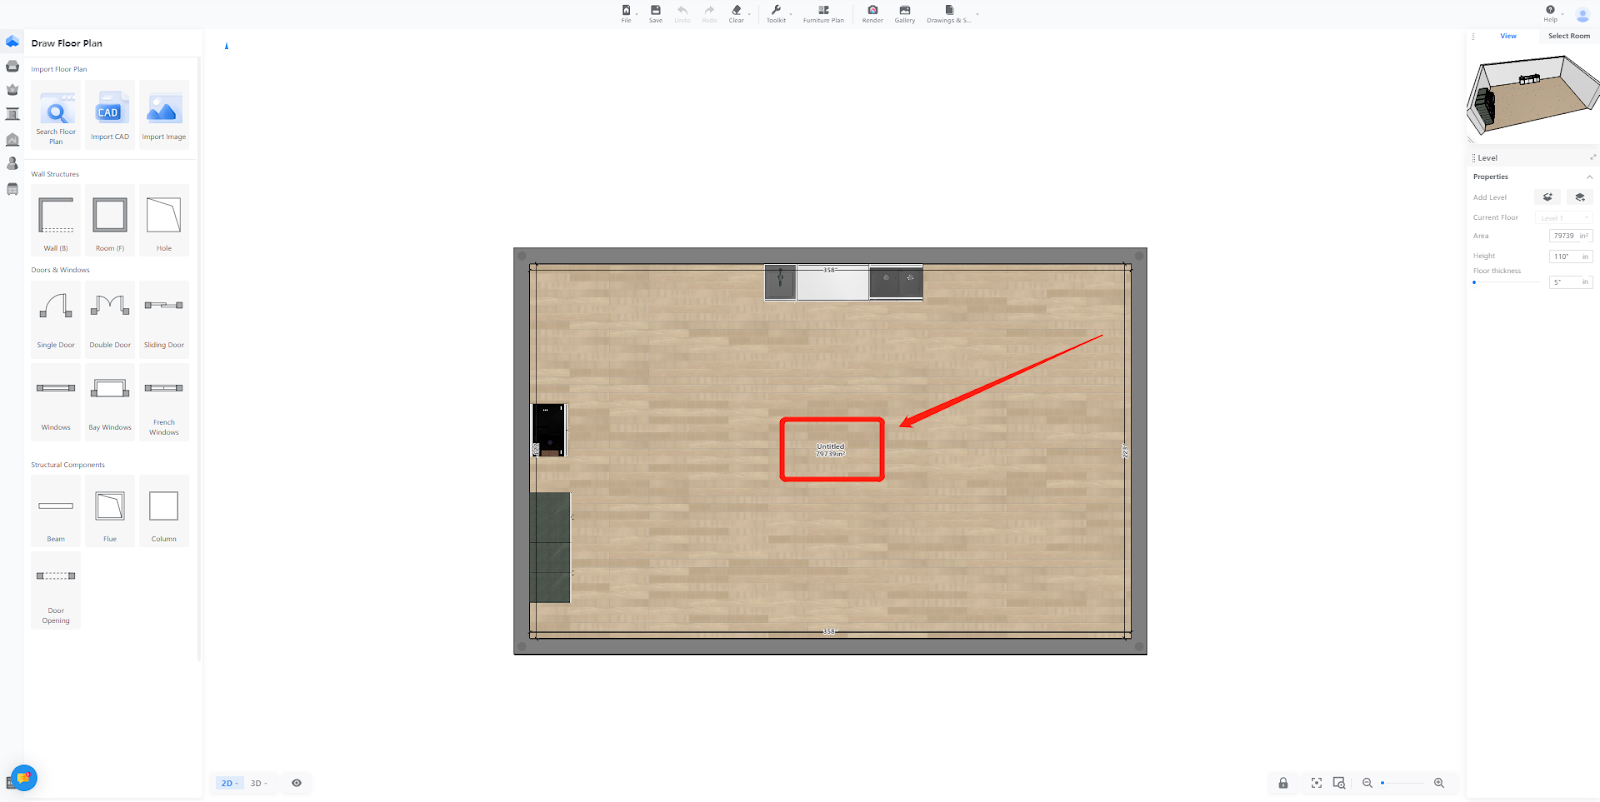
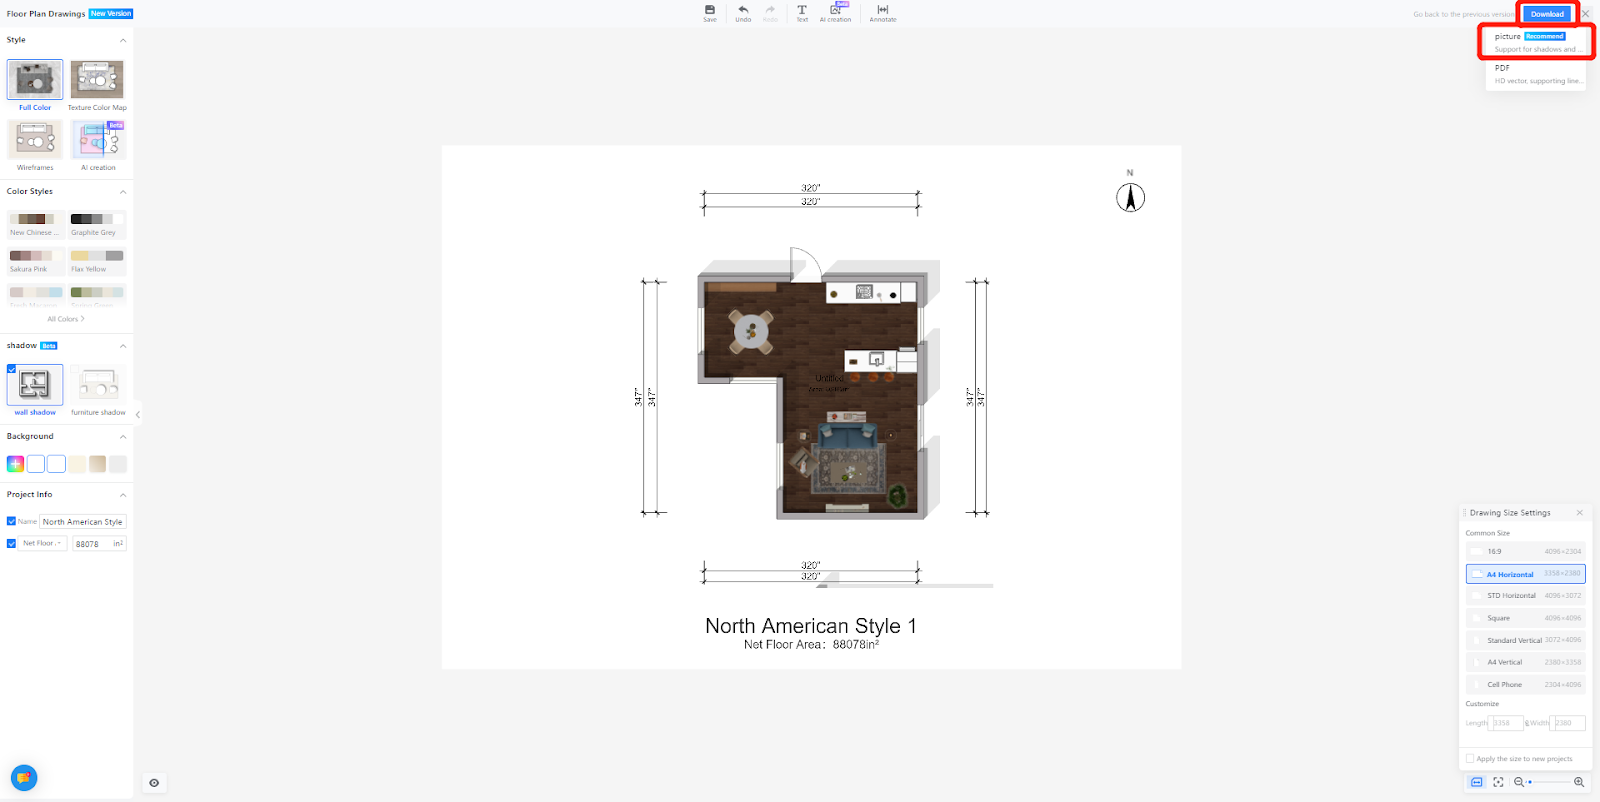
【Floor Plan Drawing】Drawings show interactive position changes
Introduction
In the new version of the floor plan tool, the "Drawing Display" feature that was previously in the left toolbar has been moved to the bottom left corner of the floor plan, indicated by a small eye icon. This feature allows you to selectively hide dimension labels, room names, room areas, and furniture, making the floor plan more clean and visually appealing.
Aim Users
All Coohom Users
Steps
Enter the new version of 【Floor Plan Drawings】
To show or hide specific objects in the floor plan, simply hover over the "show/hide" option located at the bottom left corner of the floor plan
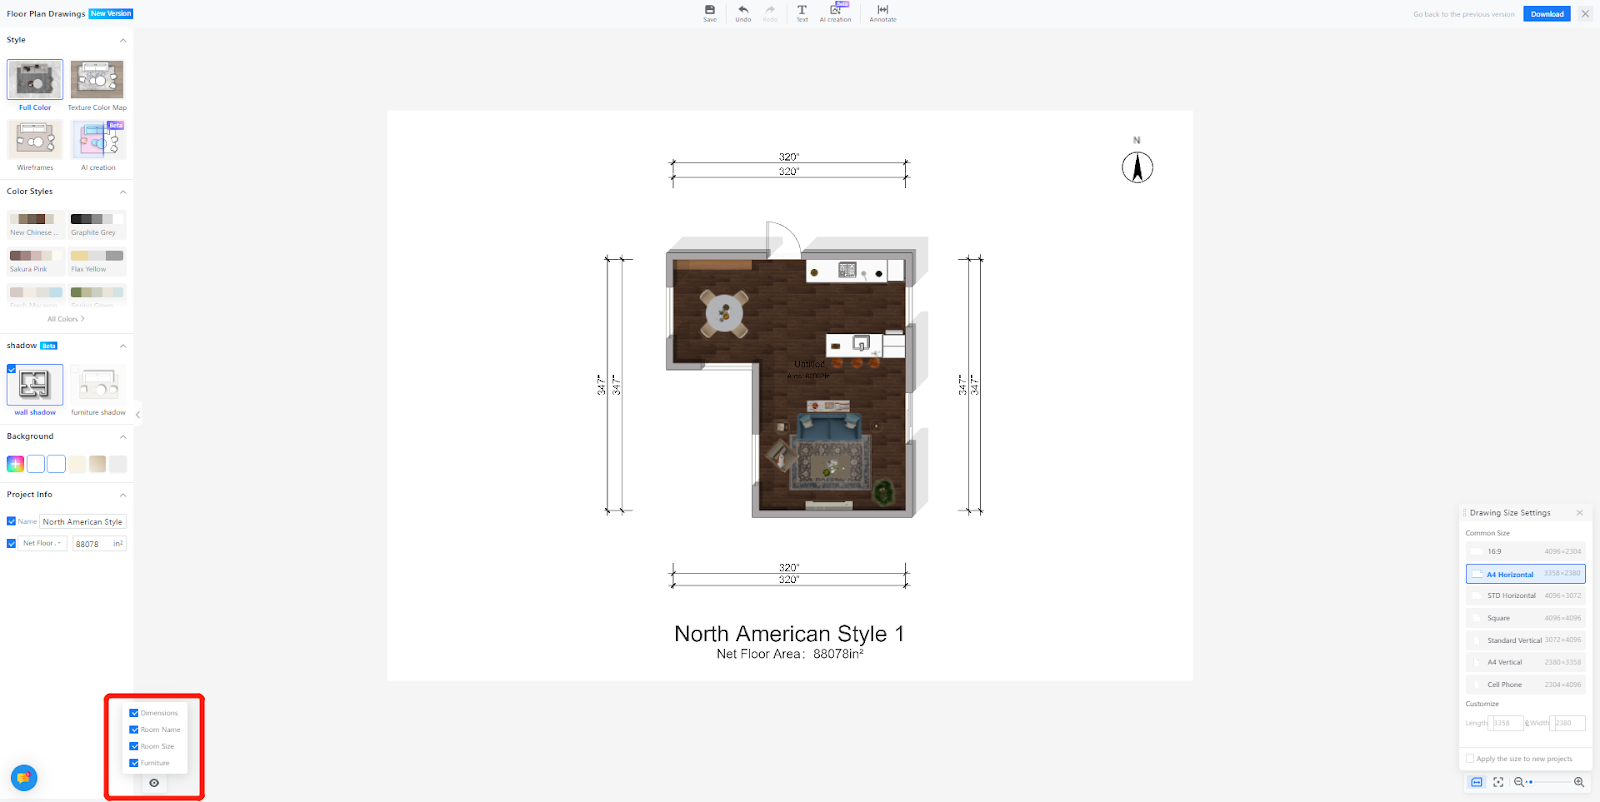
.
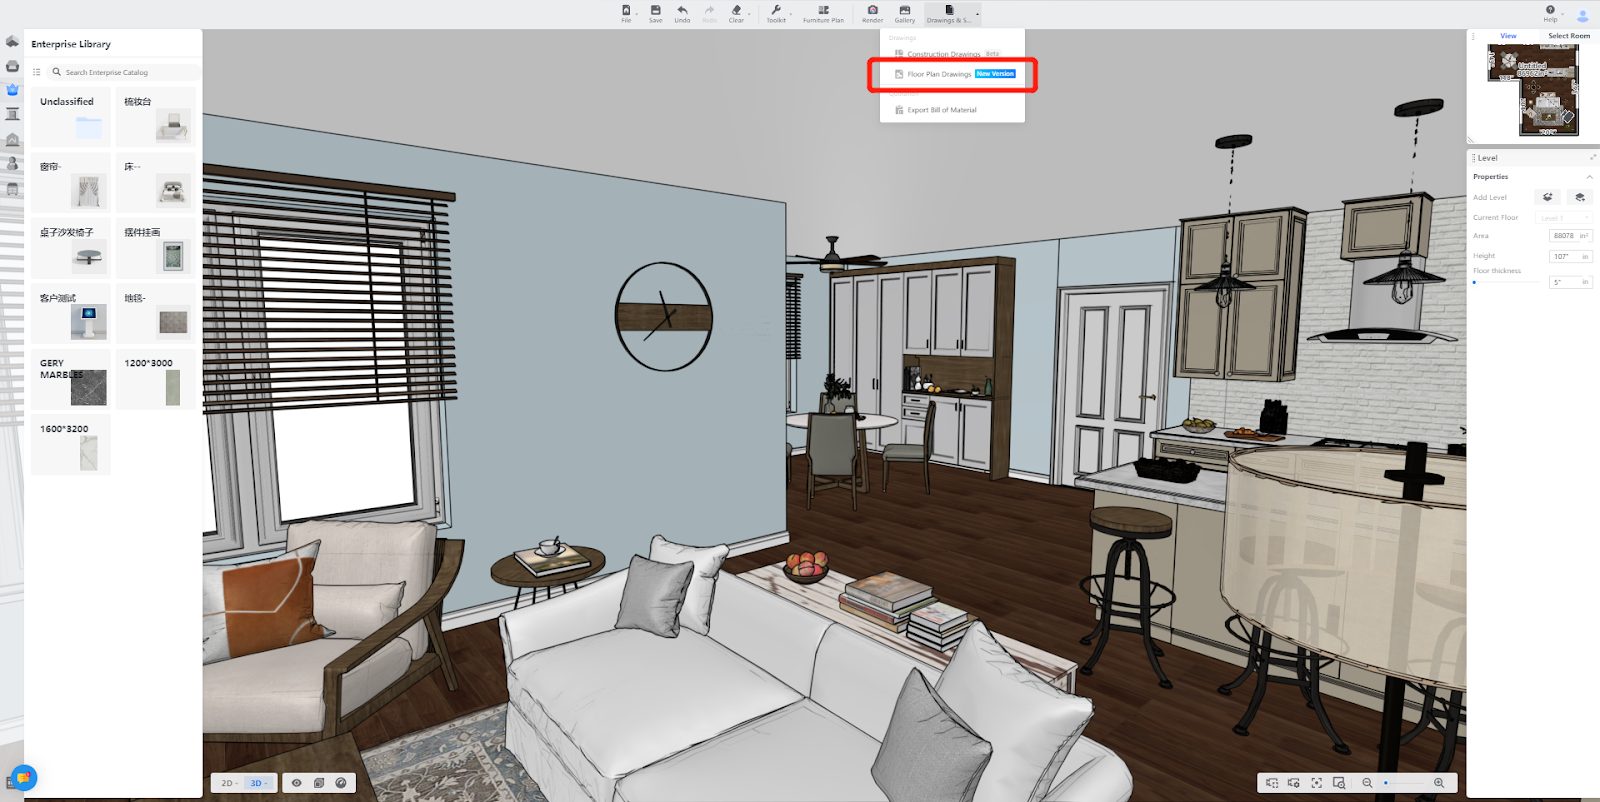
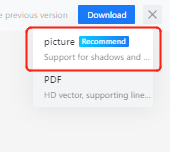
【 Floor Plan Drawing】Adding high-resolution file download for floor plan drawing
Introduction
The new version of the floor plan drawing supports a 4K image output for the floor plan drawing. The previous download options of "jpg" and "png" have been merged into a single "image" option, allowing users to download and save floor plans in high-definition PNG format
Aim Users
All Coohom Users
Steps
Enter the new version of 【Floor Plan Drawings】

Click【Download】-【Picture】, support for download shadows and gradients picture
Tips
If users need jpg files, they can change the downloaded.png to.jpg
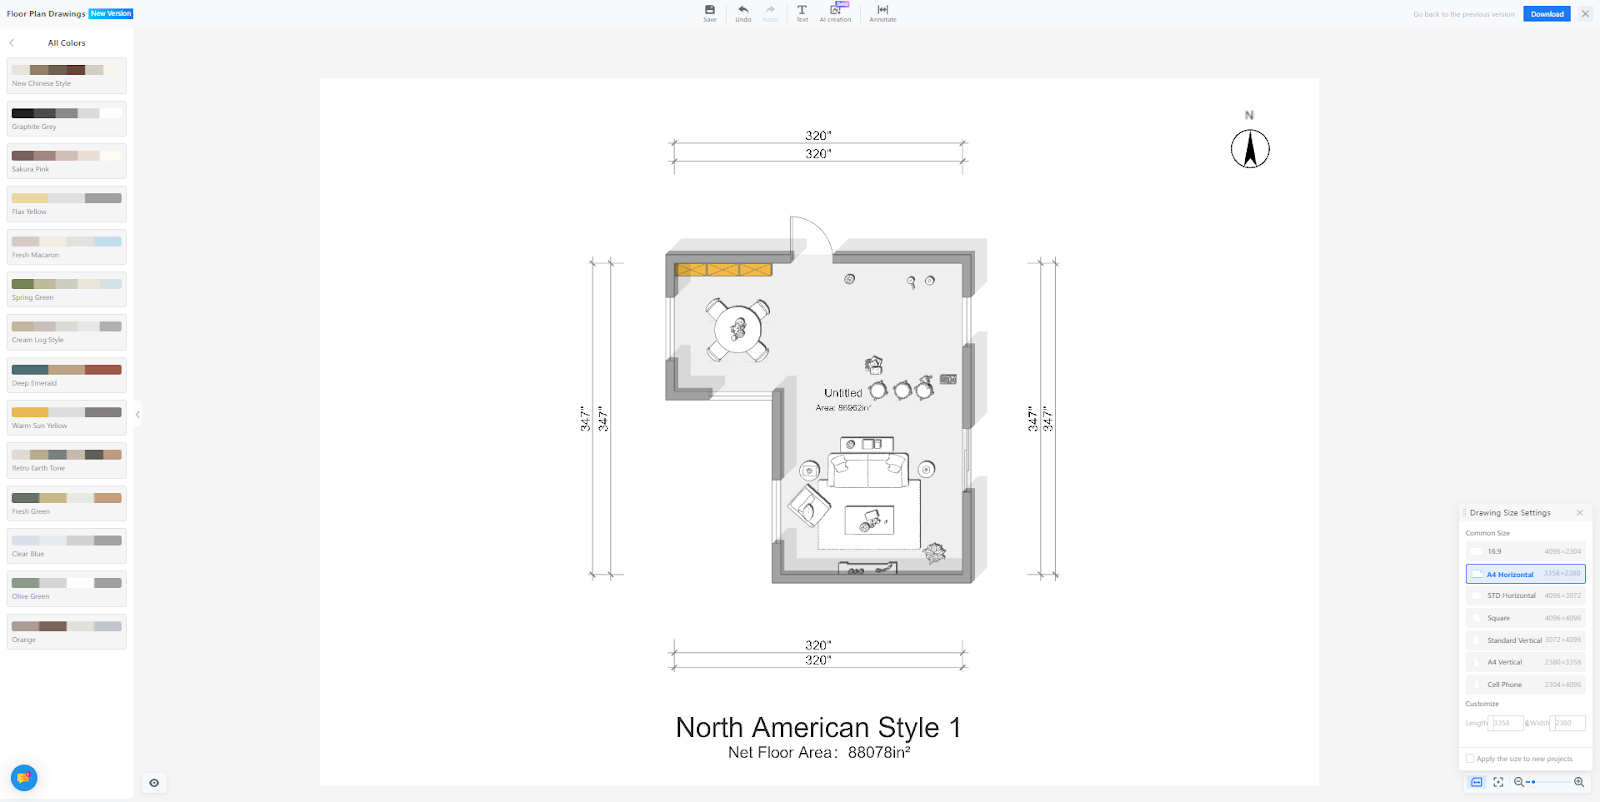
【Floor Plan Drawing】Floor plan supports a wide range of color styles
Introduction
The new version of the floor plan tool provides color style templates for selecting colors. There are 13 color style templates available, allowing you to generate colored floor plans with just one click. This feature significantly reduces the threshold for creating colored floor plans and enhances their aesthetic appeal.
Aim Users
All Coohom Users
Steps
Enter the new version of 【Floor Plan Drawings】
In the new floor plan dawings, on the left side of the view, you will find a 【Color Styles】. This feature allows for easy switching between different color palettes to customize the appearance of the floor plan according to your preferences.
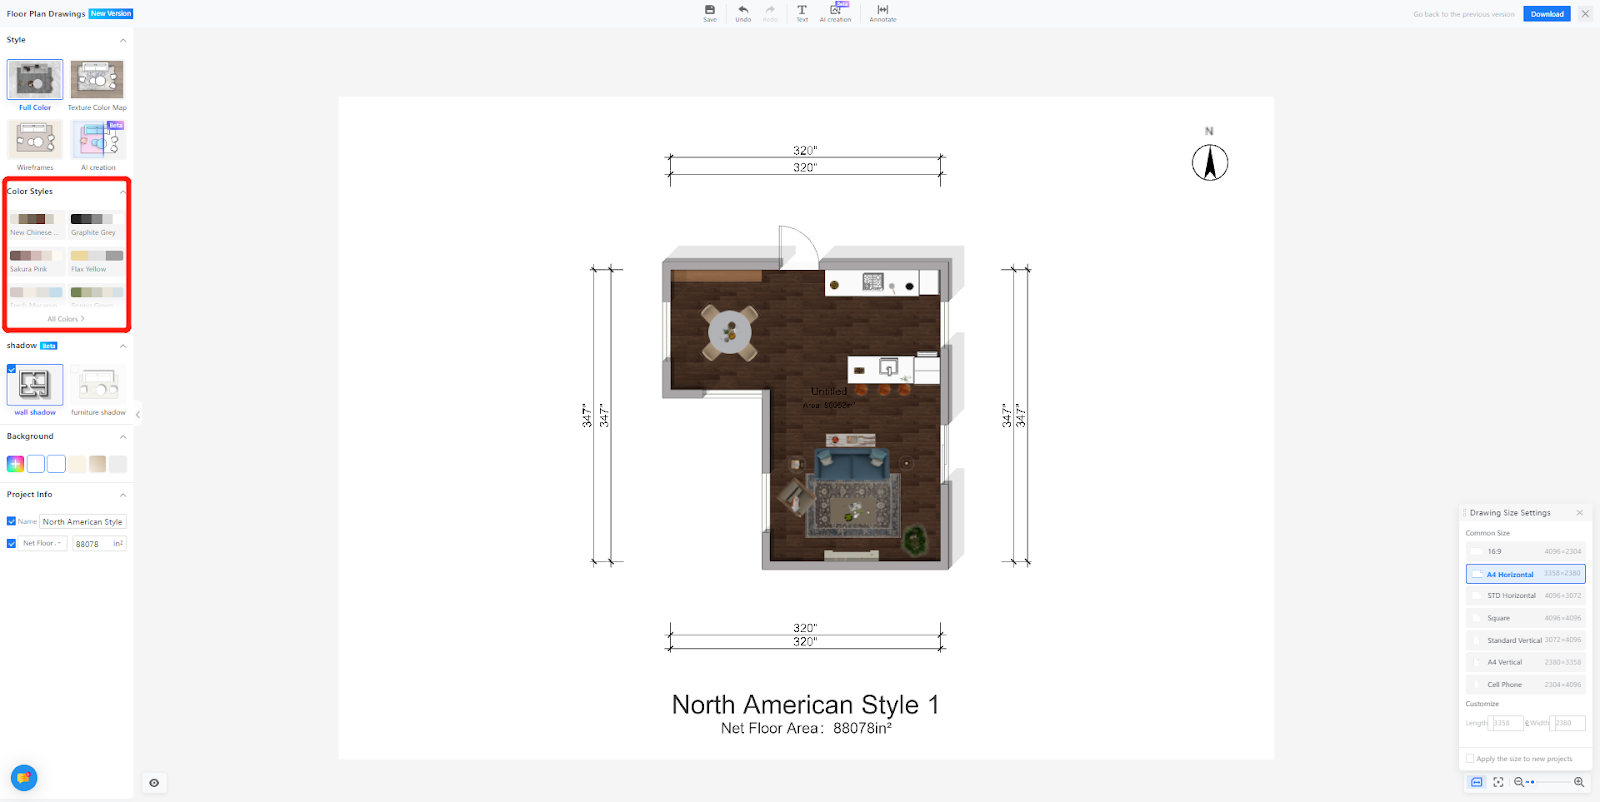
Click【All Colors】 will display more color templates to use
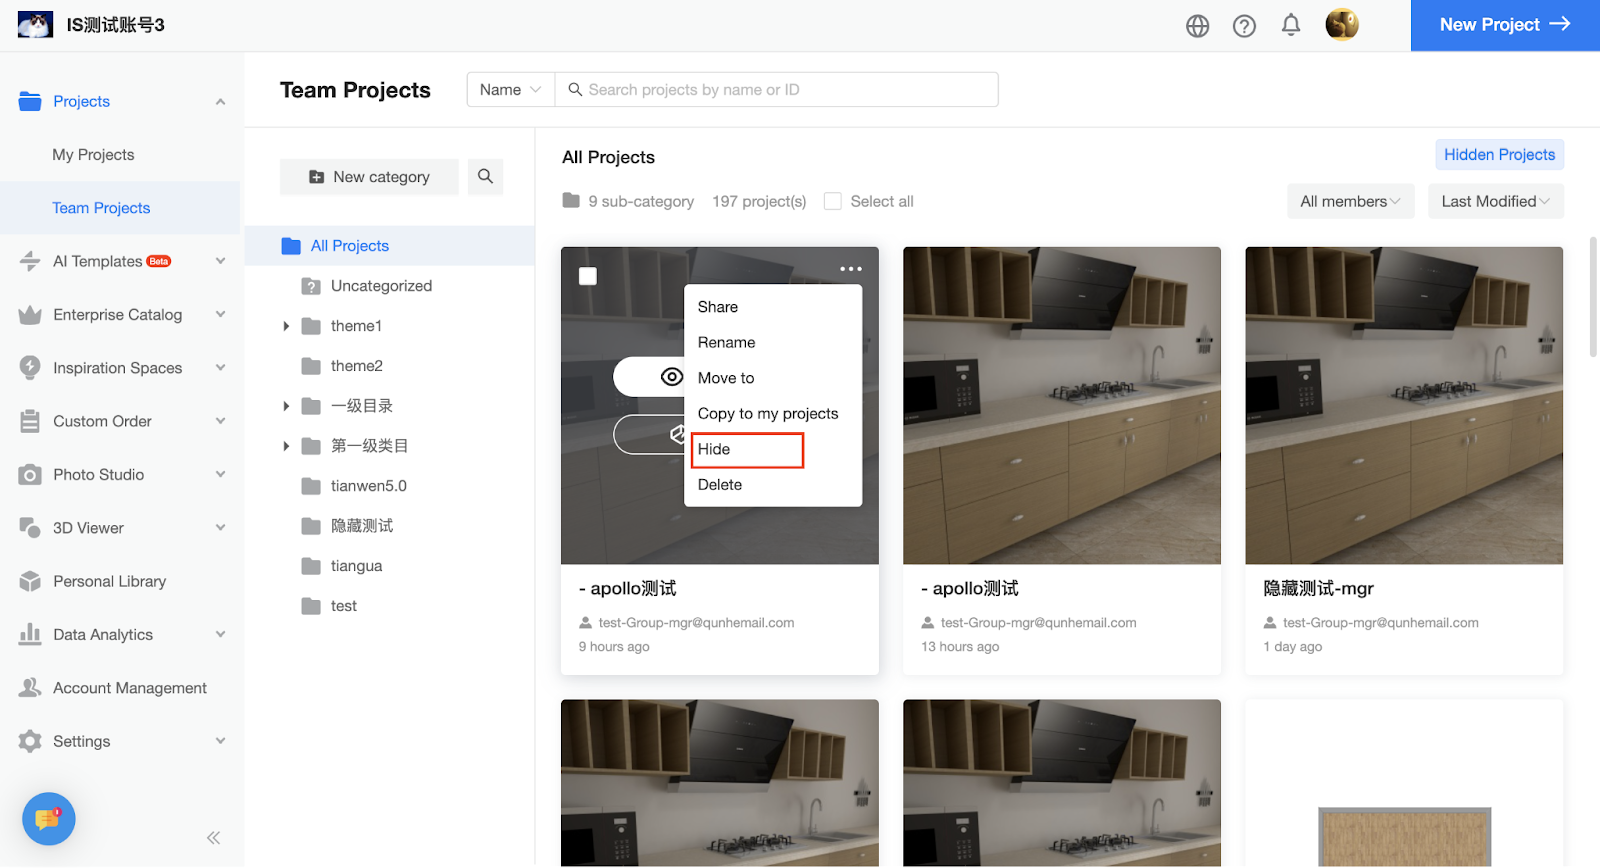
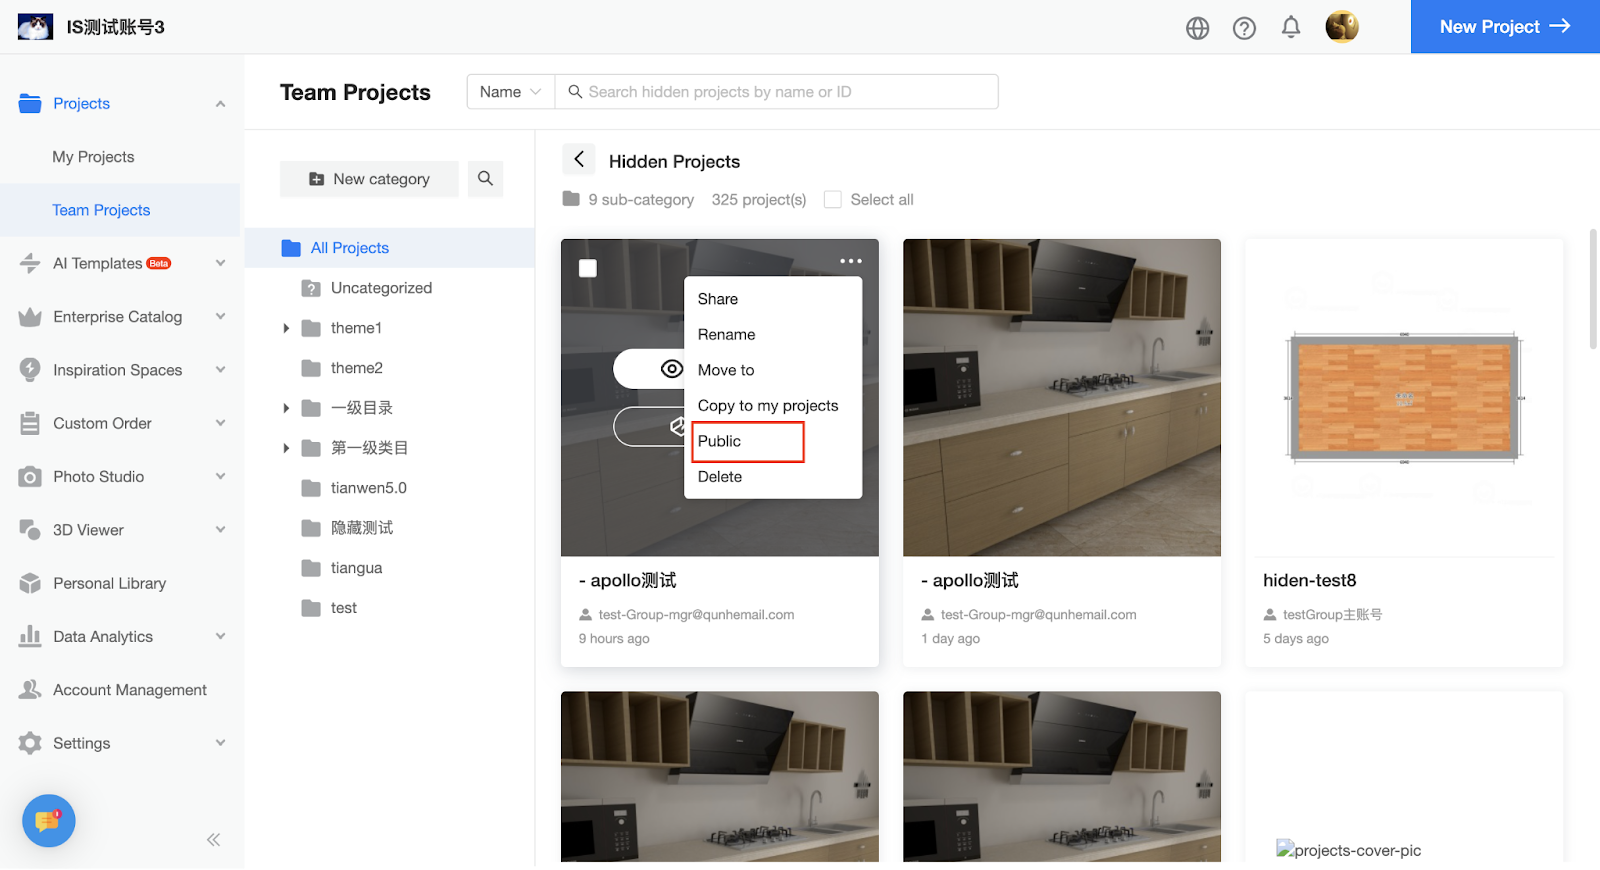
【Enterprise Background】Hidden Sub-Account Projects
Introduction
Enterprise customers may share sub-accounts with suppliers or partners, but they do not want key solutions within their accounts to be leaked or altered. Therefore, a feature has been added where the main account of the enterprise can hide all the solutions for its sub-accounts. Once hidden, the sub-accounts will not be able to see that particular solution, but the main account can still view the hidden solution or restore it if needed.
Steps
Click on the "..." in the top right corner of a design proposal, and a new button labeled 【Hide】 will be added. When a design proposal is hidden using this button, it will be removed from both the "My Projects" and "Team Project" in the sub-account.
If customers wish to restore a hidden design proposal, they can click on the "..." in the top right corner of the proposal and select the 【Public】
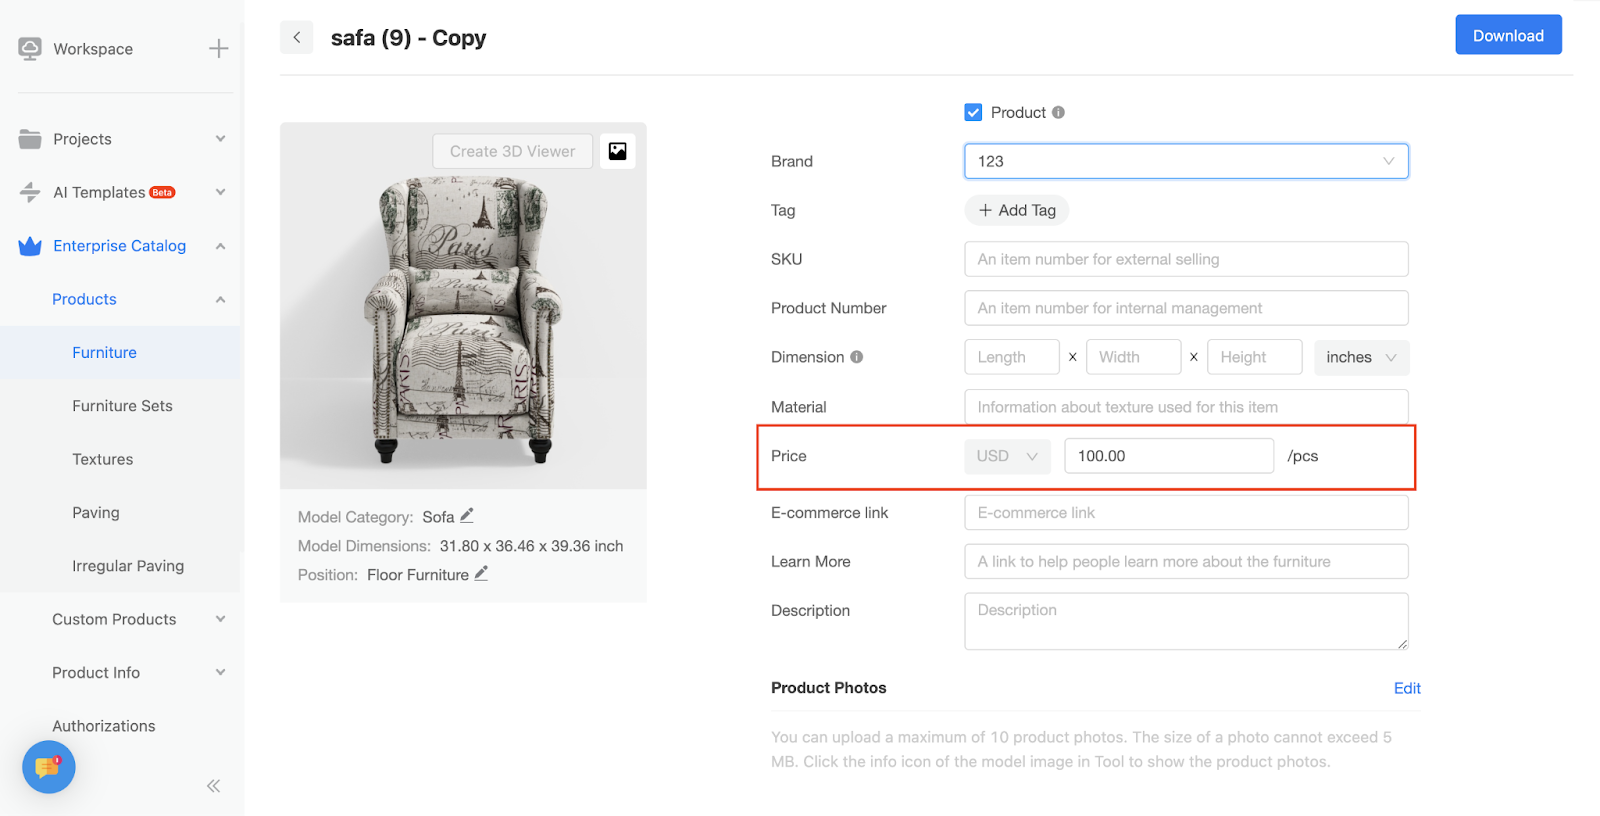
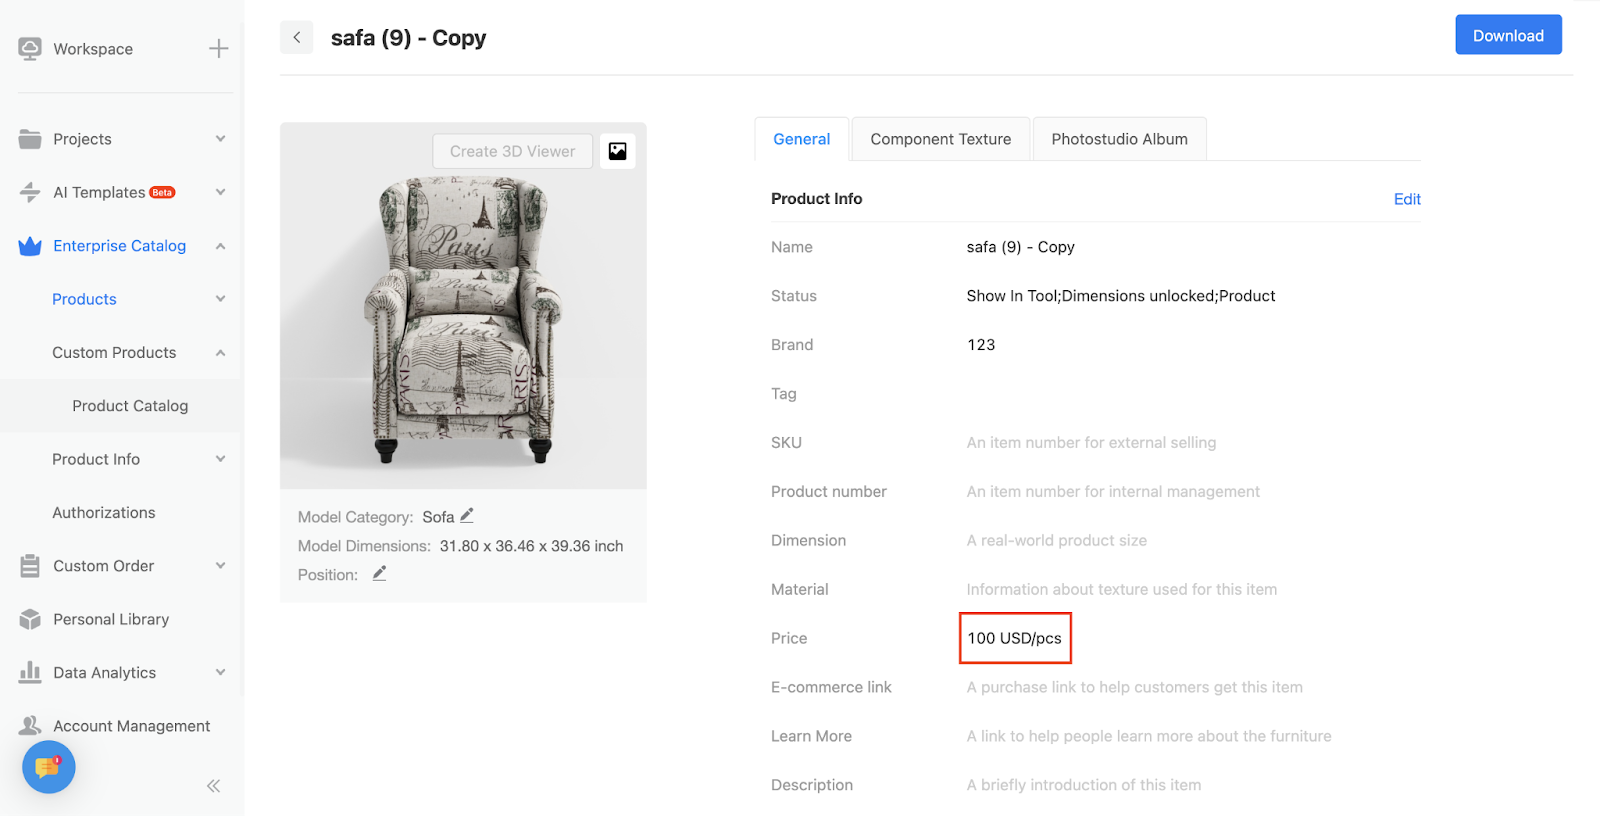
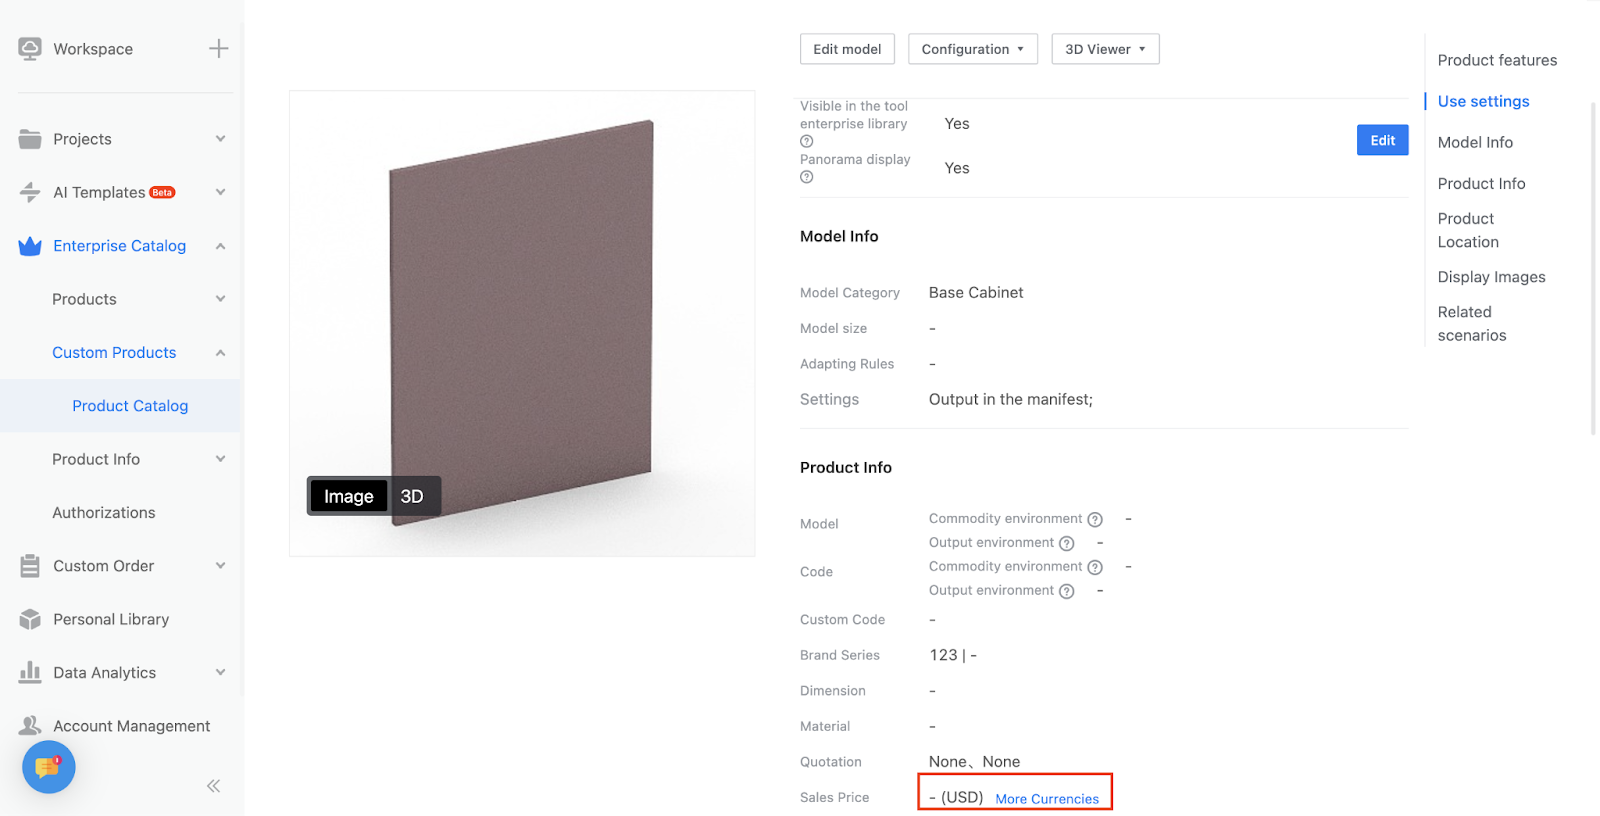
【Enterprise Catalog】Set Default Currency
Introduction
Provide the ability to set the default currency of the product.
Aim User
All Coohom Enterprise Users
Specific Operation
Clients can set a default currency in 'Price Manager' of 'Product Info'. When the 'Display currencies based on the language version of your design tool' mode is closed, a default currency could be set. You can change it from the default condition 'Not set yet' to any other currencies.
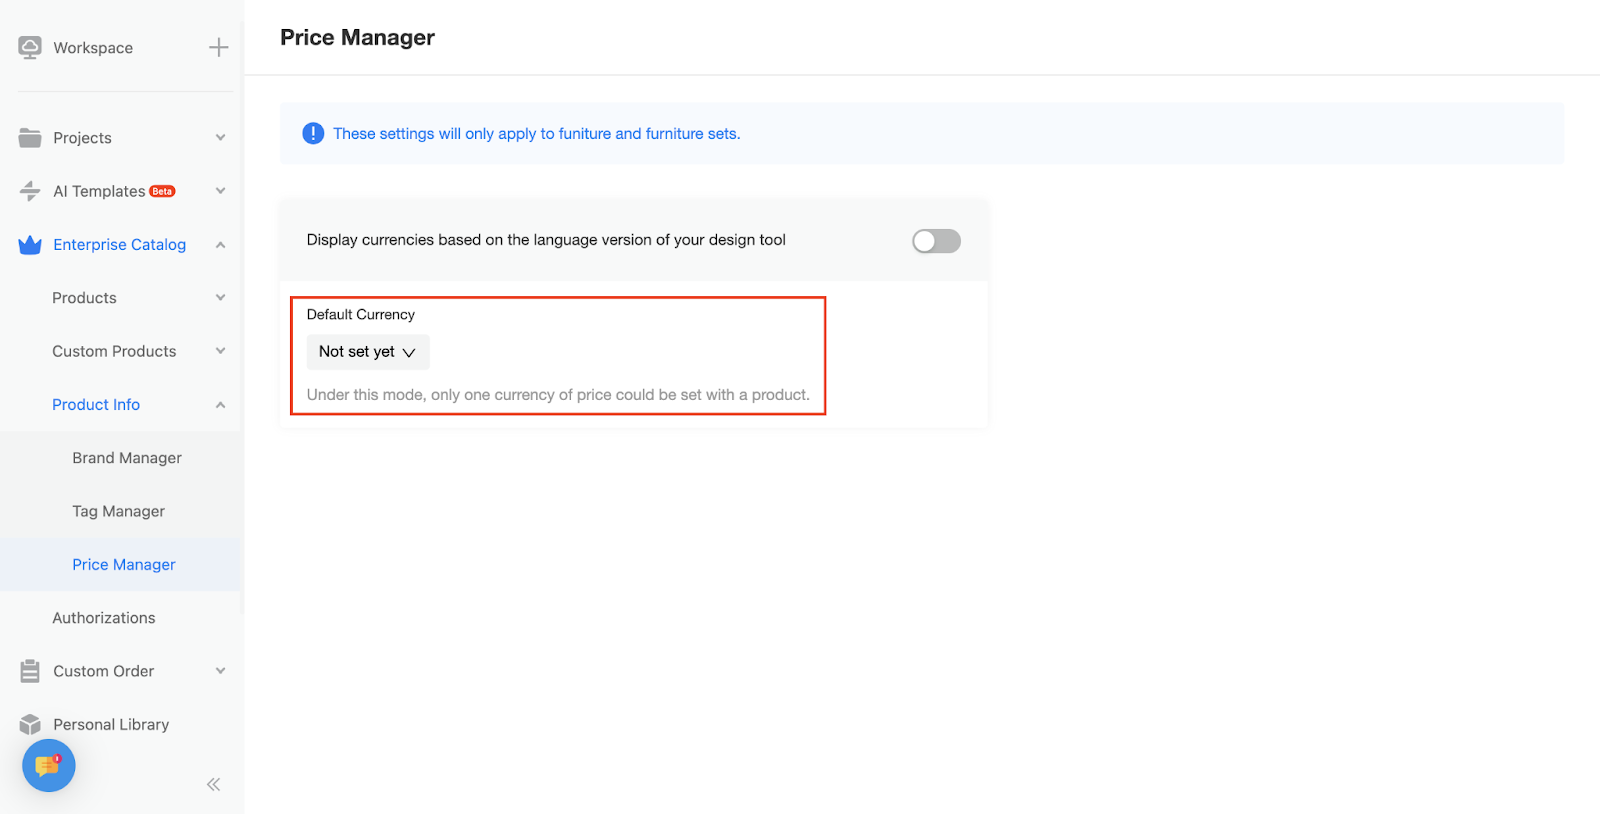
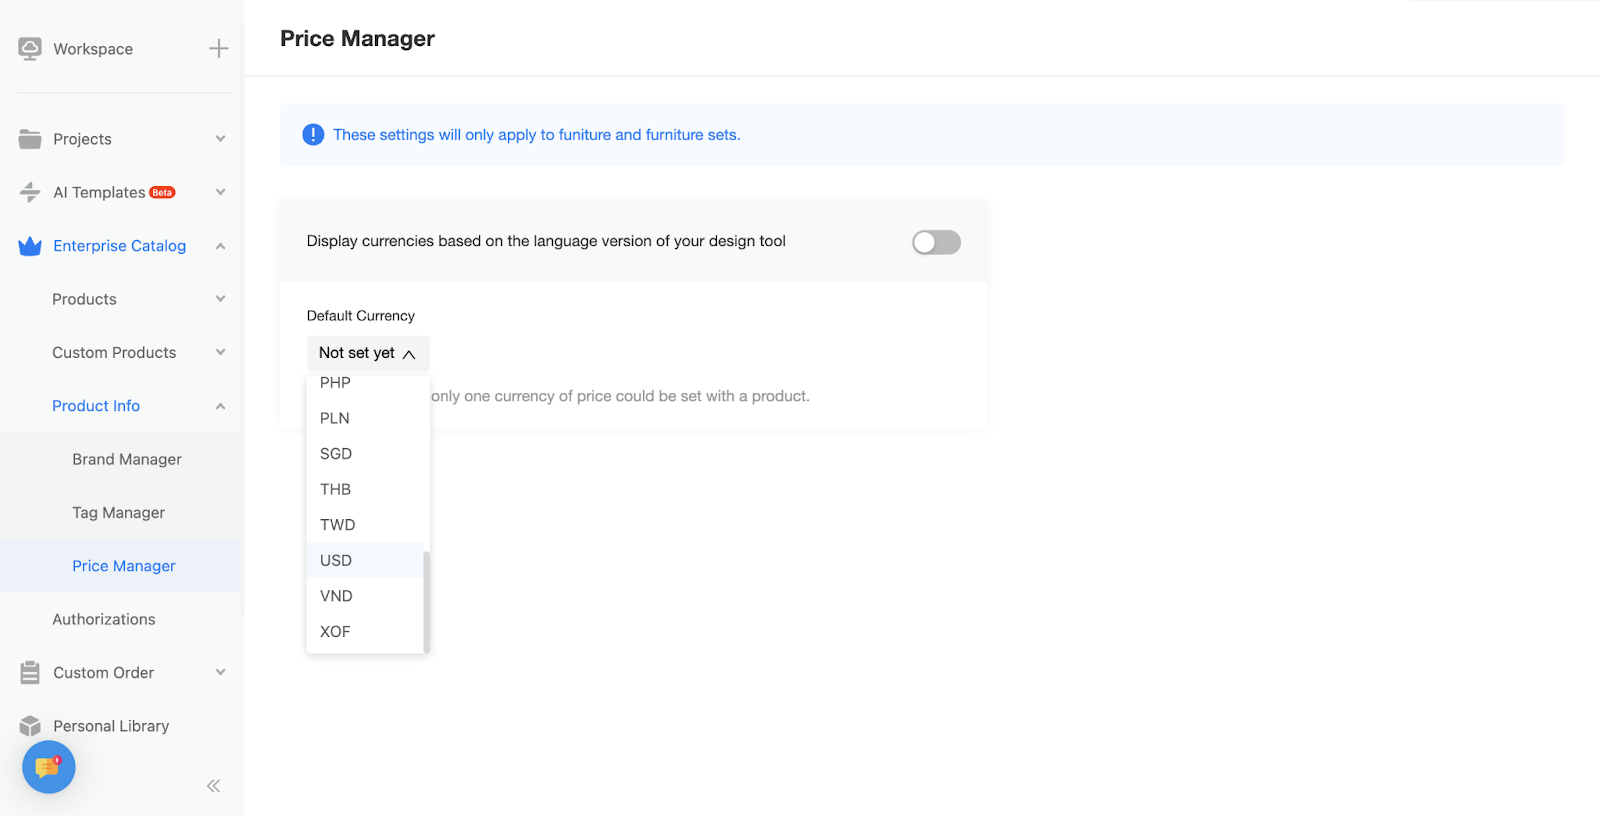
When the currency is changed, the default currency of products and custom products are both affected.
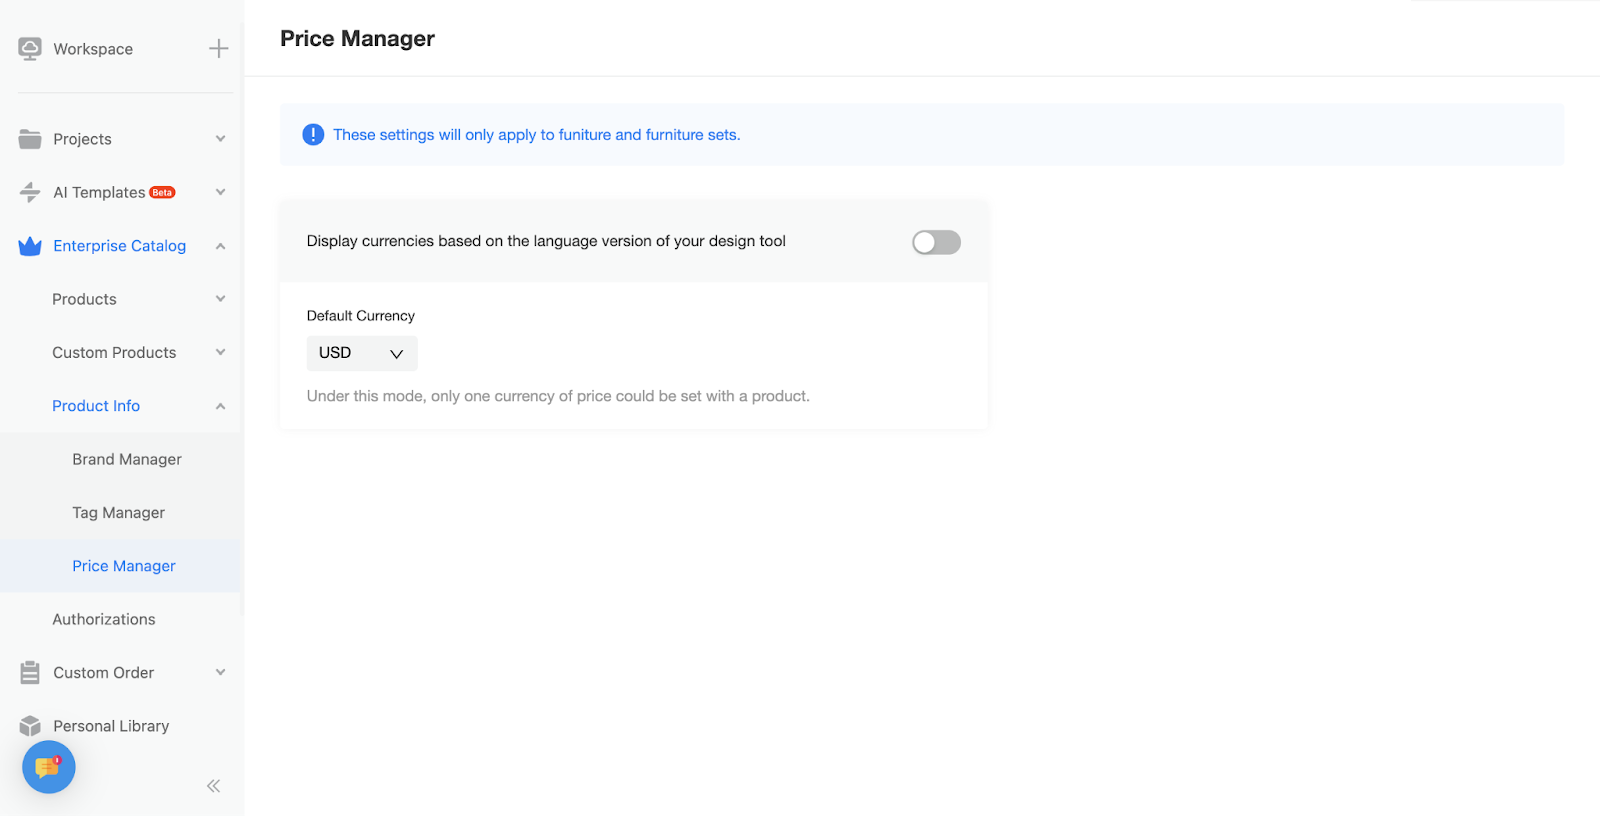
For products, the price can only be set in default currency.
For custom products, prices in different currencies still can be set. The default currency displayed will be the same as you set.
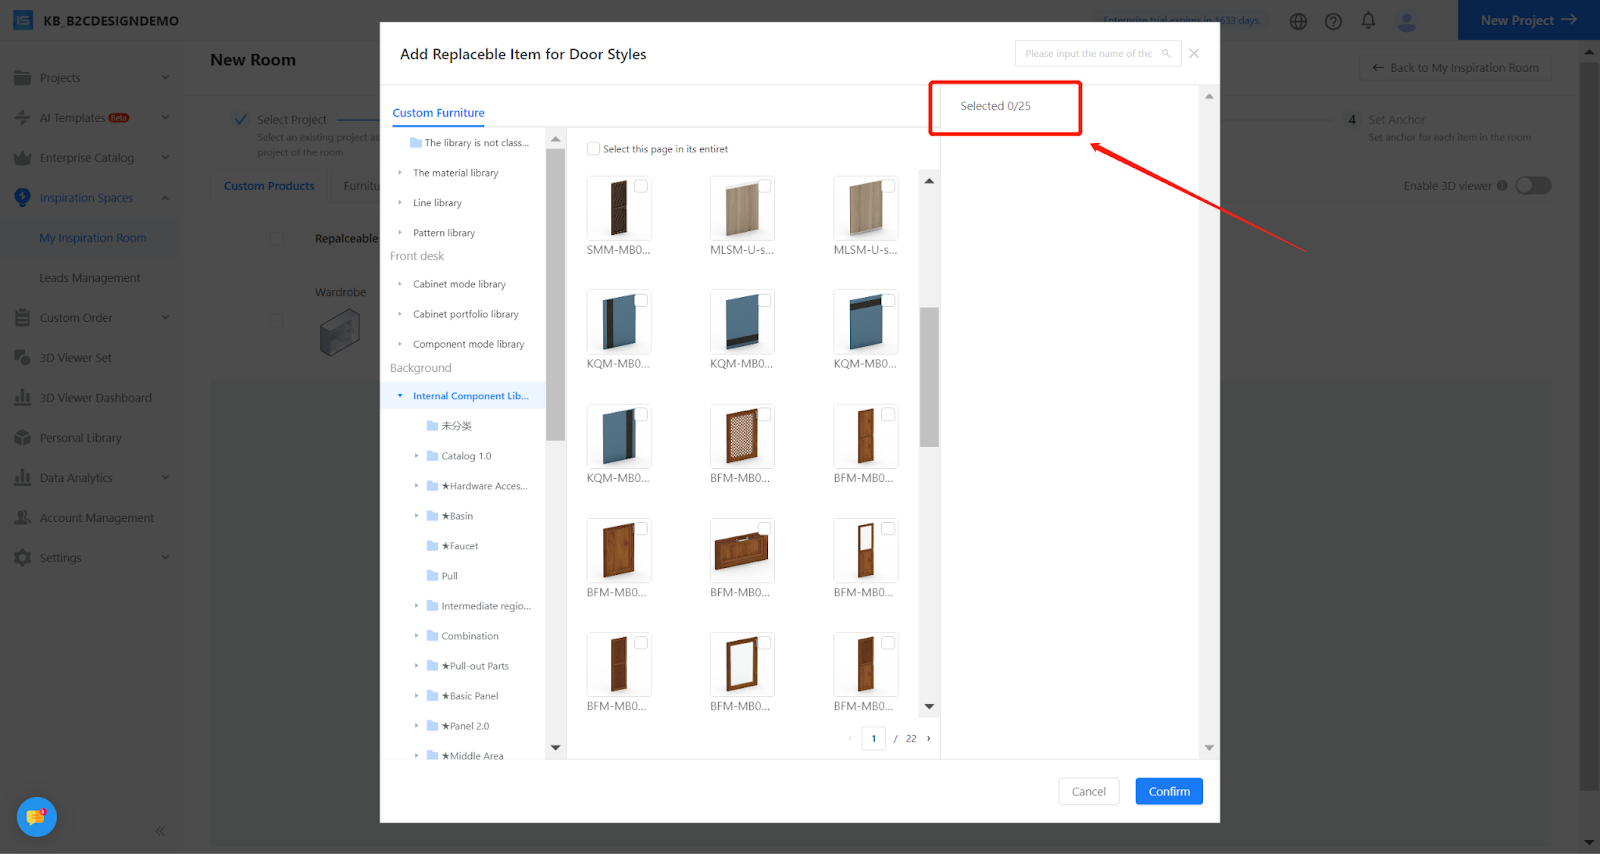
【Inspiration Spaces】Replacement Items have been increased from 19 to 25
Introduction
Replacement options for Inspiration spaces have increased from 19 to 25, providing customers with greater flexibility to showcase their products
Steps
On the editing page, each product can support a maximum of 19 replaceable items to be added.
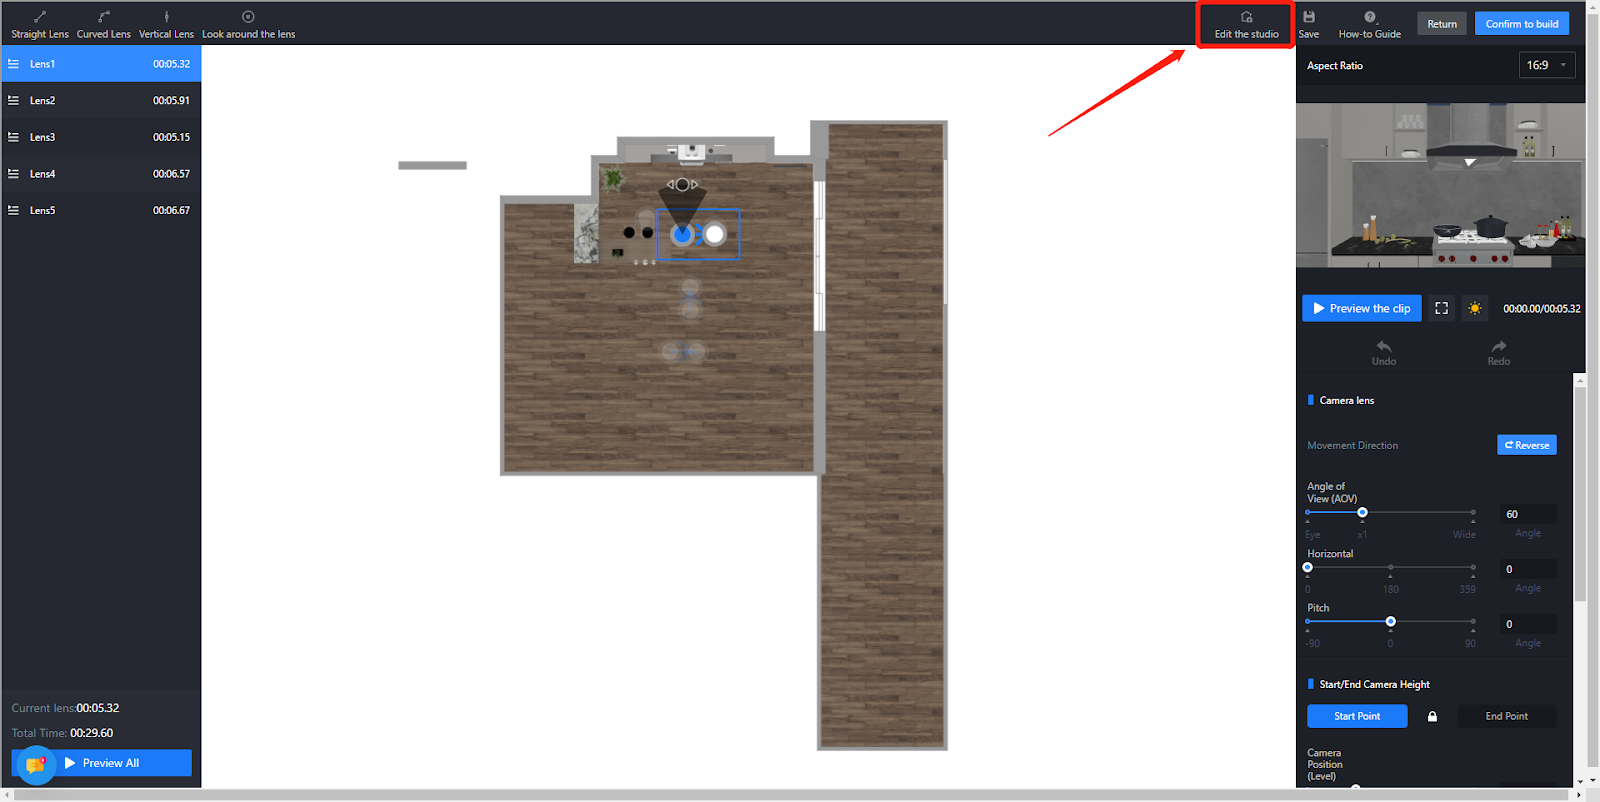
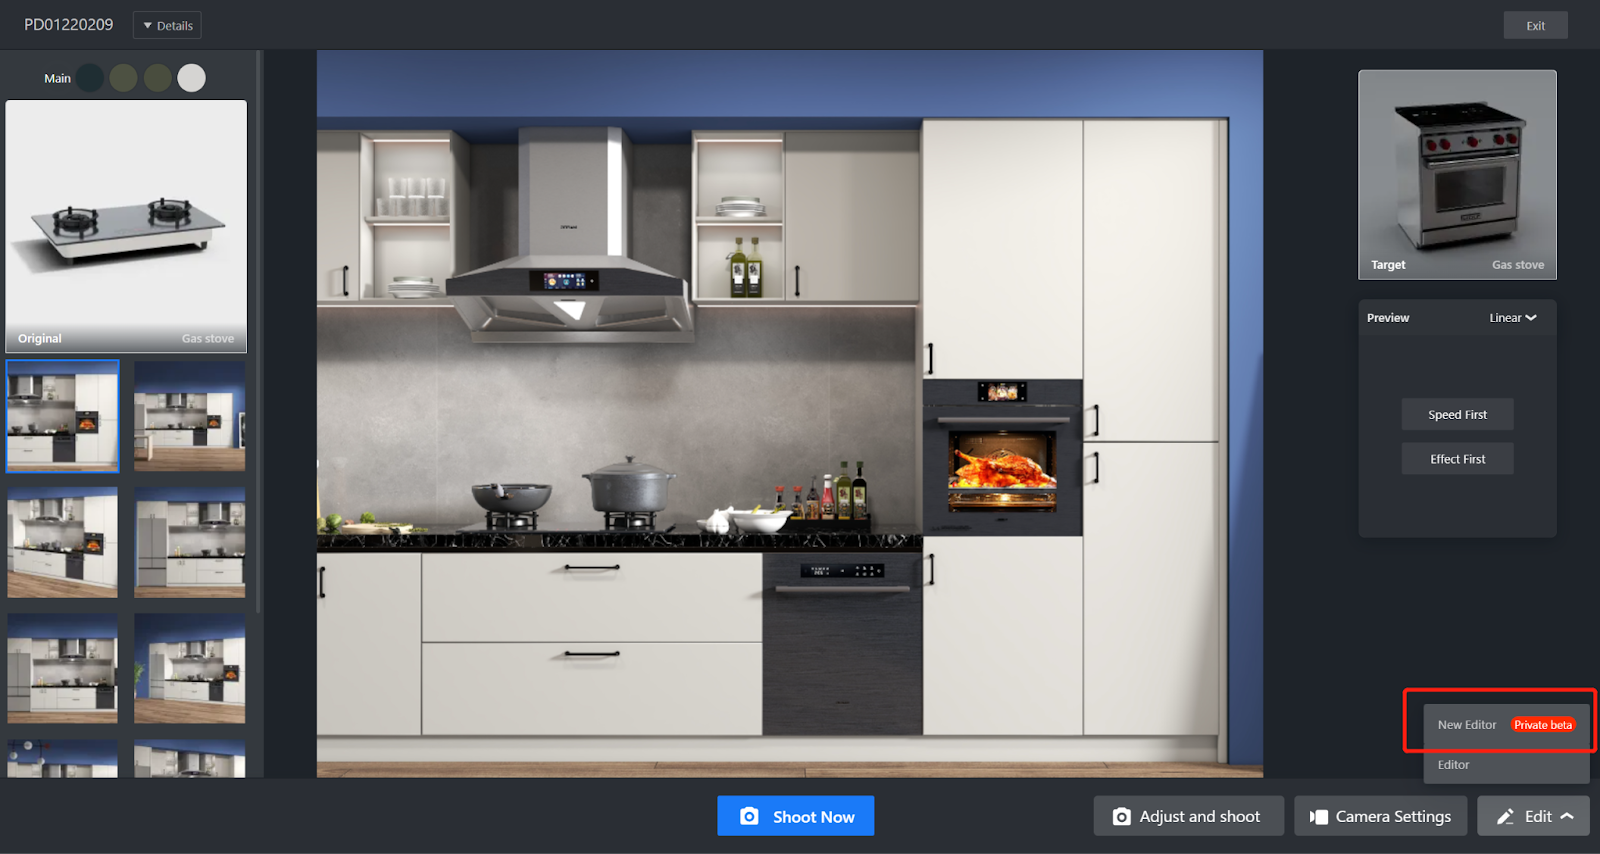
【Photo Studio】The new version of the studio shooting adds a studio editor
Introduction
A new feature has been added to allow users to directly access the editing studio, enabling them to make modifications to the solution before initiating video shooting. This provides a more convenient and efficient way for users to return to the studio and make edits to the project.
Steps
Step 1: Access the studio adjustment tool in the new version of studio shooting
Step 2: Click on 【Video Path Editing】
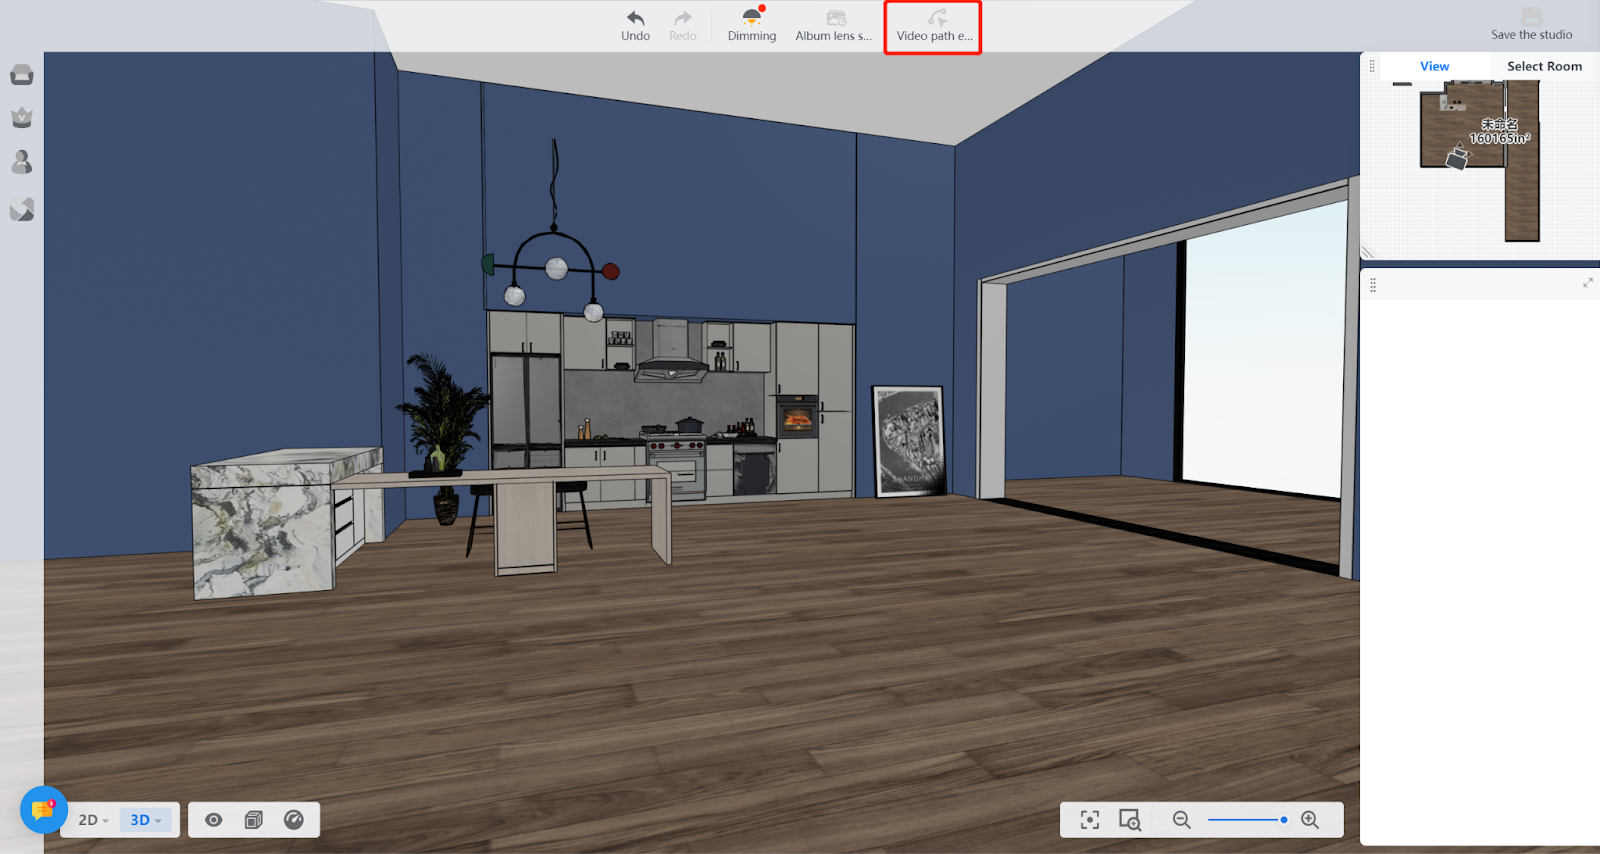
Step 3: If you need to make adjustments or modifications to the current solution, click on 【Edit the studio"】to return to the editing page